
Data Upload & Import/Export Overview
Learn why and where to import and export files to and from Valsight, and find out which data formats are supported.
Basic Overview
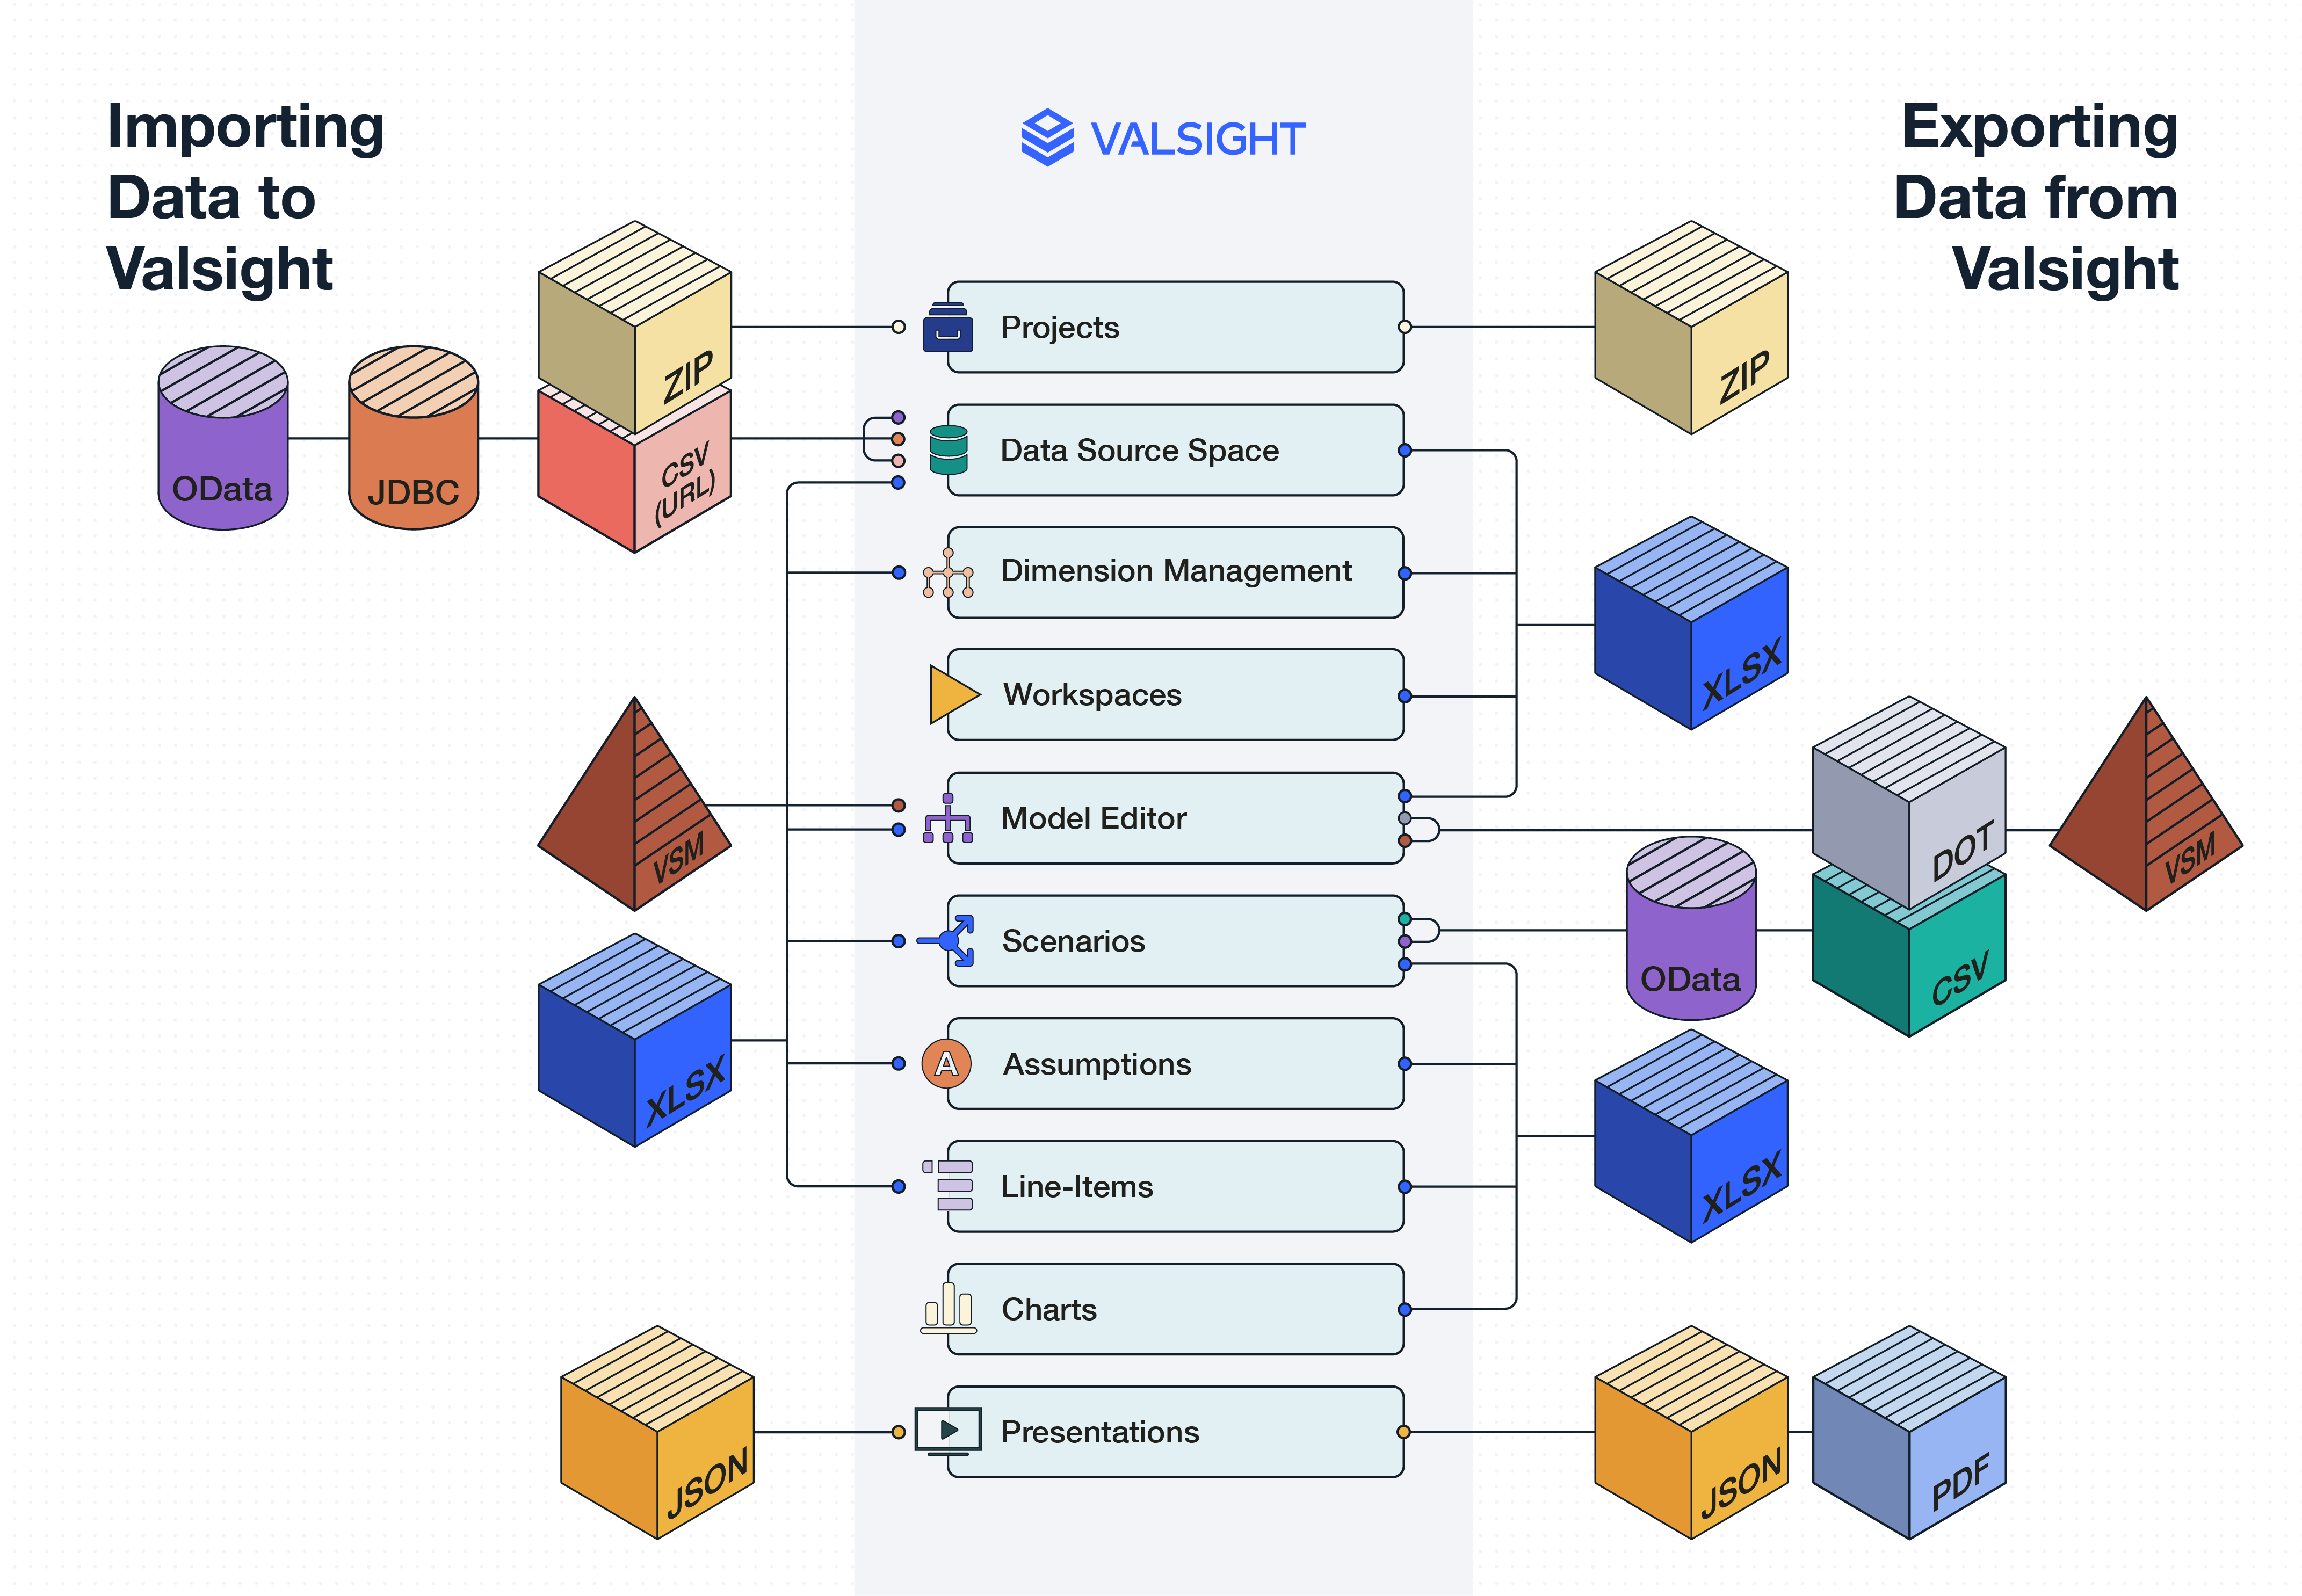
Data can be imported and exported at several places in Valsight
Importing data enables a quick and easy setup of base data, drivers, assumptions, and more
Exporting data from Valsight allows you to save software-generated data, charts, and configurations for further usage
Valsight supports a multitude of data formats and interfaces (e.g. XLSX, OData, CSV, JDBC)
Importing and Exporting Data
Uploading external data allows you to quickly build models, simulations, and visualizations based on pre-existing databases. That way, you do not have to manually insert your relevant data, but can save time and enable a seamless connection between your business's databases and Valsight.
In the same manner, calculated or otherwise generated data can be exported to extract data sets, integrate processed data back into other databases, or simply to save the configuration settings of Valsight functions.
Exporting data from Valsight and creating charts with other programs can be a complicated effort. To simplify this process, exported Valsight data can be linked directly to a PowerPoint or Word file.
Valsight Instances That Support the Import/Export of Files
When using Valsight, there are several instances that support the up- or download of data.
These instances are:
Projects
Data Source Space
Dimension Management
Model Editor
Workspaces
Scenarios
Assumptions
Line-Items
Charts
Presentations

Projects
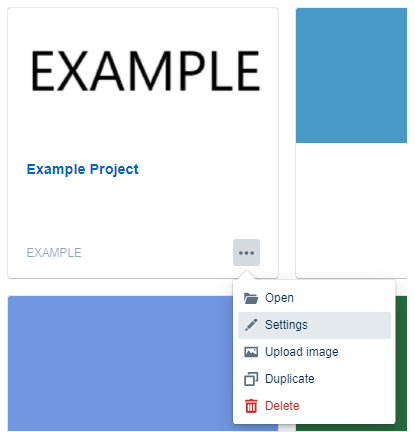
It is possible to im- and export entire projects. To do so, head to the configuration menu by clicking the cogwheel on the navigation bar.
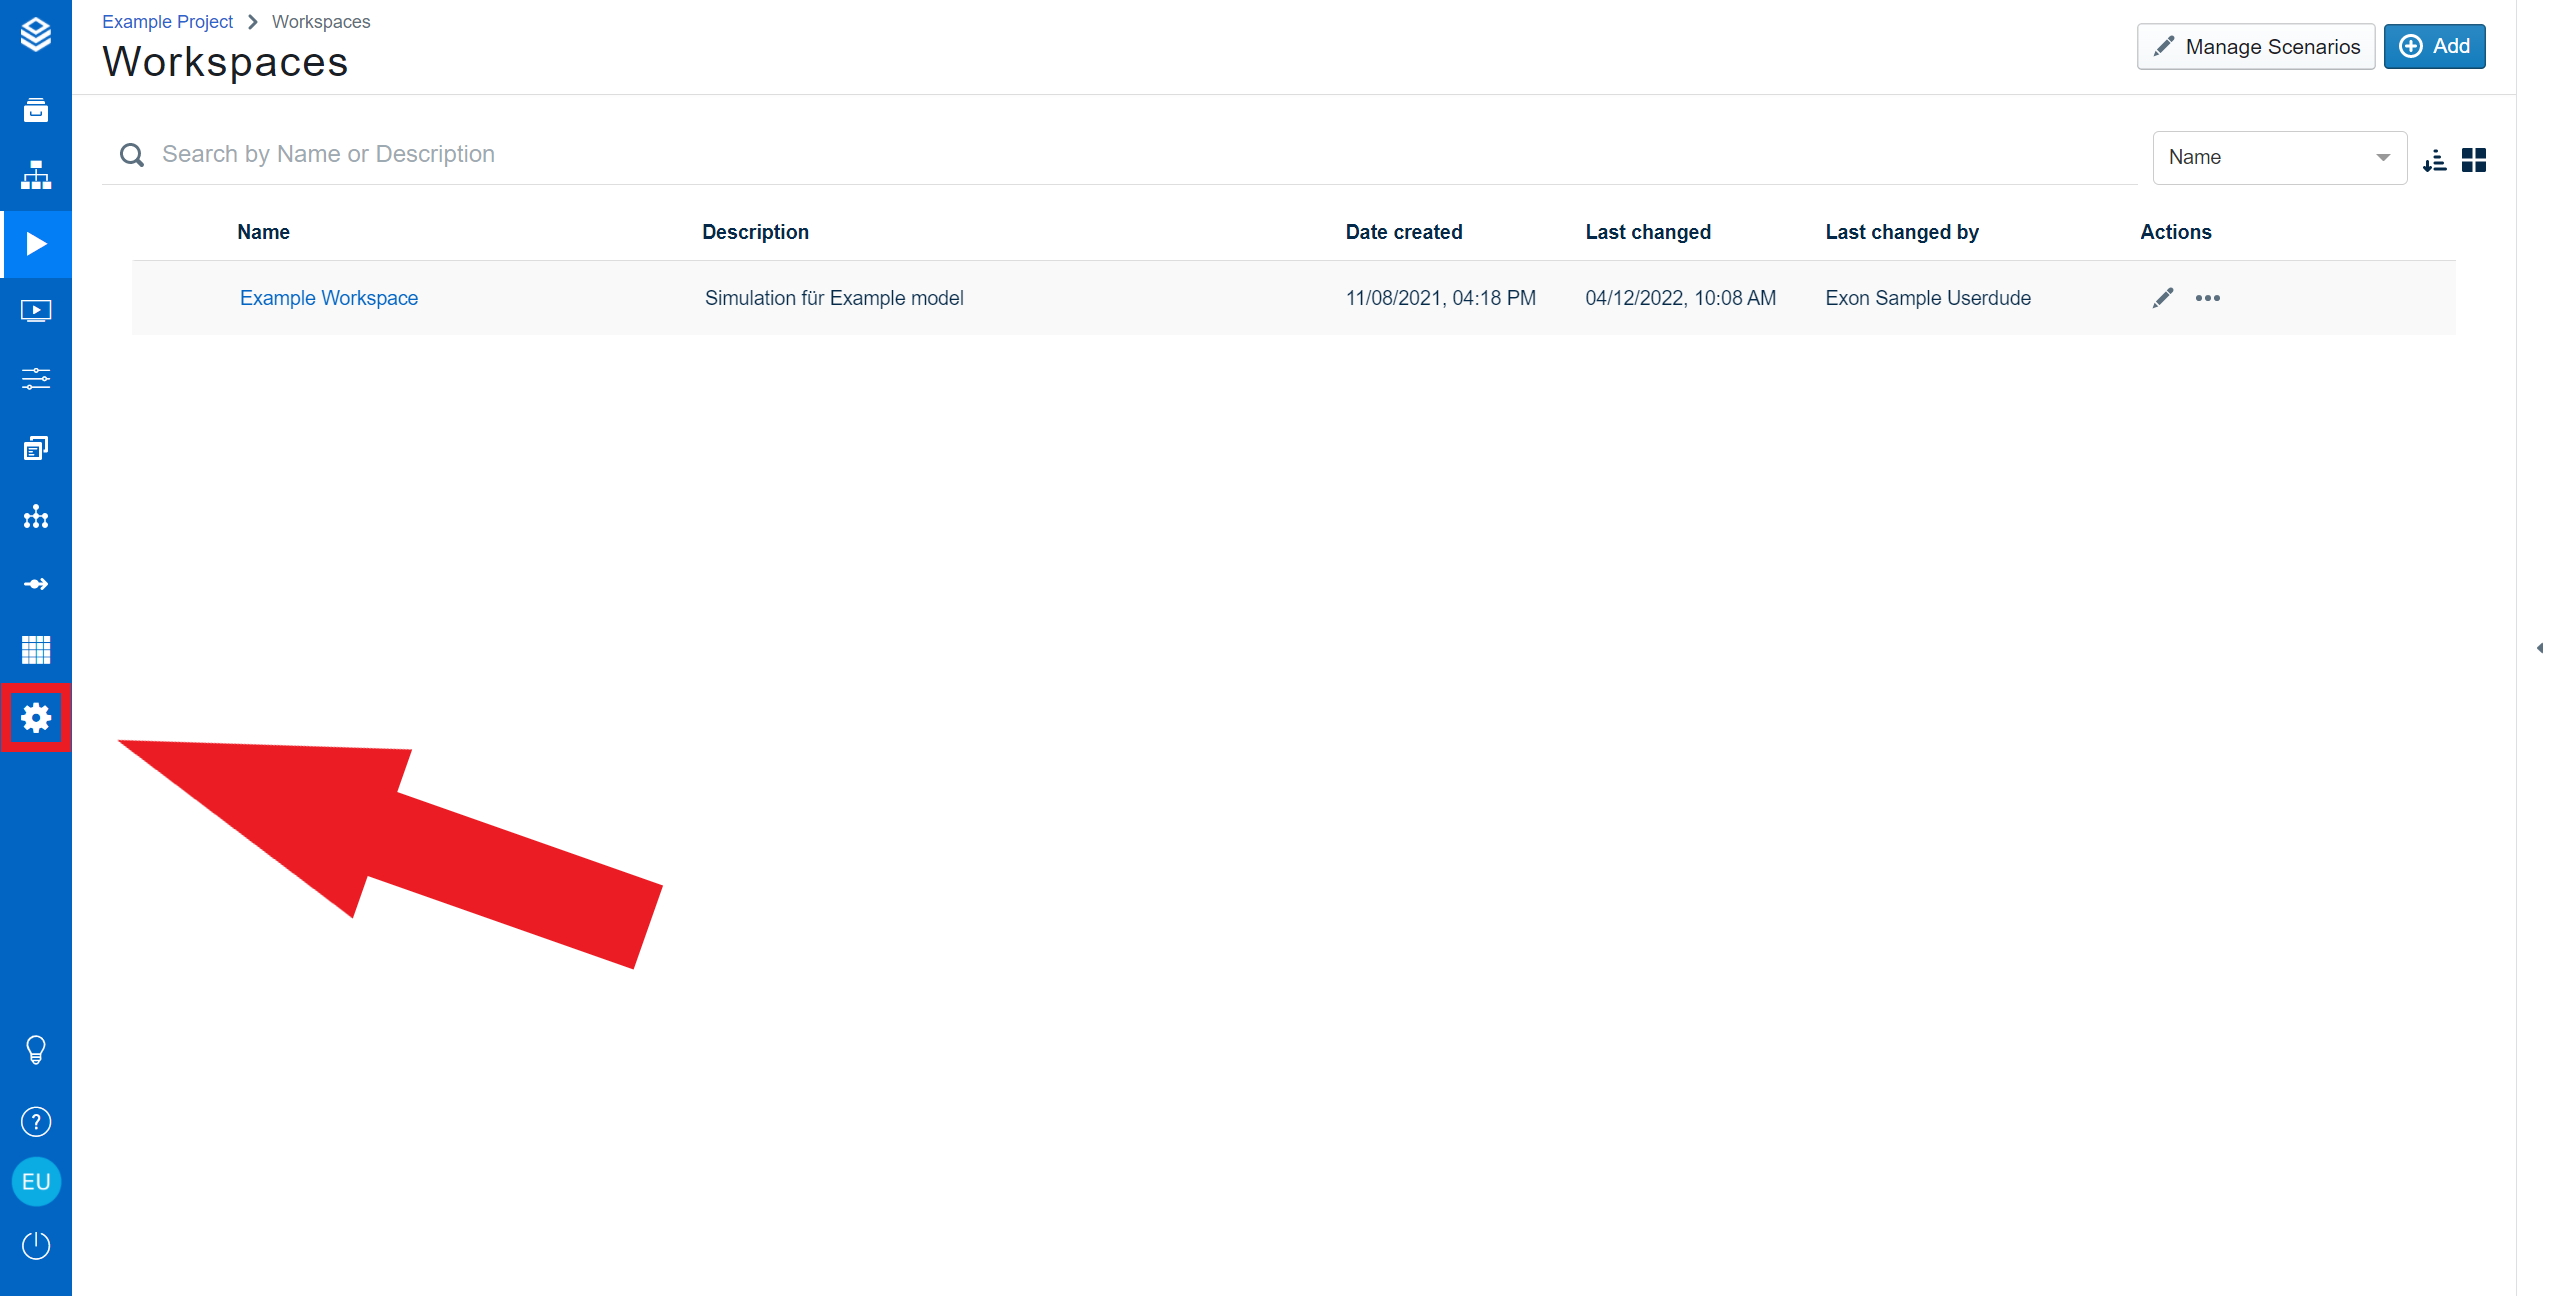
Click the cogwheel to get to the configuration menu.
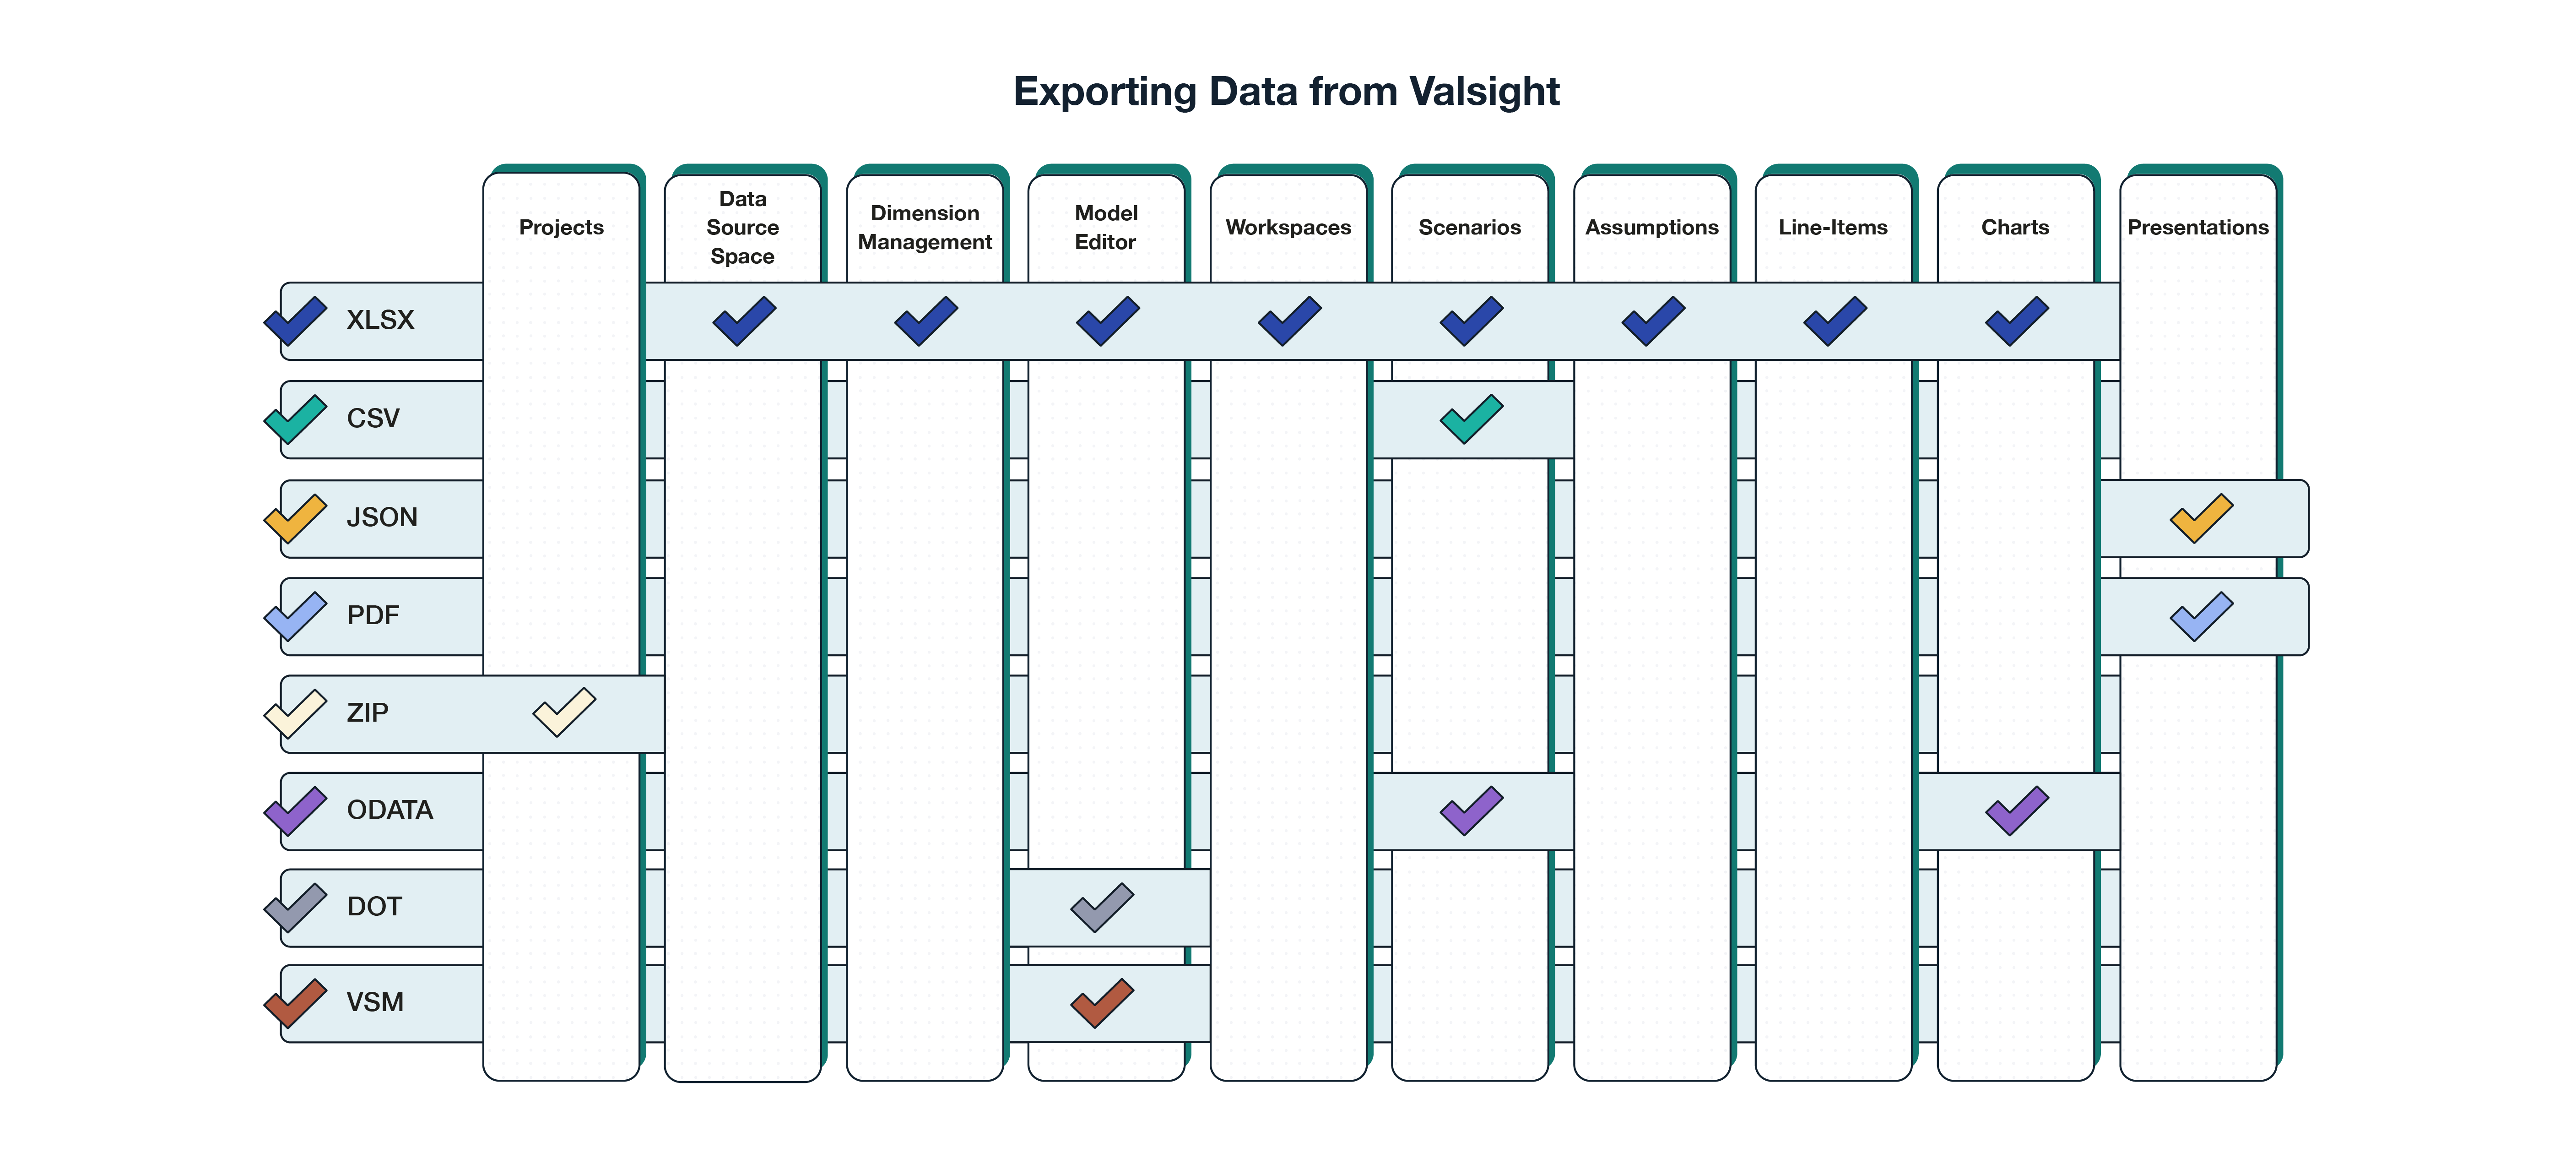
From there, select “Projects” to open the project settings. Select the project you want to export and click “Export” to download the project as a ZIP file.
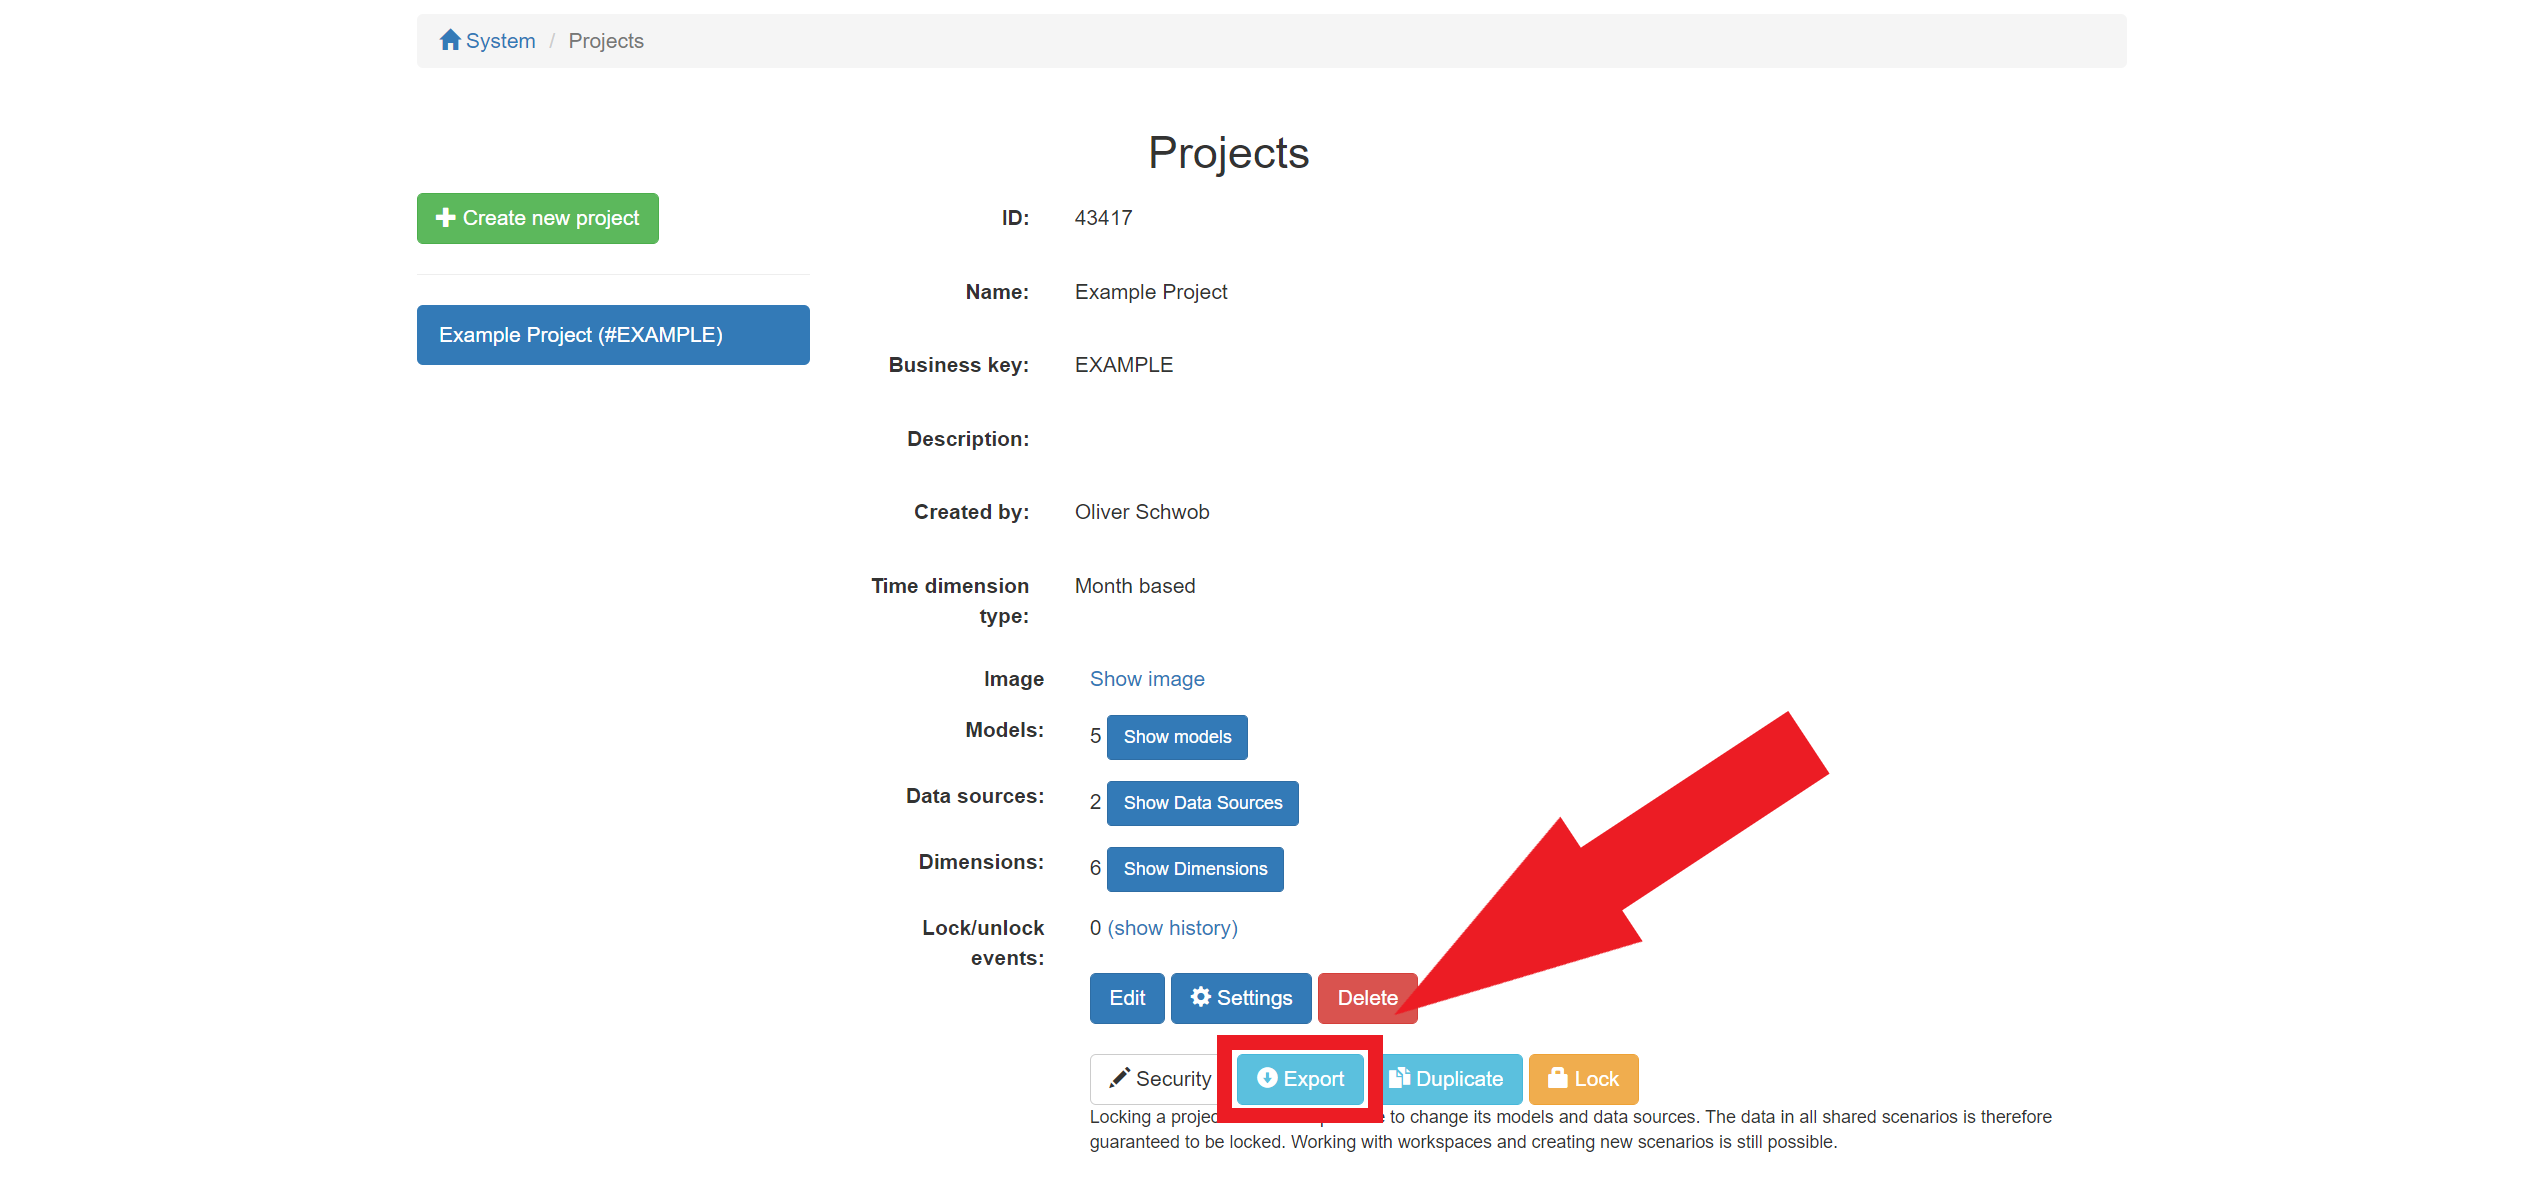
Click “Export” to download a ZIP file containing the project.
Here you can also import a project by uploading it as a ZIP file.
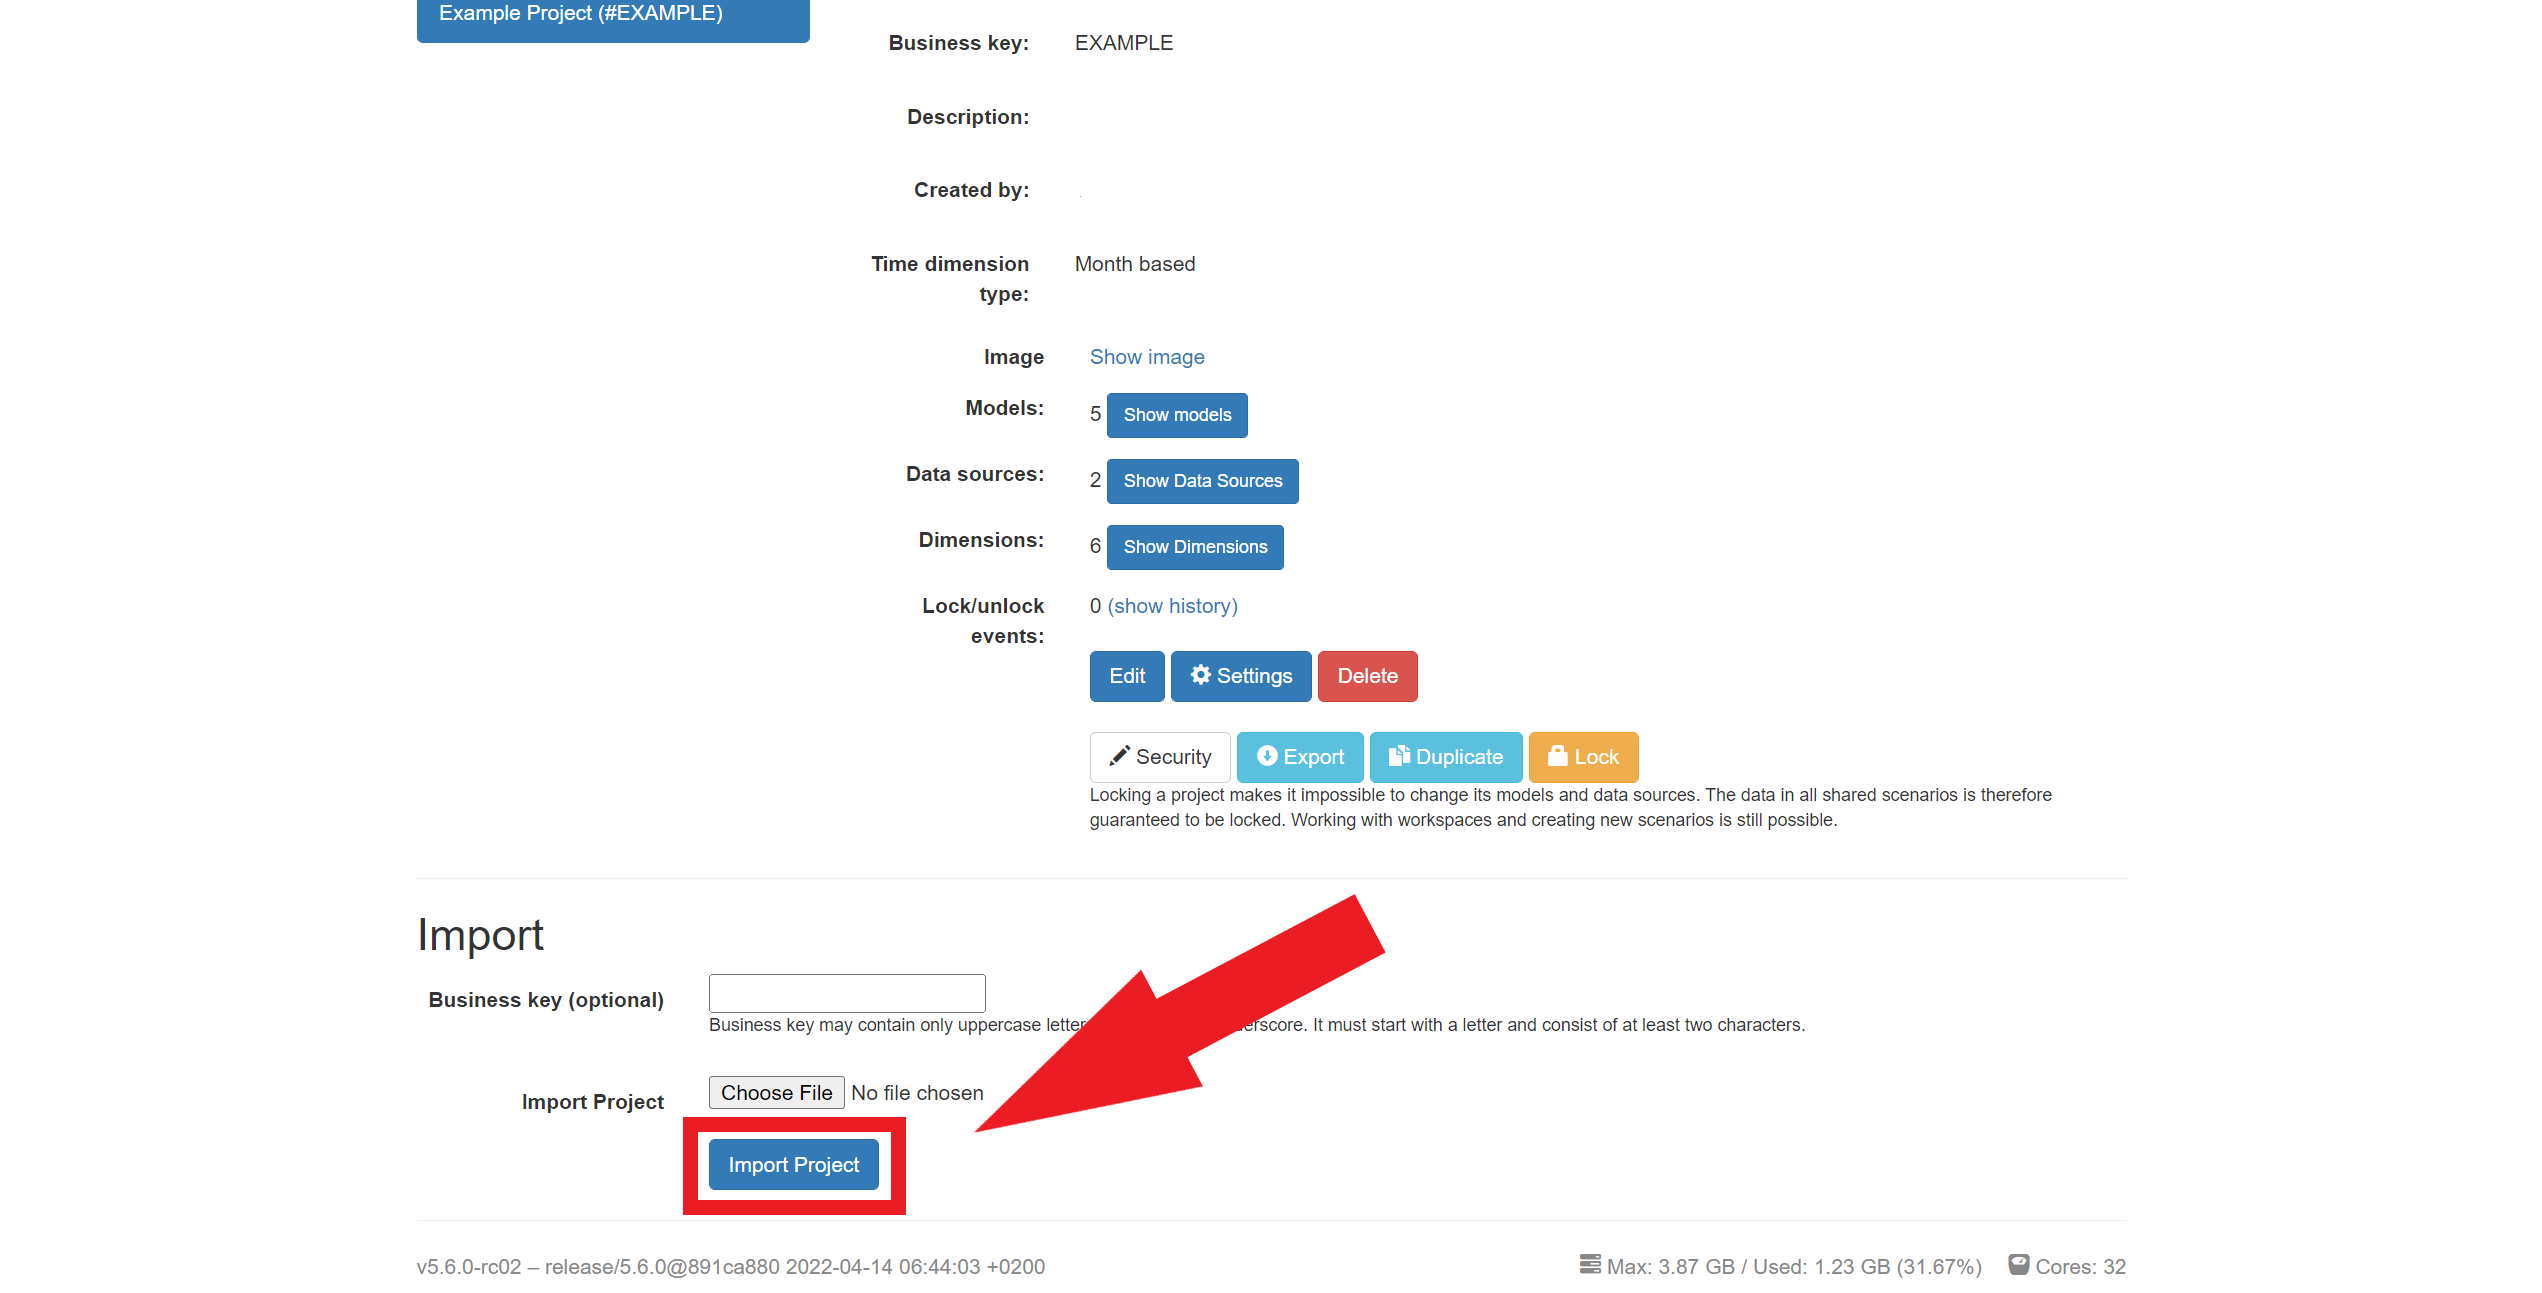
By clicking “Import Project” you can import a ZIP file containing a project.
Data Source Space
The data source space is fundamental to Valsight. Here you can upload your main data sources to base your driver model on. Upload a structured file and Valsight will allow you to access the data in a comprehensive way by structuring it with your base model.
Information on how to correctly structure data so that Valsight can utilize them can be found here.
You can also download the base data of a project that has previously been uploaded, making it possible to upload an adjusted version of an existing database. The supported base data format is XLSX, with OData, and JDBC connections also being supported, allowing manual as well as automated uploading of base data. For further information on external data sources like OData and JDBC, please take a look at our dedicated guide.
An in-depth guide on how to create and update data sources in Valsight can be found here.
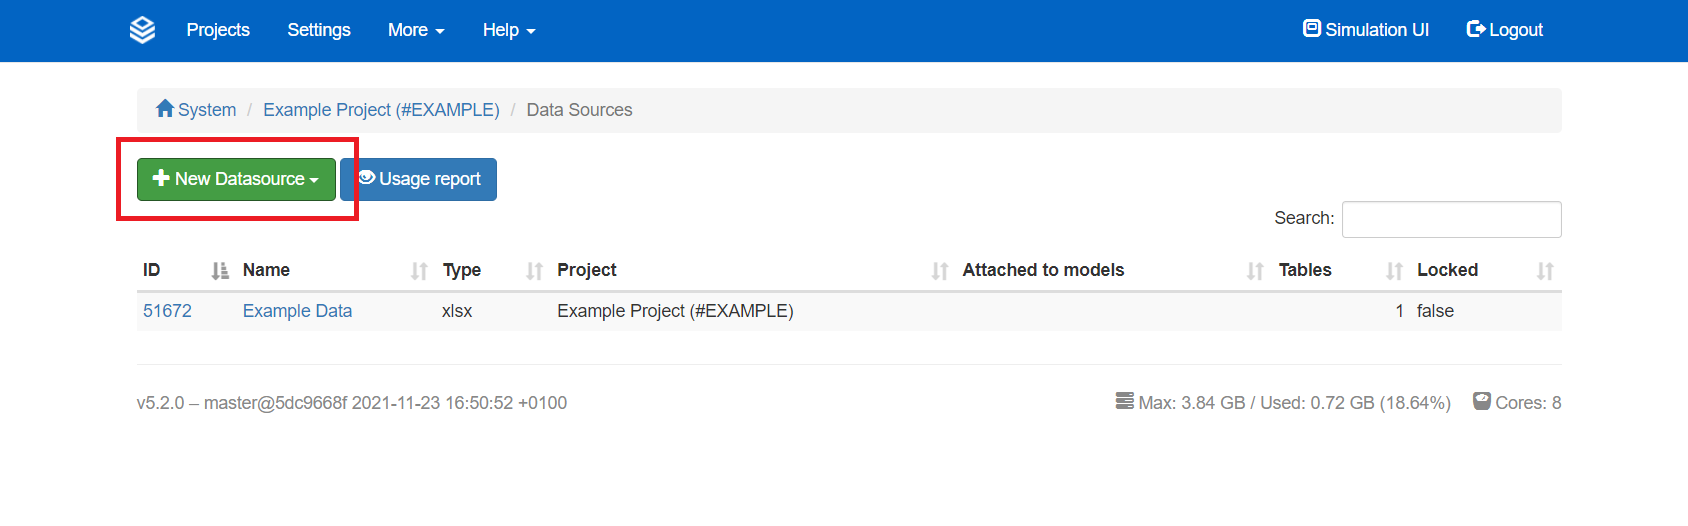
Click “New Datasource” in the data source space to create a new data source from an uploaded file.
Dimension Management
The dimension management supports the creation of dimensions based on imported XLSX files. This way you only have to manually insert dimension hierarchies, but do not need to insert level values. You can also download an XLSX file of an existing dimension if you wish to implement minor changes to the existing dimensions.
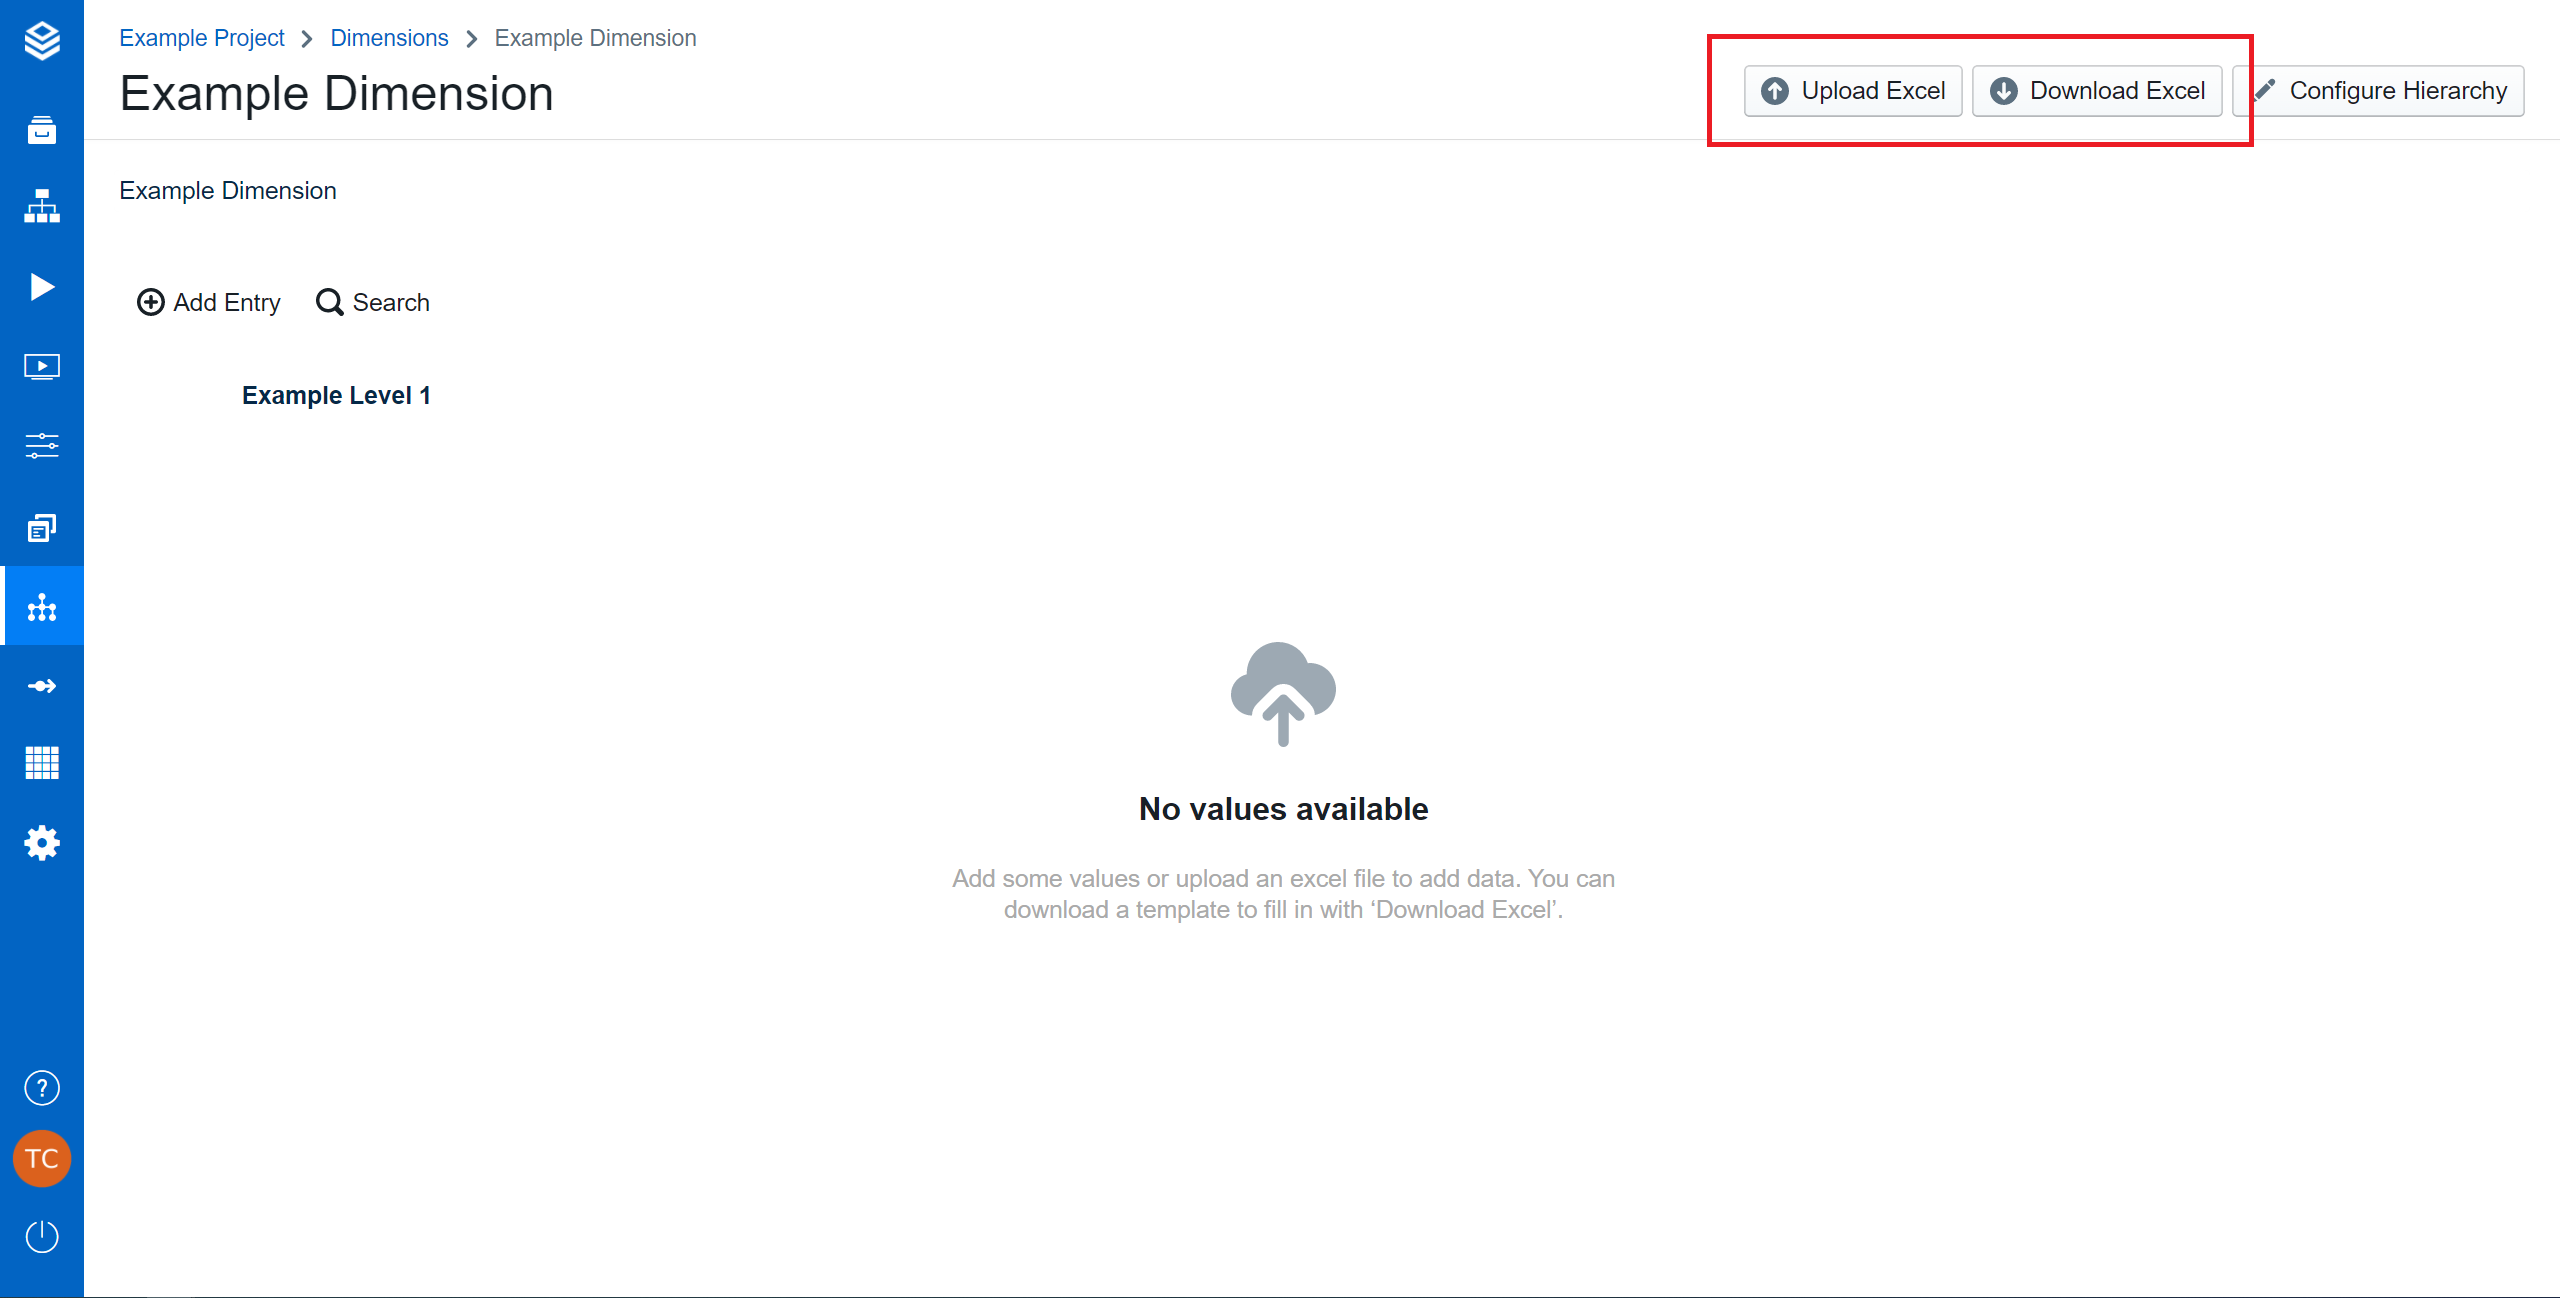
By using the buttons in the top right of the dimension management, you can fill dimensions by importing an XLSX file or exporting existing dimensions as such.
Workspaces
Workspaces can be exported as either raw or formatted XLSX files, allowing a quick extraction of generated data. Raw XLSX files are easier to transform and display data in a more machine-friendly way but may be hard to read for human users.
The raw XLSX exports a file that contains raw data structures (primary data) that have not yet been processed for use. Raw data is organized in columns and rows without merged cells. Each column represents one single data category, and every row contains data for each column.
Formatted XLSX files are easier to comprehend but might be incompatible with other software or databases. The formatted XLSX option exports a file that is structured in tables with sorted data and additional information (for example applied Filters). A formatted export also includes merged cells.
This option might be used in the case of presenting data to others via excel.
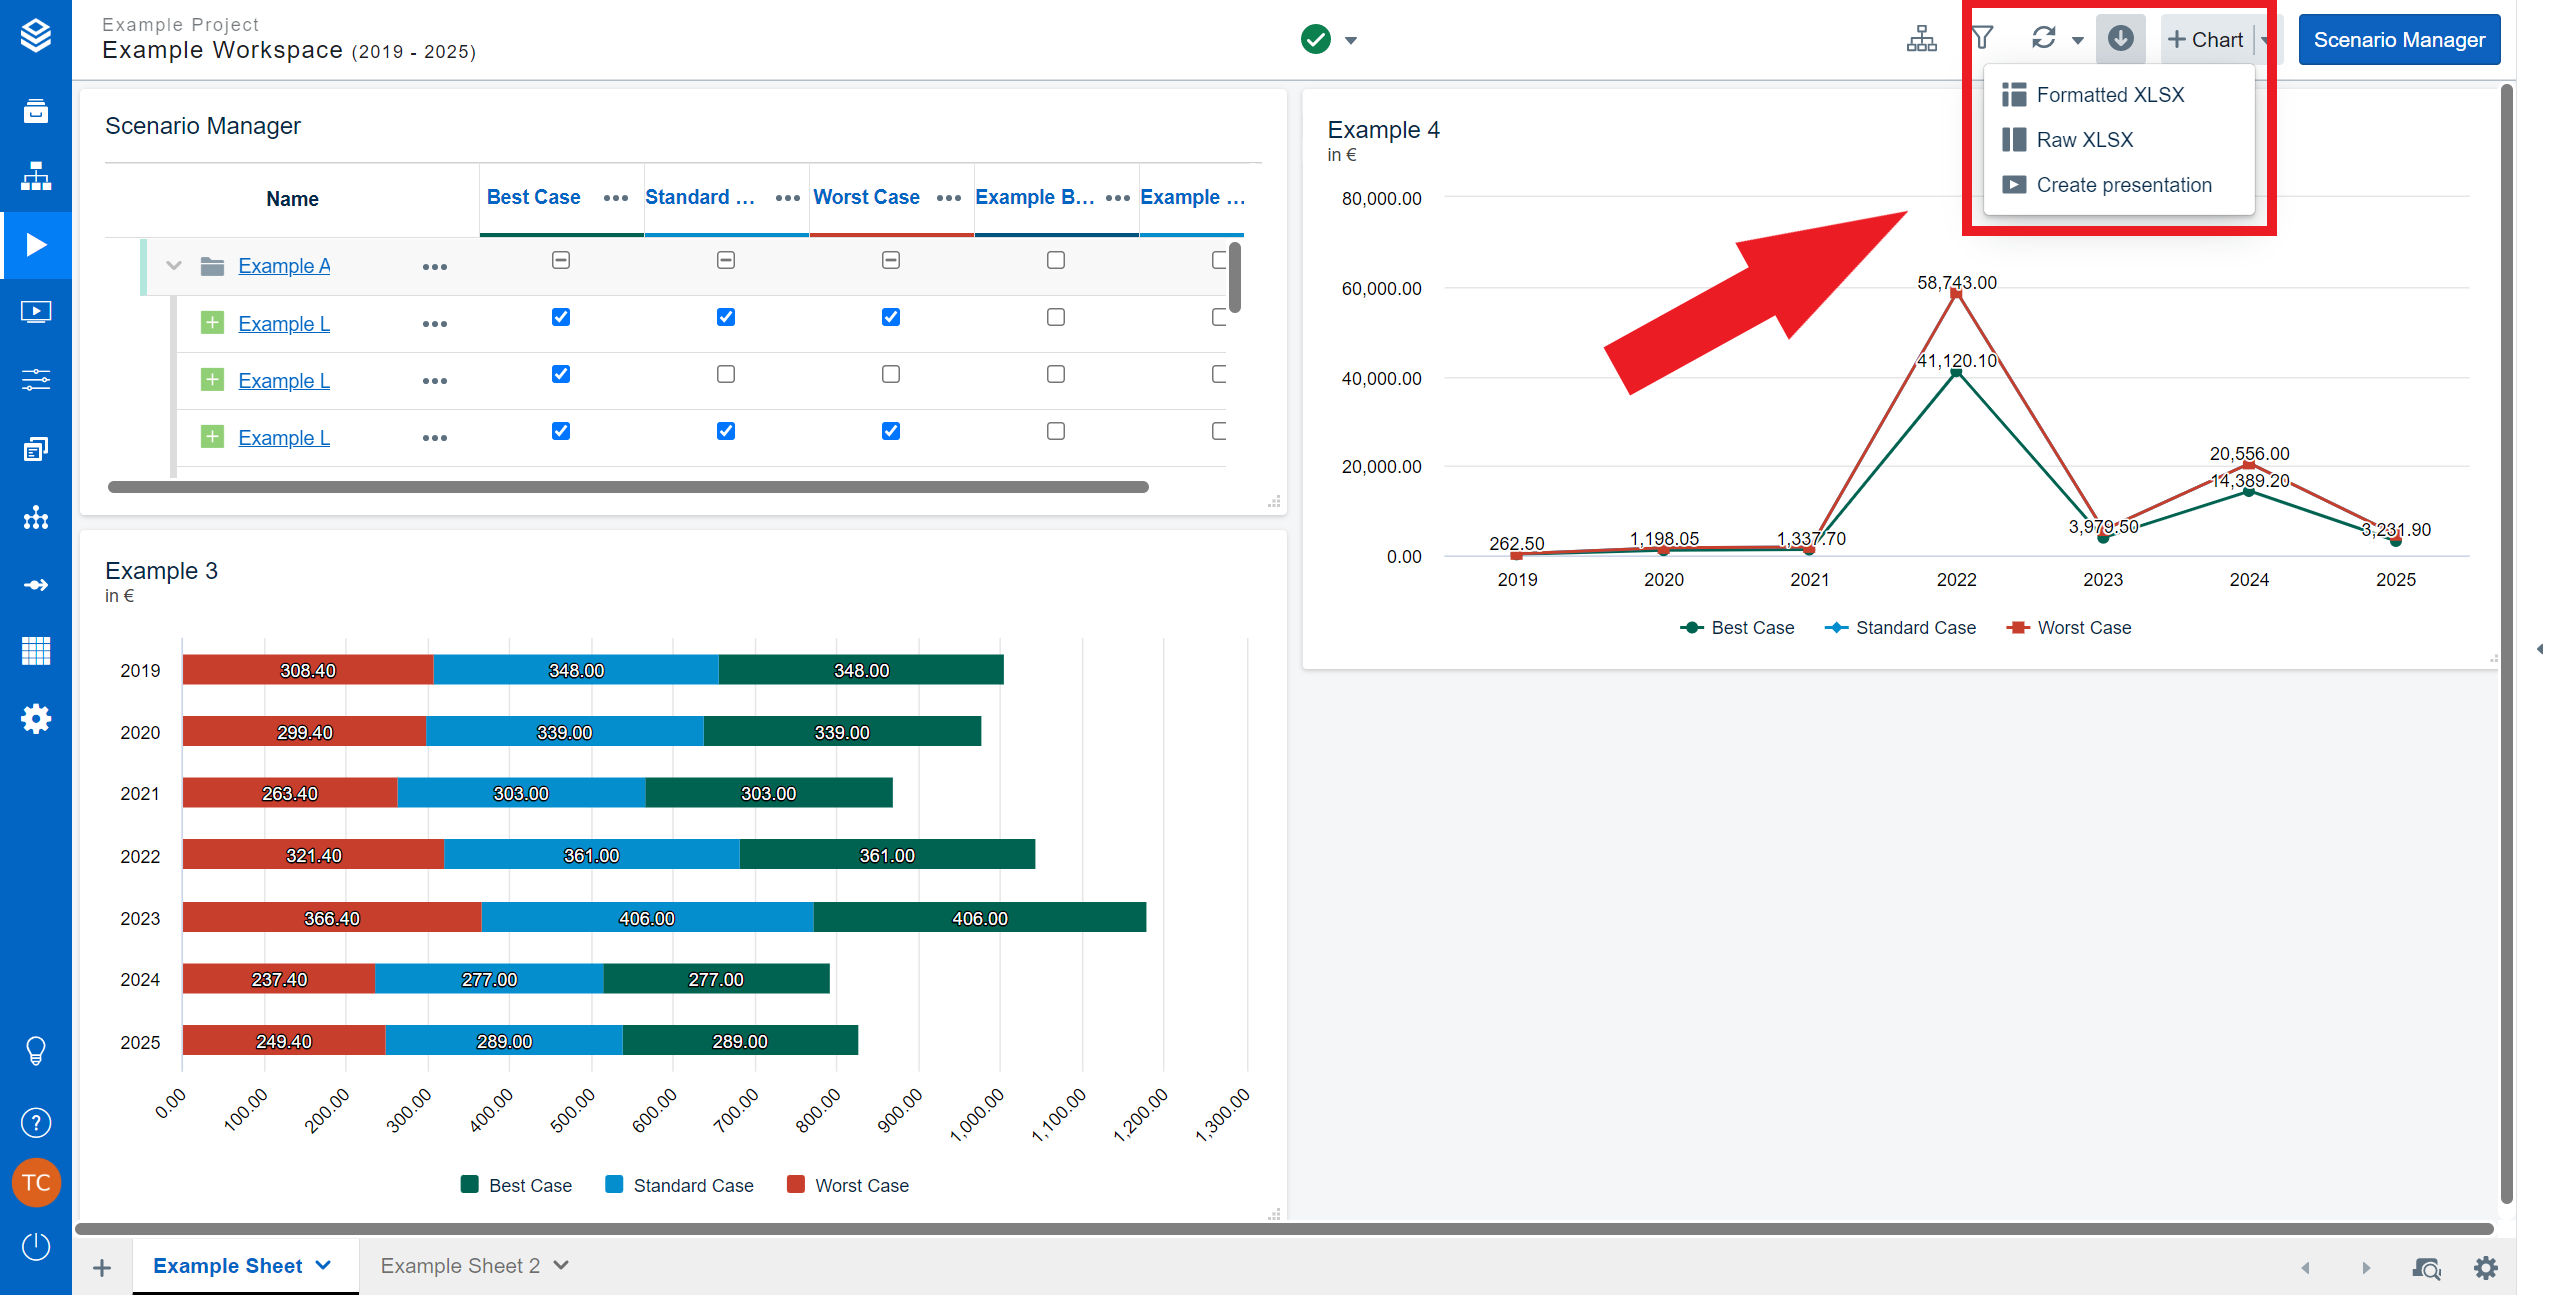
By clicking on the “Export” dropdown, you can download your workspace as raw or formatted XLSX, as well as create presentations.
Charts
Chart can be exported as XSLX or OData.
As XLSX you can export the raw and formatted data of individual charts and tables, giving you a more specific option for exporting simulation data.
The OData link will automatically be copied to your clipboard.
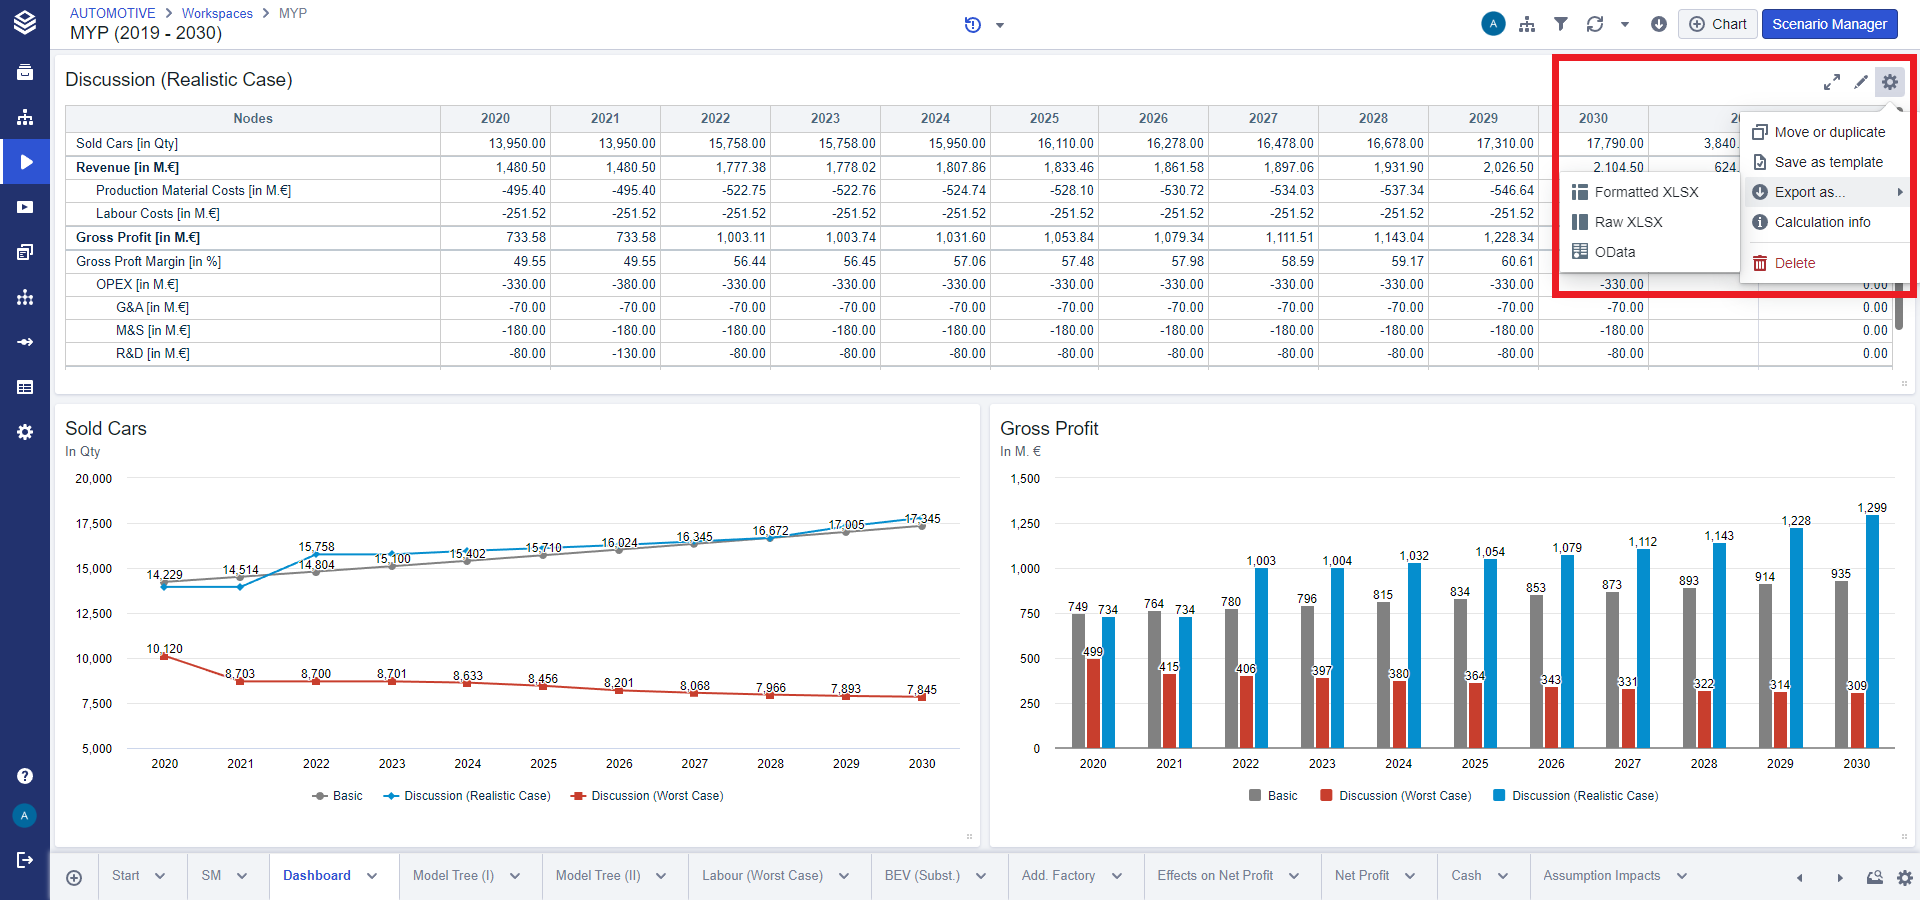
Each chart’s “Settings” menu contains the submenu for raw and formatted XLSX and OData exports of that chart.
Model Editor
The model editor opens another option to upload data. Here you can download existing data sources and apply changes, which can then be uploaded again to your model. Data downloads can also be done with individual nodes, for a clear overview of the processed data. Via the model editor, you can also upload new data sources to create entirely new databases, if the need should arise.
The model editor itself supports the upload and download of XLSX files.
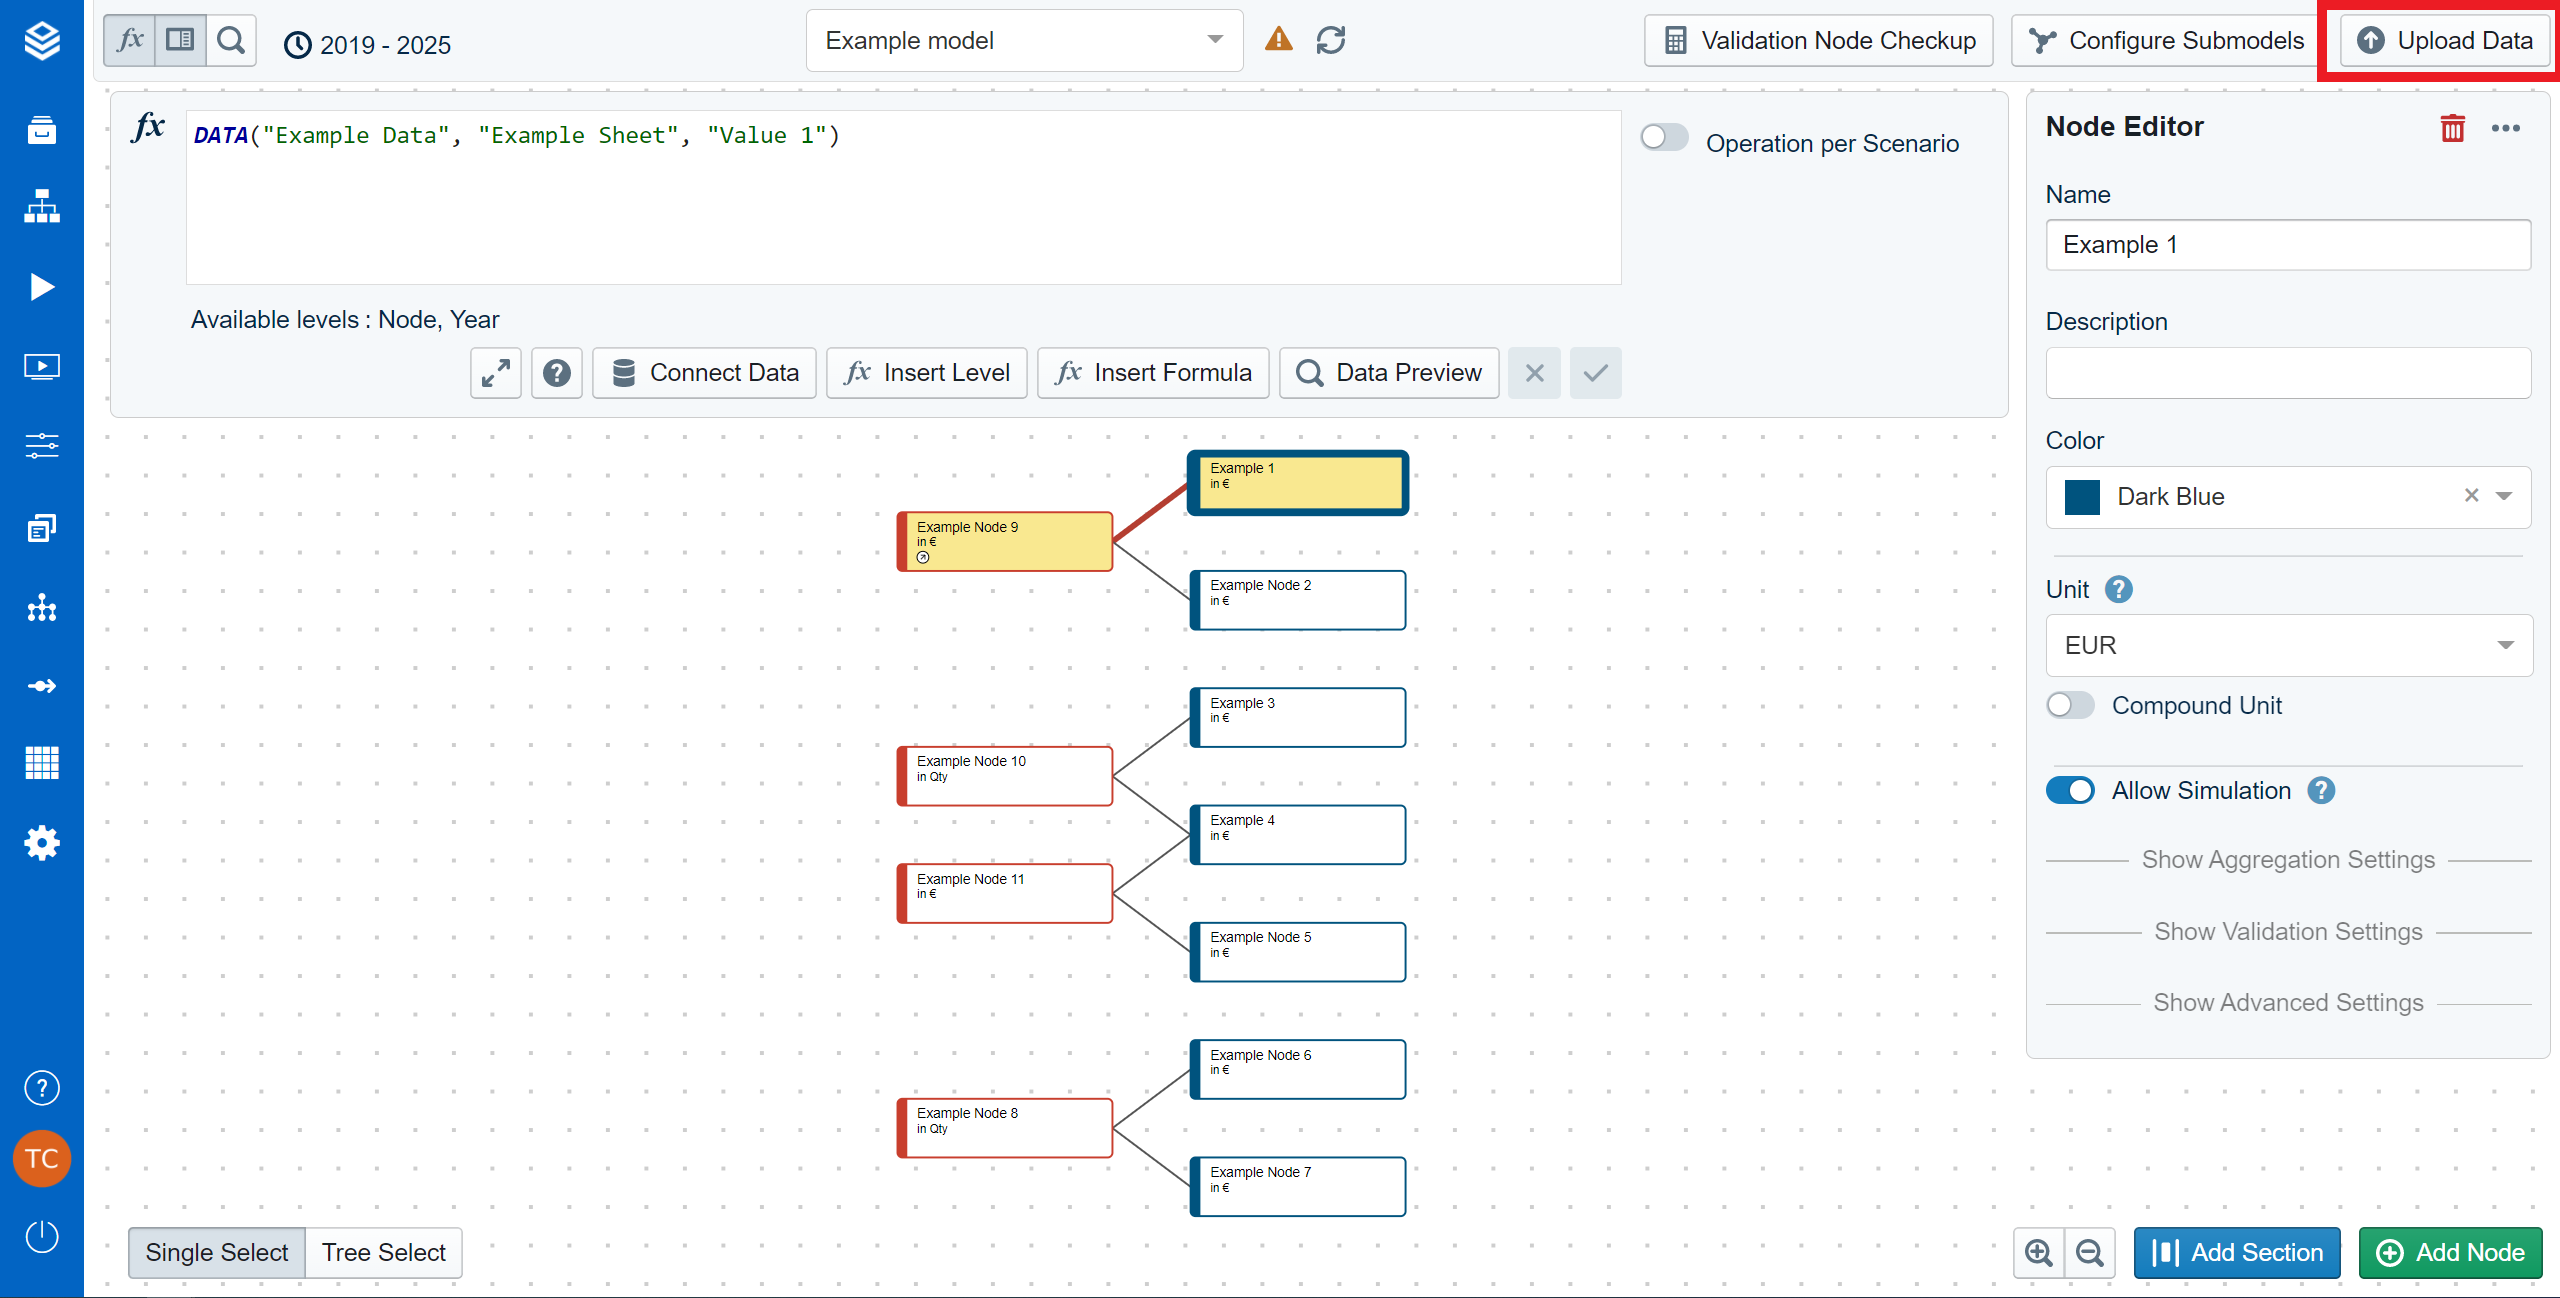
In the top right corner of the model editor, you can find the “Upload Data” button.
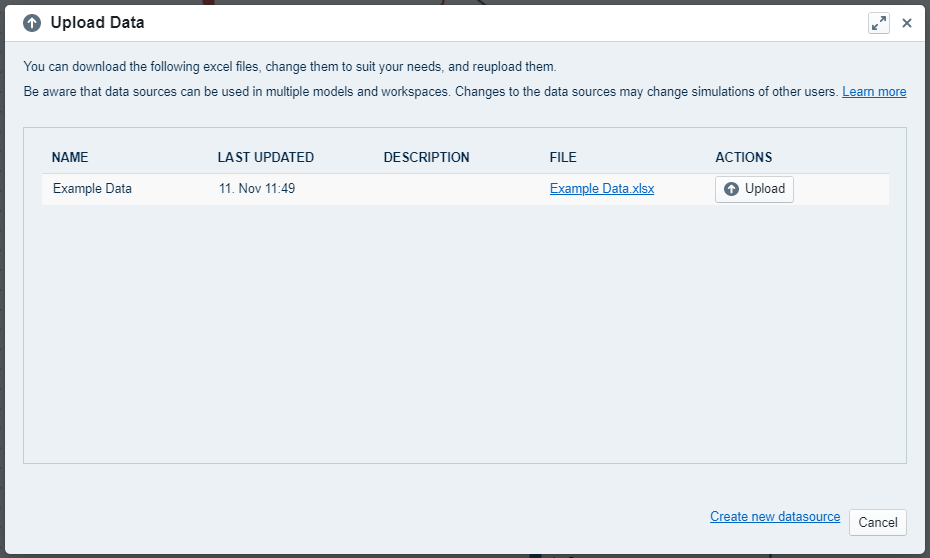
The “Upload Data” dialog enables you to make adjustments to your base data on the fly.
When uploading data via the model editor, Valsight enforces strict conditions in order for the upload to work. This is done to ensure that the newly uploaded data conform with any existing data sources or models.
These strict validation checks:
if every level has all and only values for the correct levels
if the parent-child relations are correct, when there are multiple levels in the same dimension
if links in levels of tables/sheets are working properly (when using an XLSX file that is linked to an external source per interface)
if a column that would be deleted by the upload is still used
if duplicate tables would result in multiple tables/sheets with the same name
if duplicate columns exist
for conformity with multiple dimensionality rules
this includes verifying that no multiple data points with the same dimension and level values exist
if there are any empty sheets
if number columns only have numbers
Note that the bottom right of the dialog contains the “Create new data source” button. By clicking it, you will be redirected to the data source space, where you can create entirely new data sources instead of just adjusting existing ones.
Node Lists
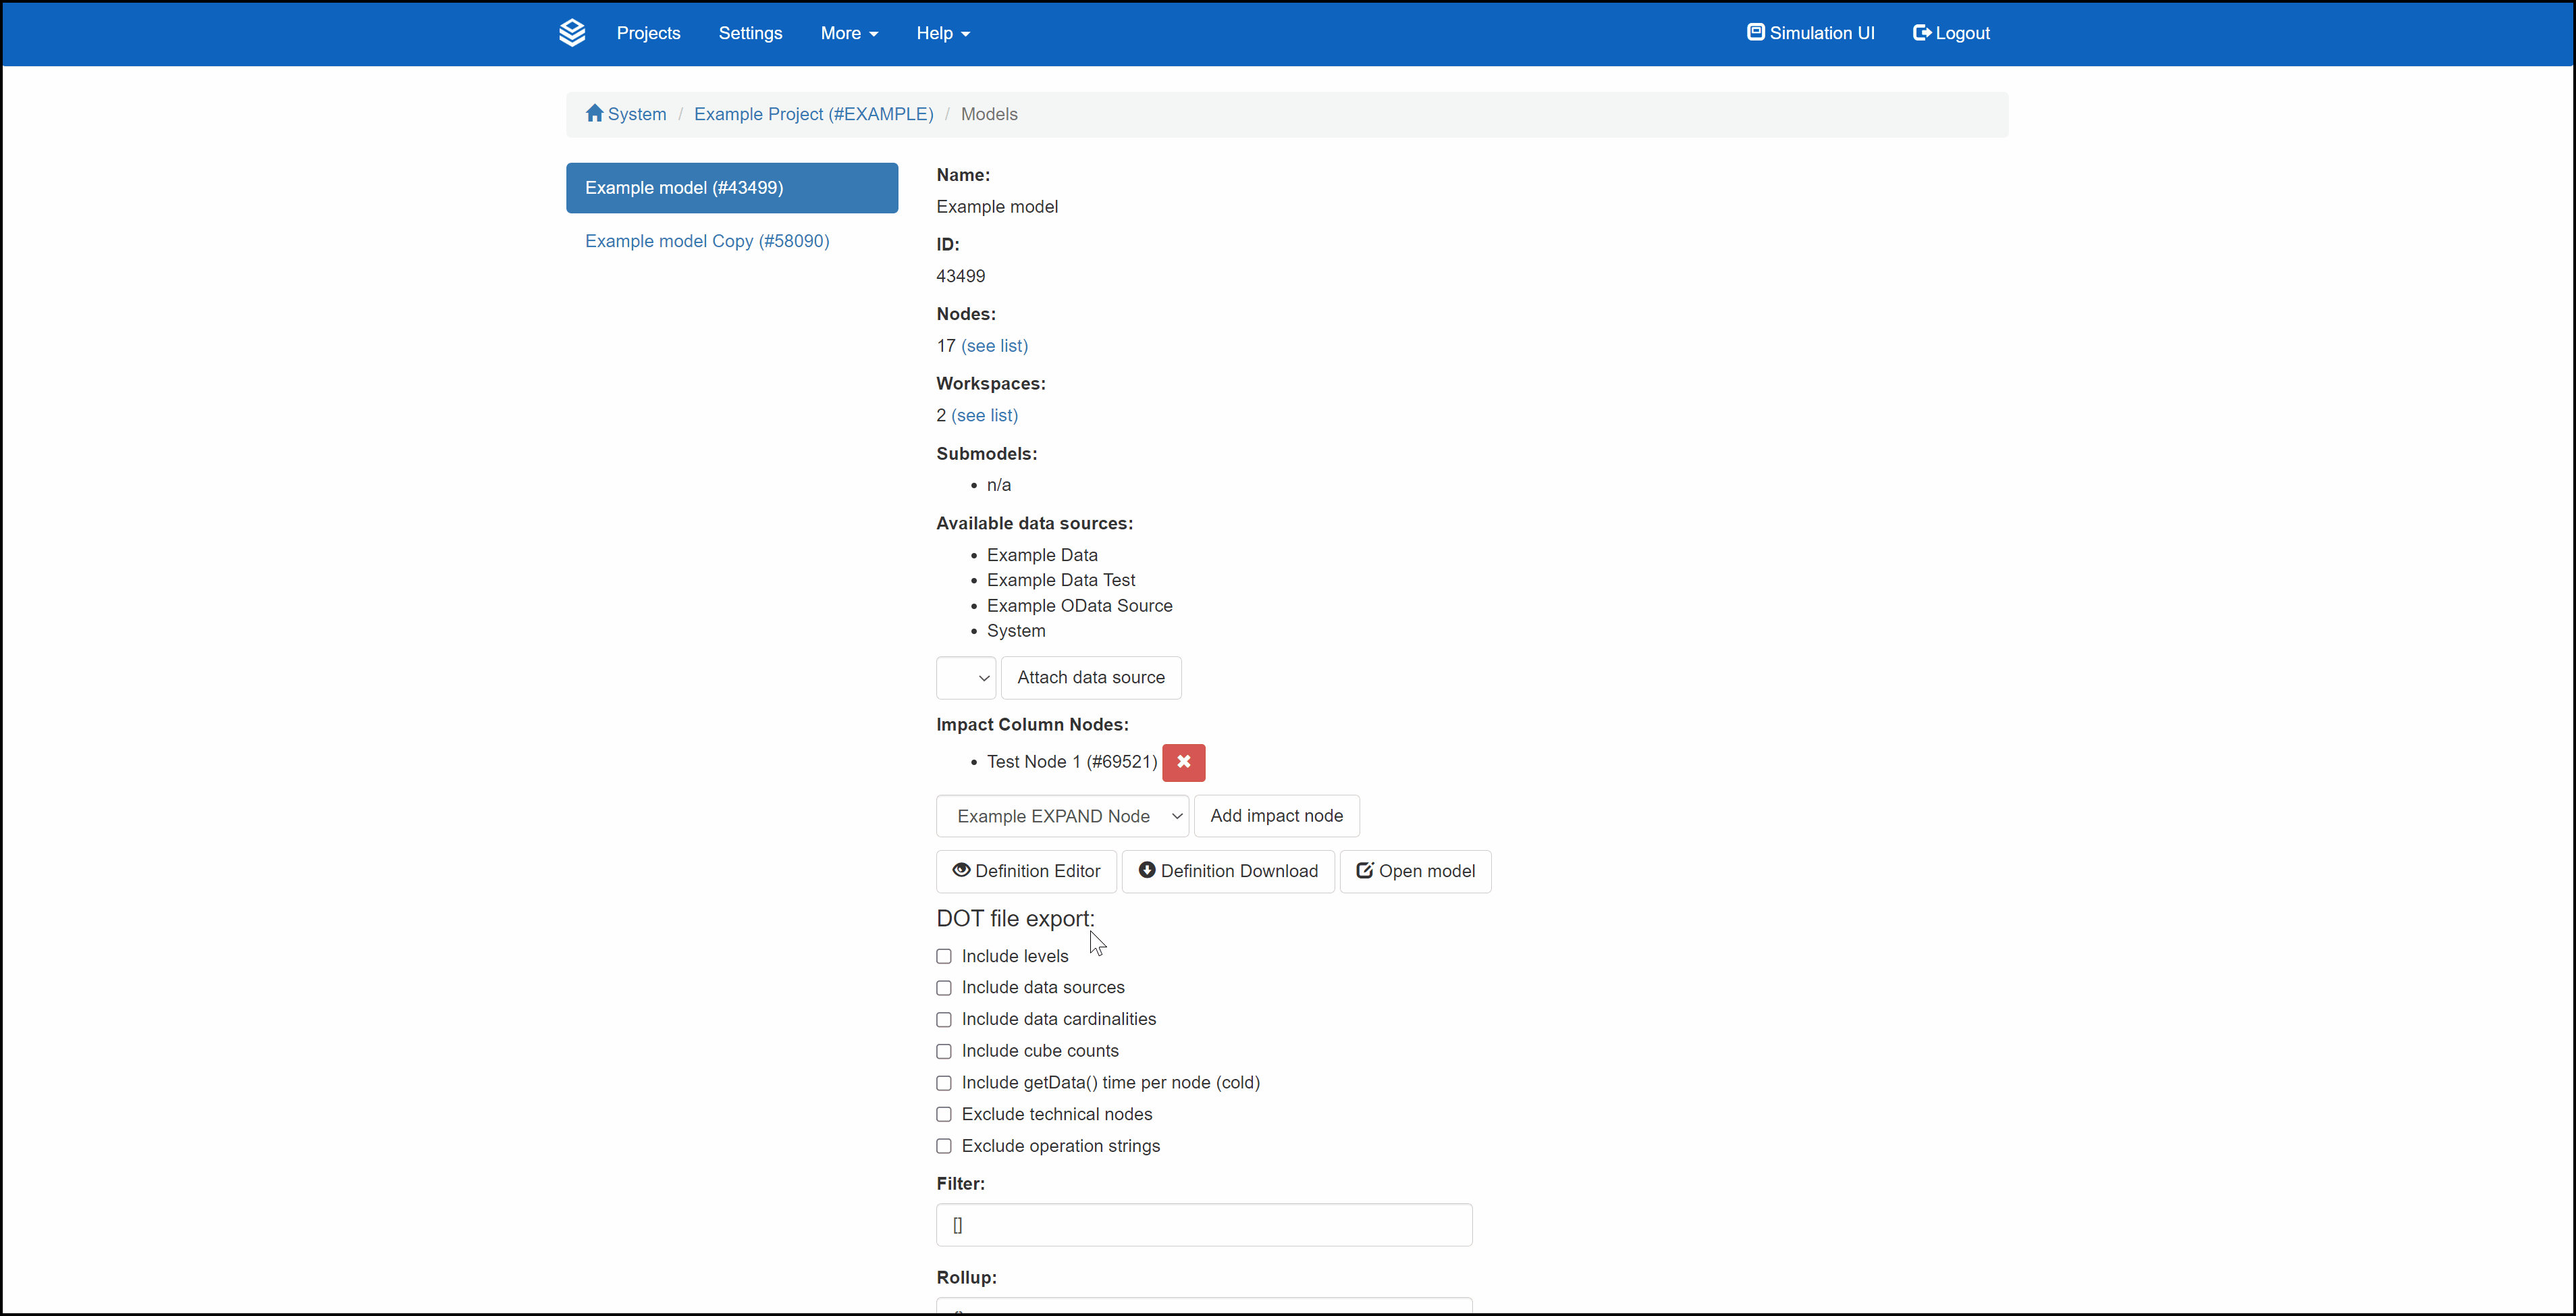
Another export option exists in the download of a list of all nodes belonging to a model.
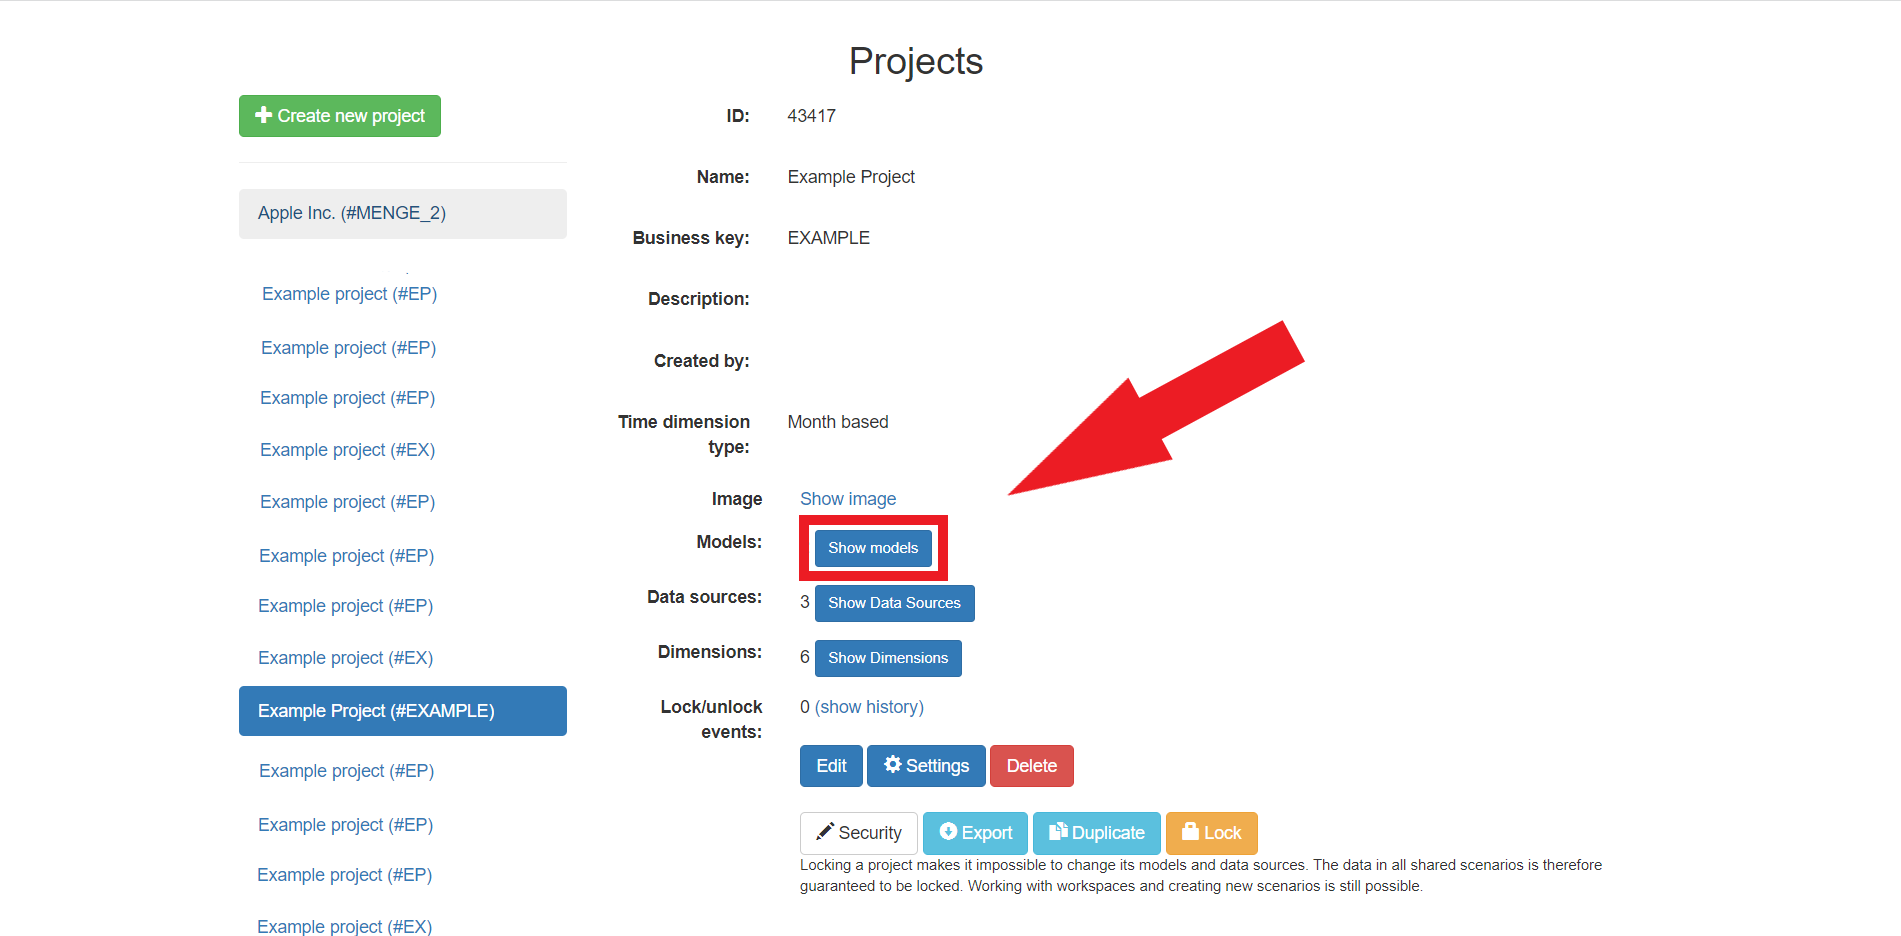
Any admin can do so by heading to the “Configuration” page via the cogwheel on the navigation bar and clicking on “Projects”
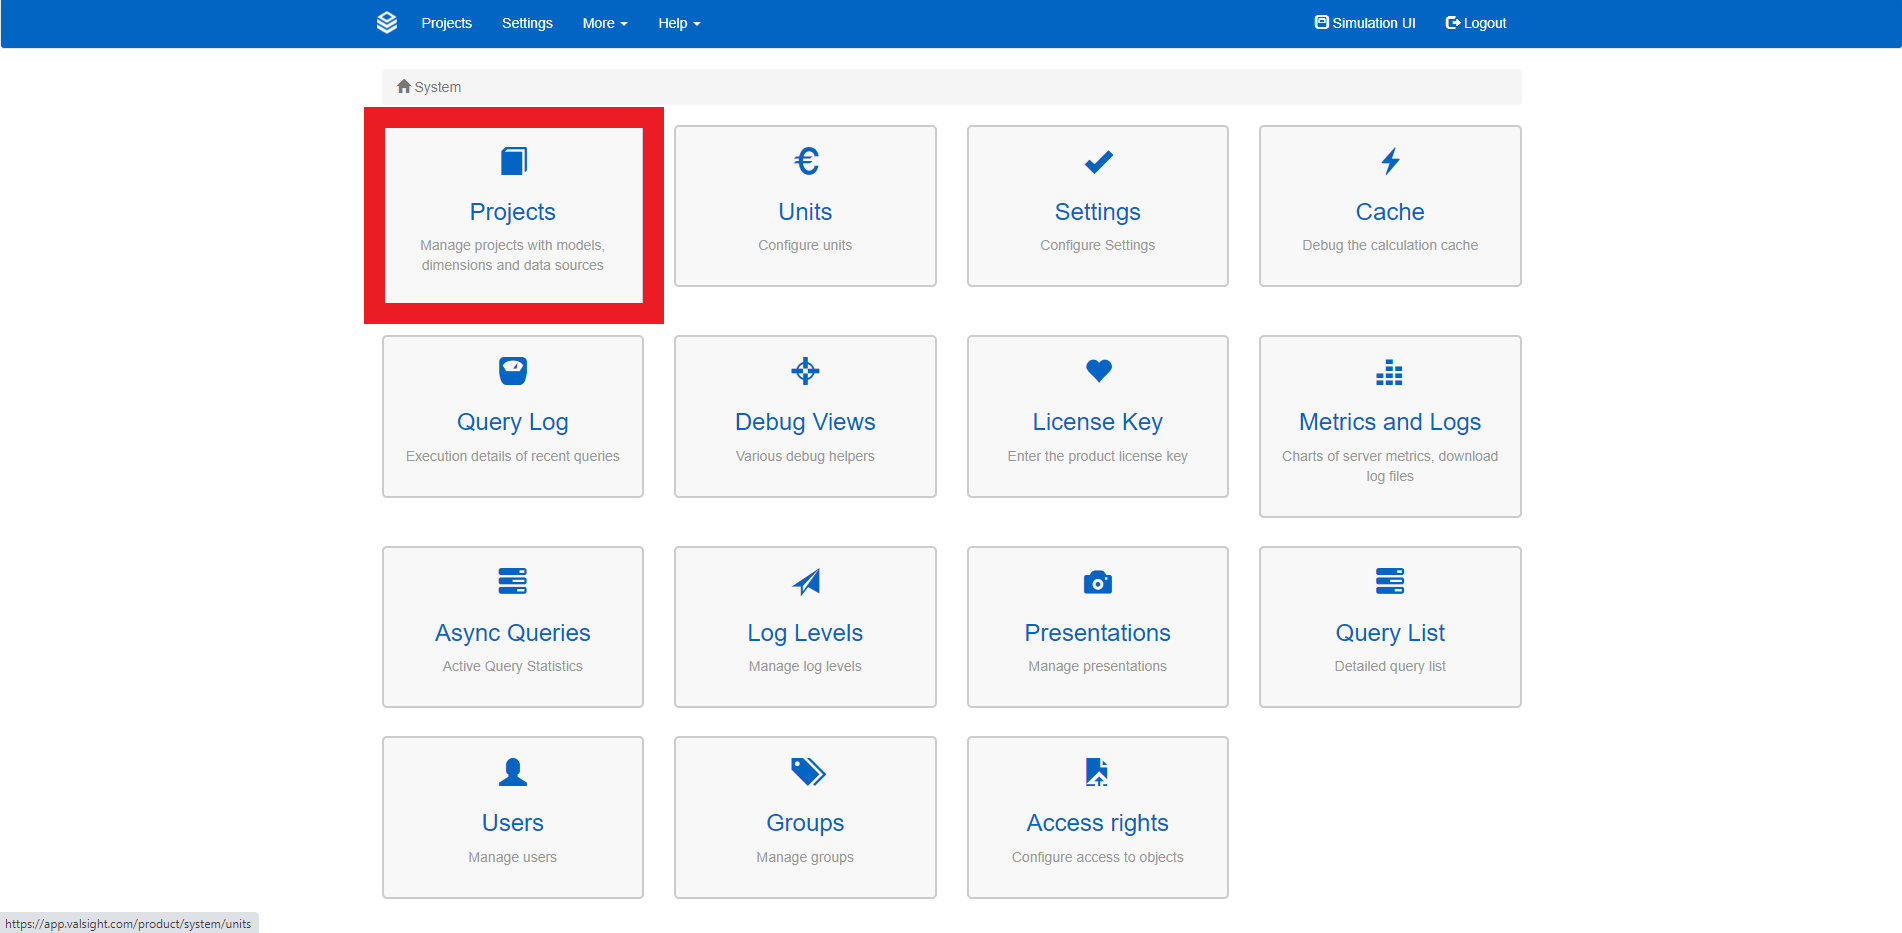
By opening the “Projects” section of the configuration menu, you can adjust basic settings and get an exportable list of a model’s nodes.
From there, select the project you want to export the node list of and click “Show models”.
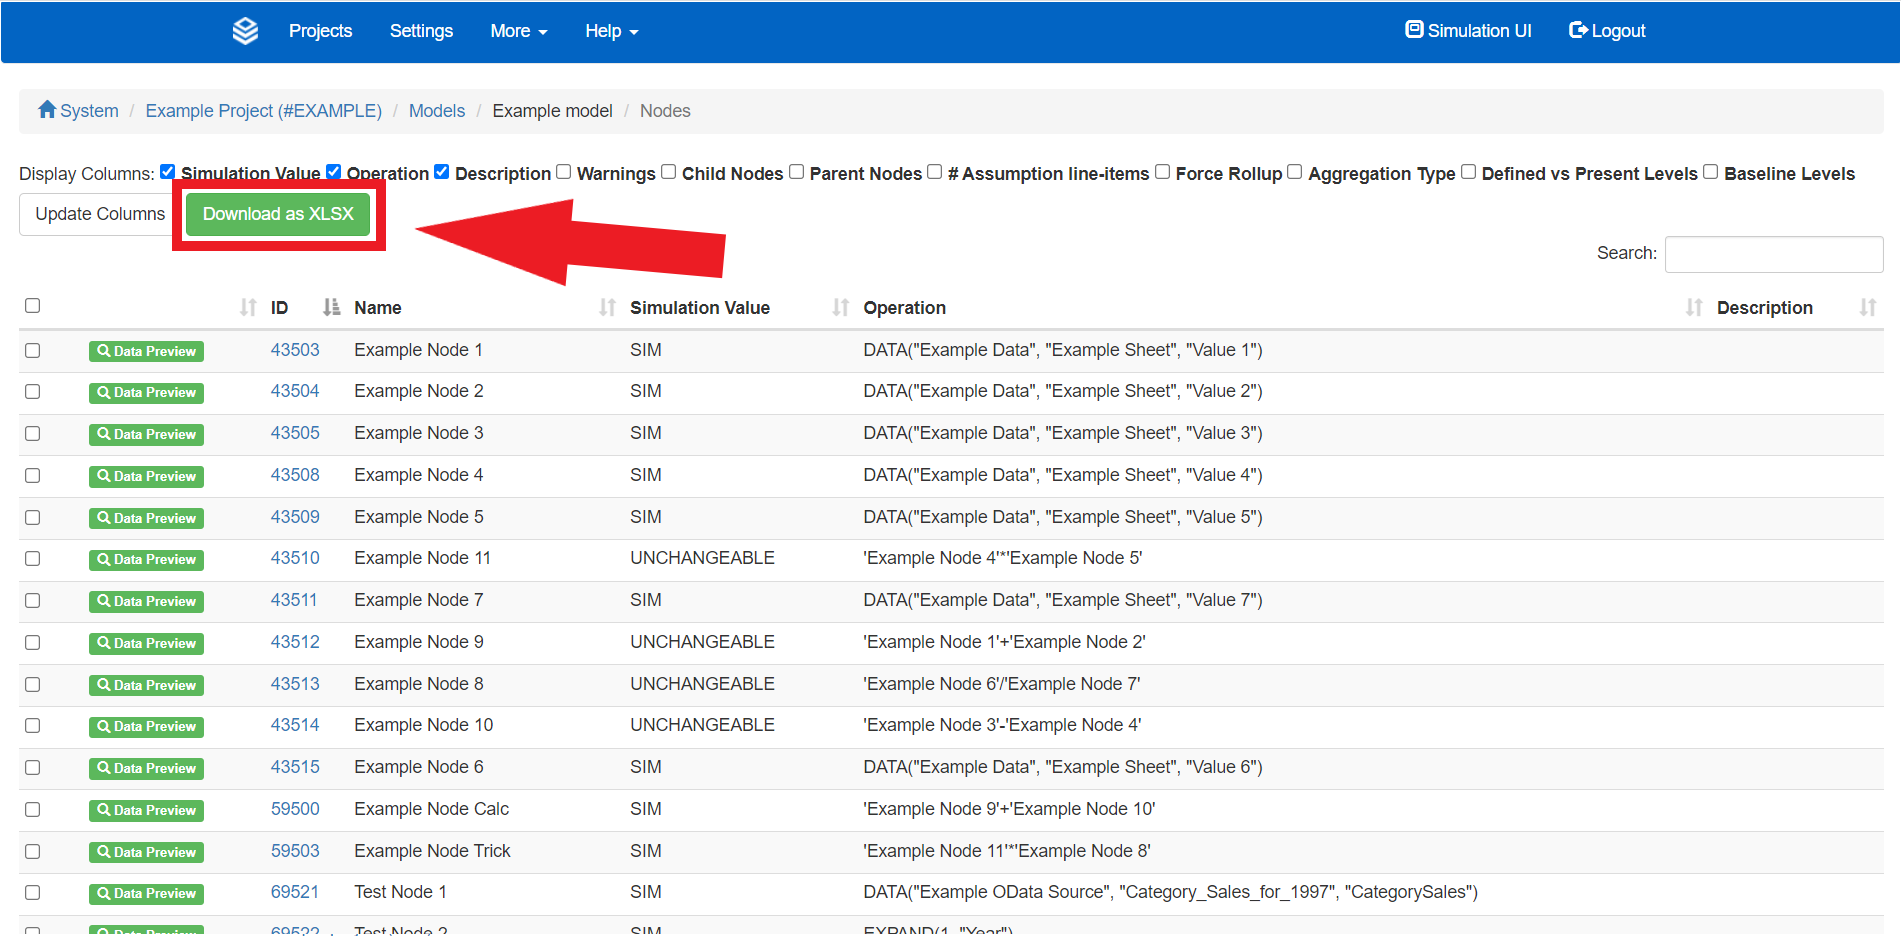
Under the header “Nodes:” you can then see the number of nodes related to the model you select from the overview list on the left. By clicking “(see list)” you can view a detailed list of all nodes. You can use filters in the header bar to filter for specific kinds of nodes or search them directly using the search function in the top right corner.
By clicking “Download as XLSX” you can download a list of all nodes. You can also manually select specific nodes that should be included in the download; all unselected nodes will not be downloaded if you do so.
Exporting a Model as DOT File
DOT is a simple but powerful language for the description and depiction of graphs and structures. Valsight enables you to download a DOT file of a model, making it possible to depict the nodes and their structure with other software.
To export a DOT file of a model, follow the steps in “ Node Lists ” until you get to the model overview in the admin UI. Select the model you want to export as a DOT file and scroll to the bottom of its configurations.
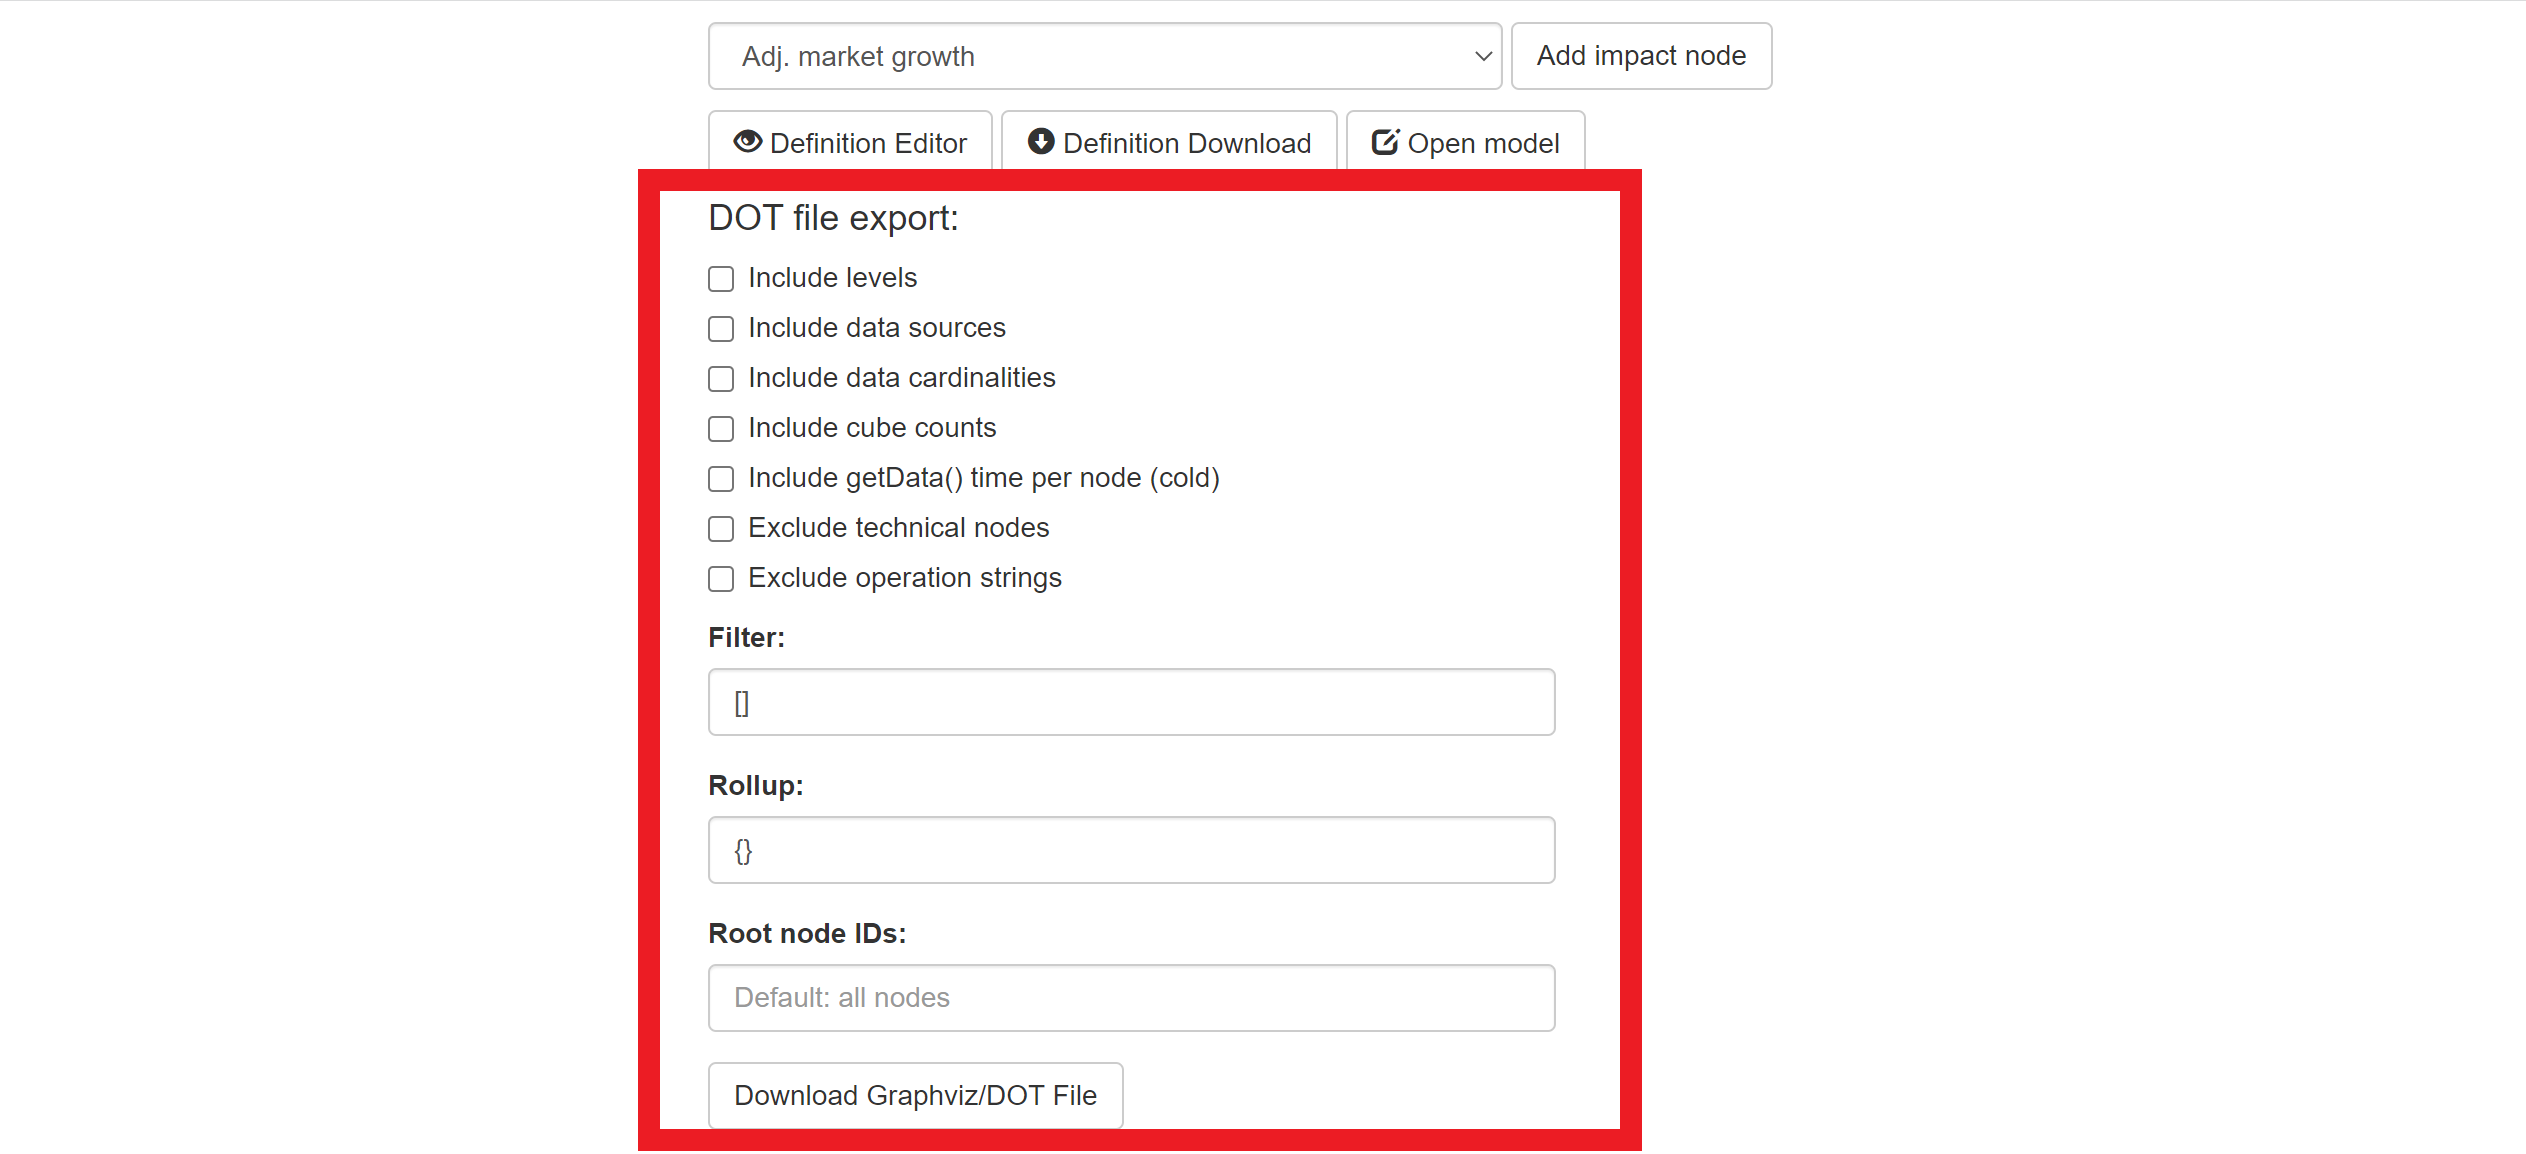
There you can select, which additional information to include in the export. You can also apply a regular expression to filter with or use a rollup.
When you’re finished with the configuration, click on “Download Graphviz/DOT File” to download the file.
Exporting a Model as DSL/VSM File
Yet another option to export a model consists of using a DSL (Domain Specific Language).
Valsight offers the export of a model using the VSM syntax. This export is guaranteed to successfully include all information included in a model.
To export a model as a DSL file, head to the admin UI and go to the model’s settings. From there, select ”Definition Download”
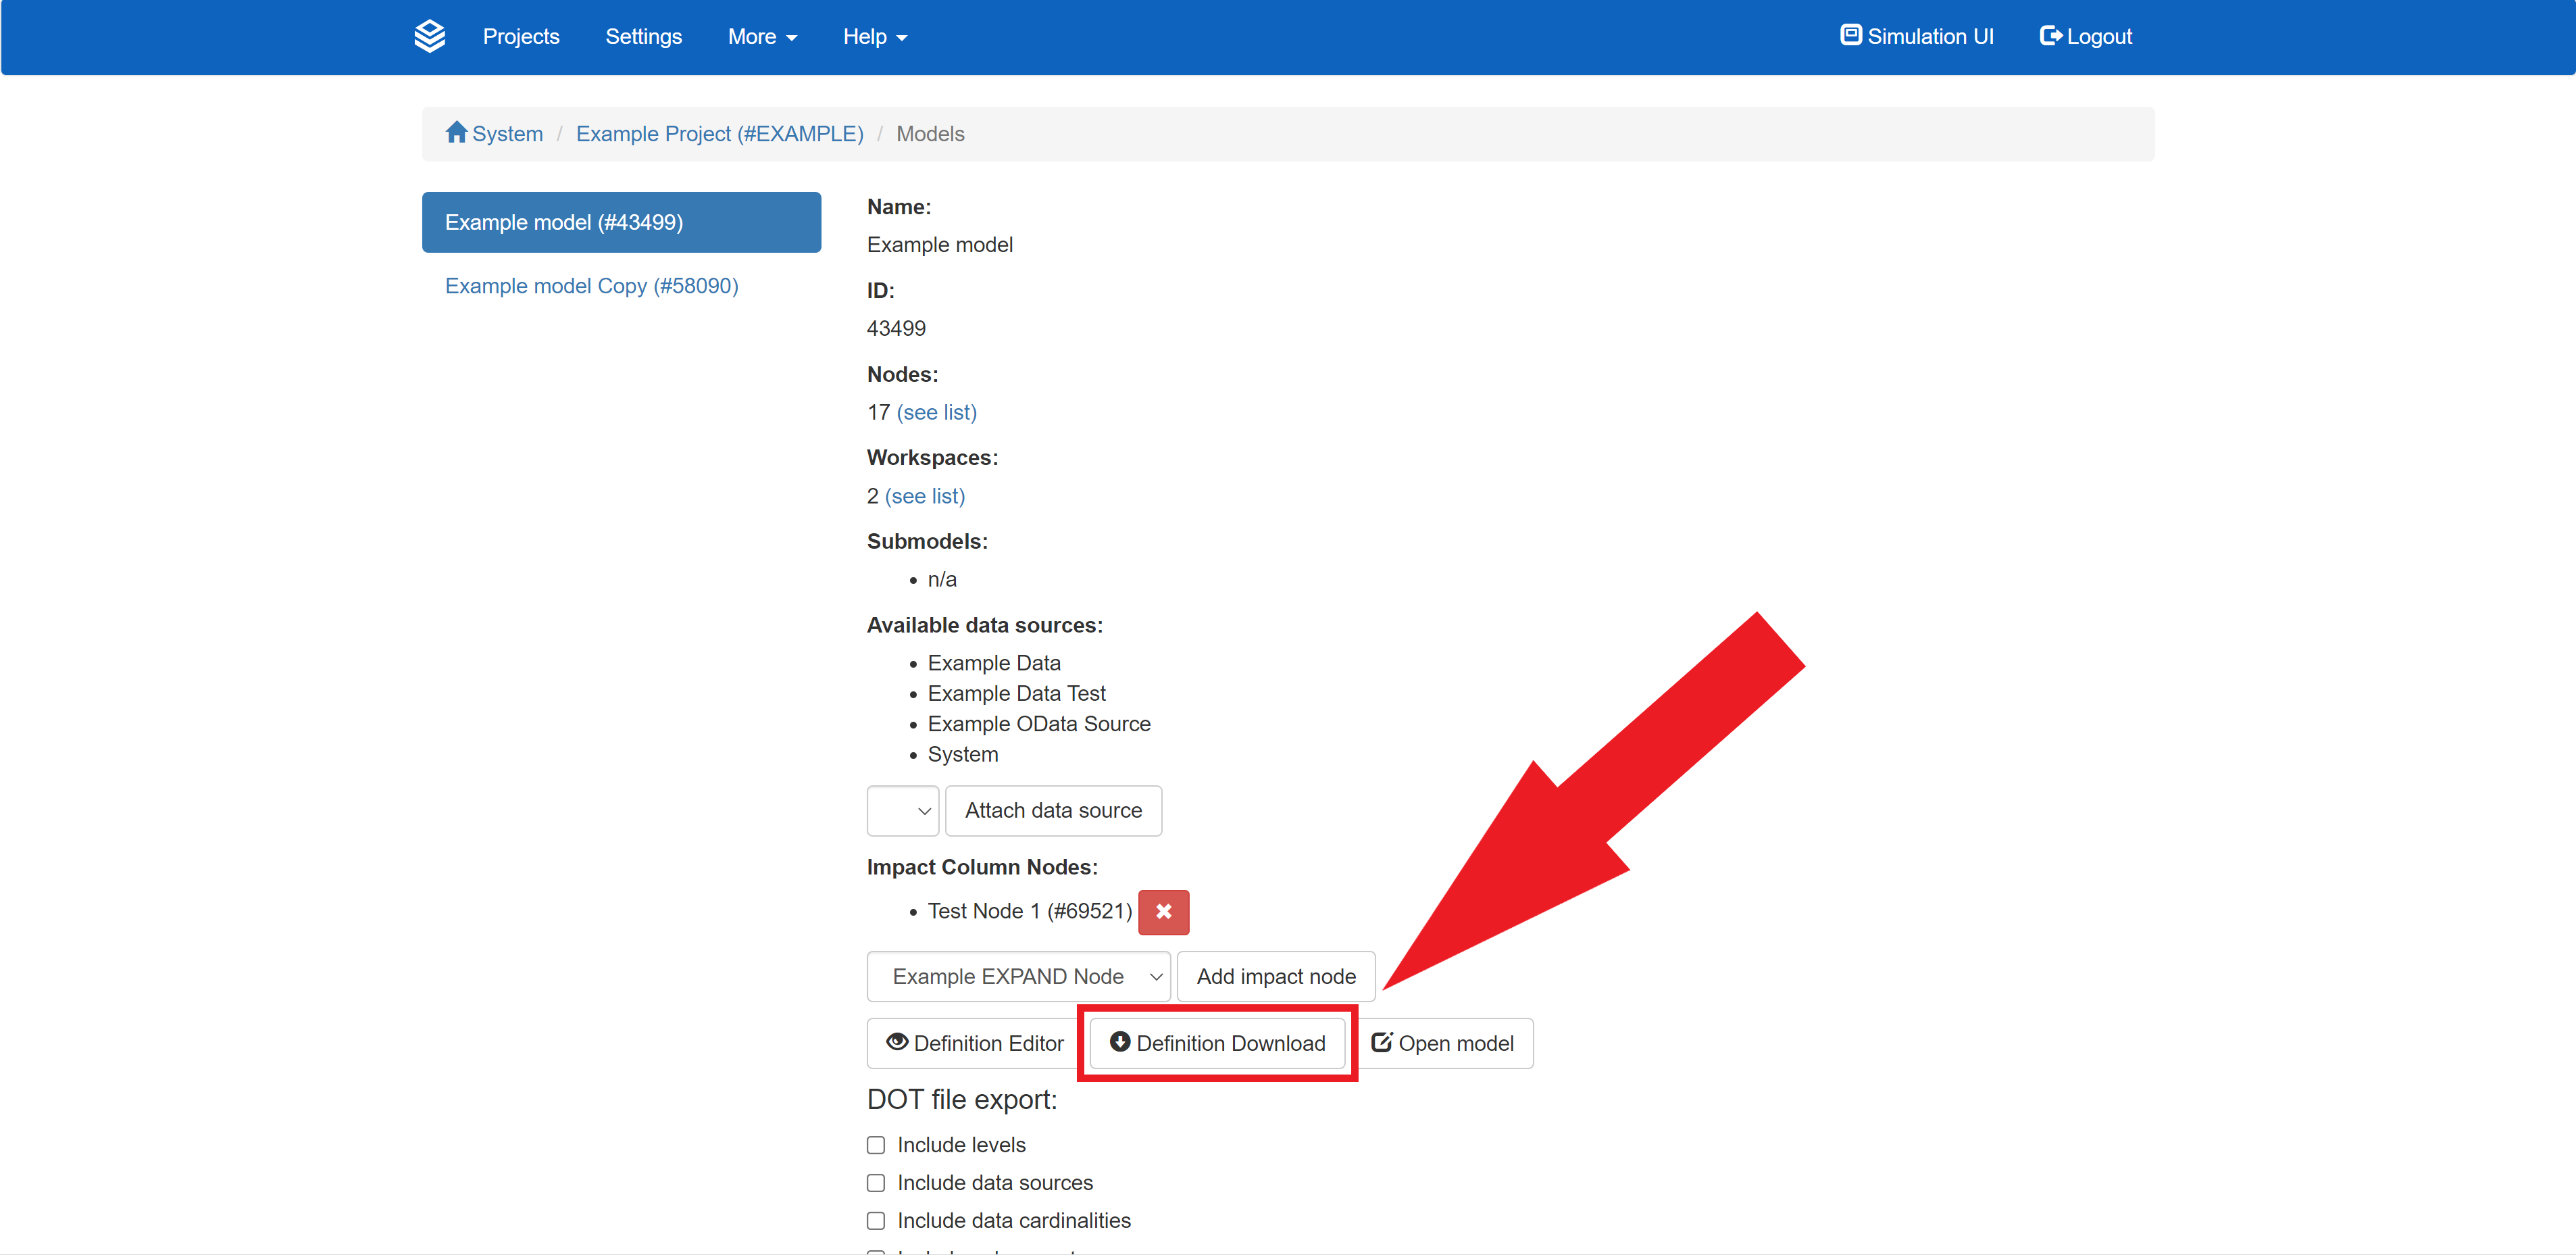
The downloaded model definition can then be inserted into any model’s definition editor to recreate the downloaded model. To do so, click the “Definition Editor” button to open the definition editor and replace the existing text with the downloaded definition.
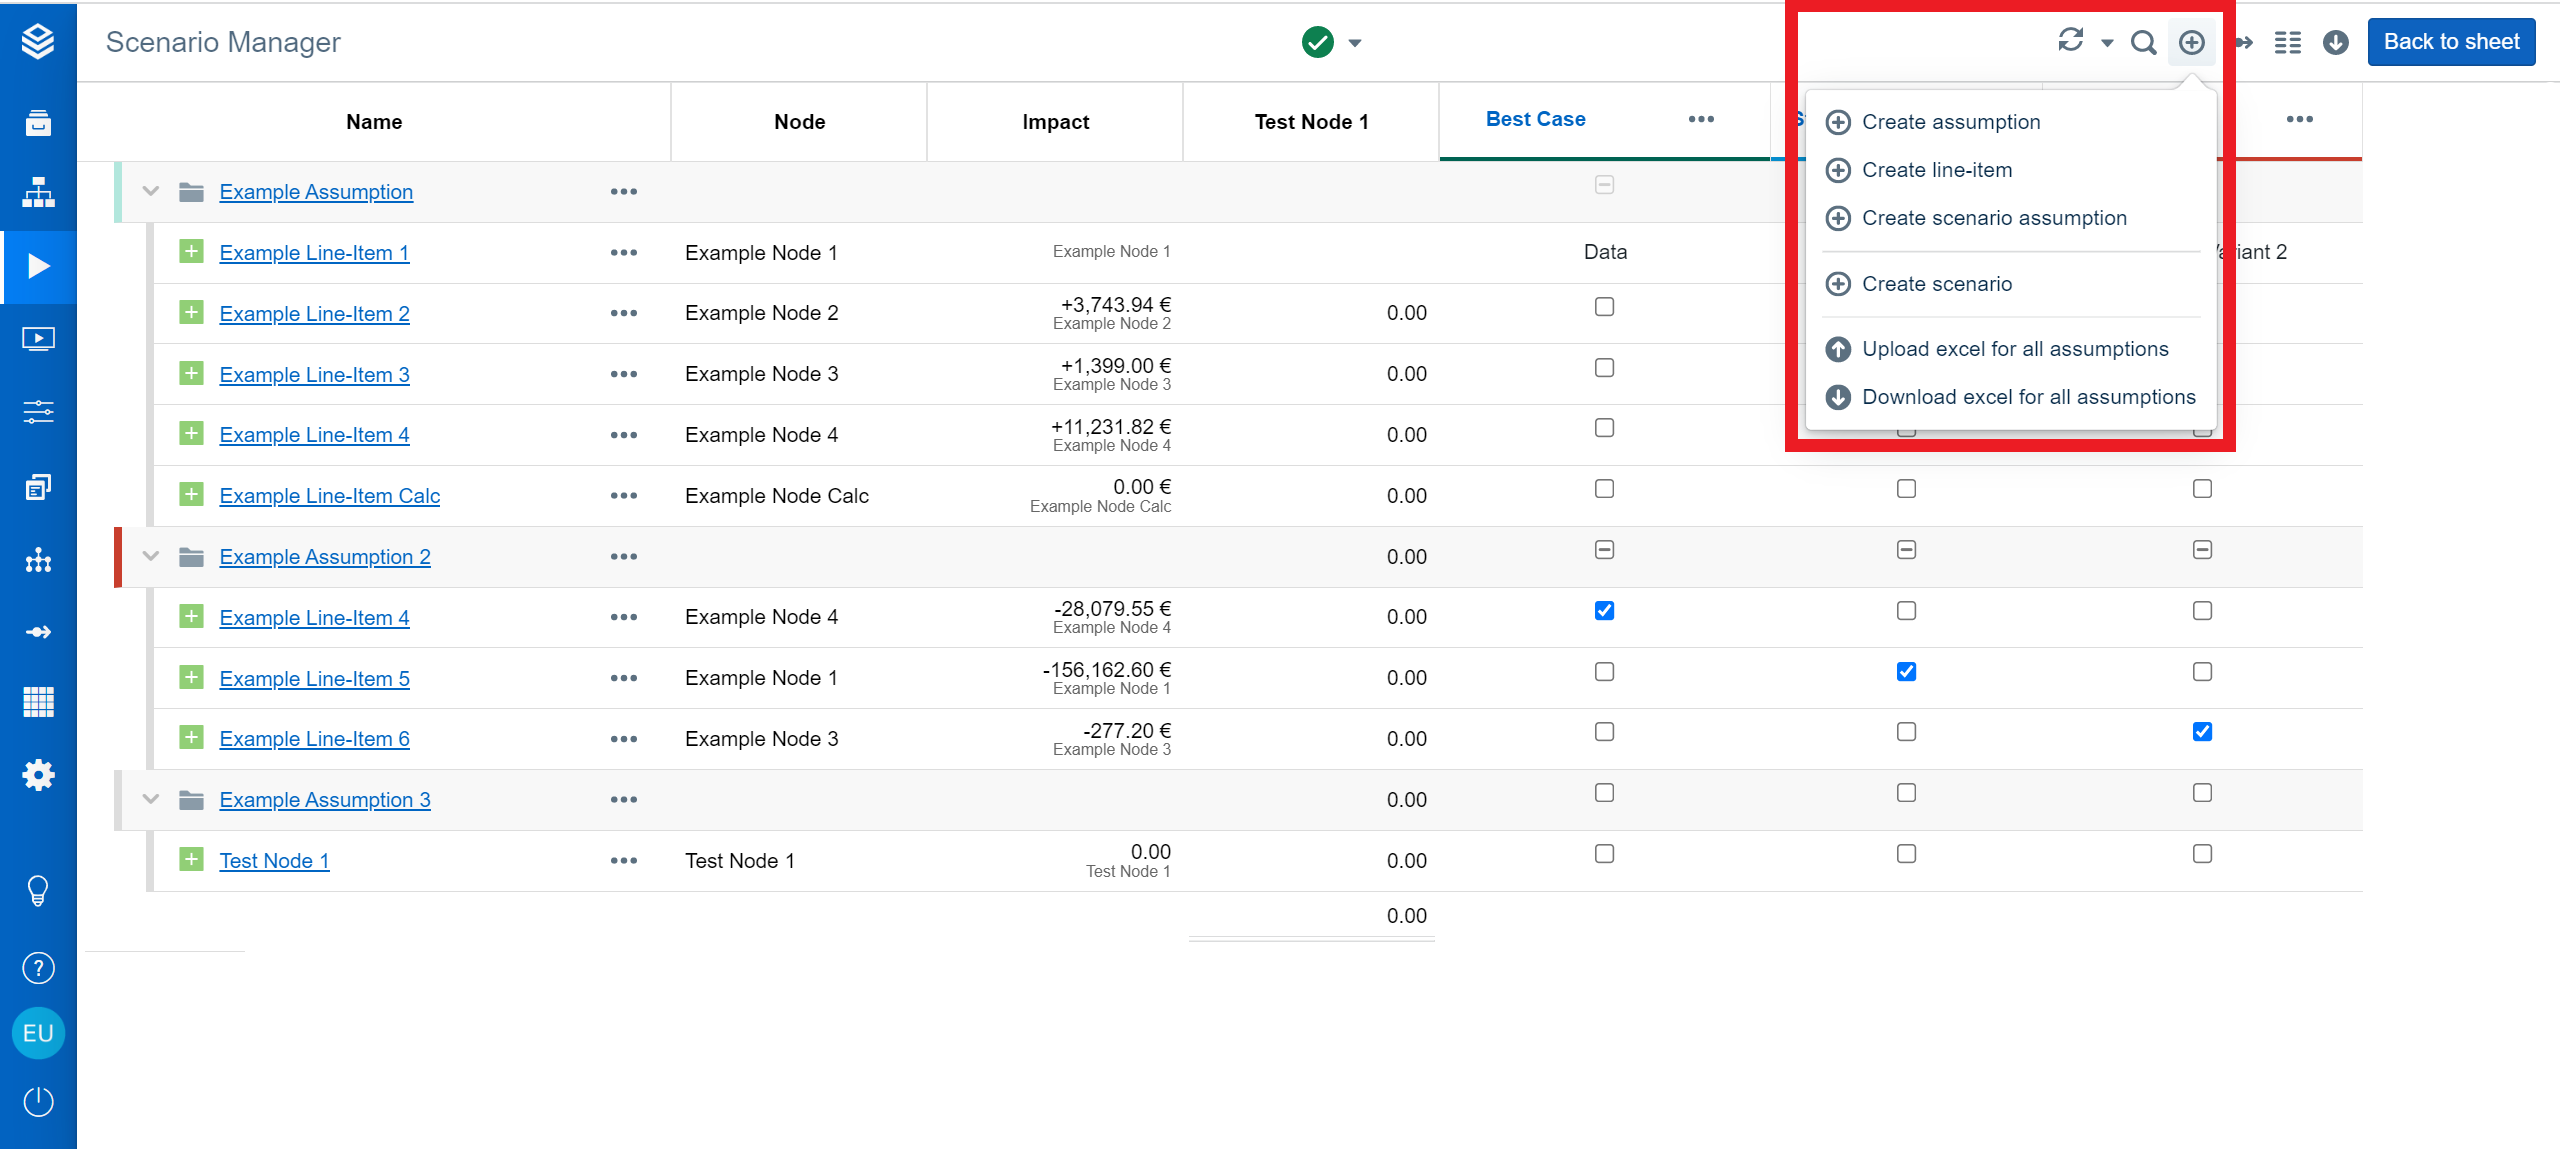
Scenario Manager
The Scenario Manager is the control terminal for your simulation calculations. Here you can create and adjust scenarios, assumptions, and line-items. You can also review and validate their effects on your base model. The Scenario Manager not only contains scenarios, assumptions, and line-items but can also export scenarios including selected models and nodes.
Scenarios
The Scenario Manager allows you to share and/or export existing scenarios. Scenarios can also be individually exported as XLSX, OData, or CSV.
Manual File Download
To export scenarios, click on the “Export Scenarios” button.
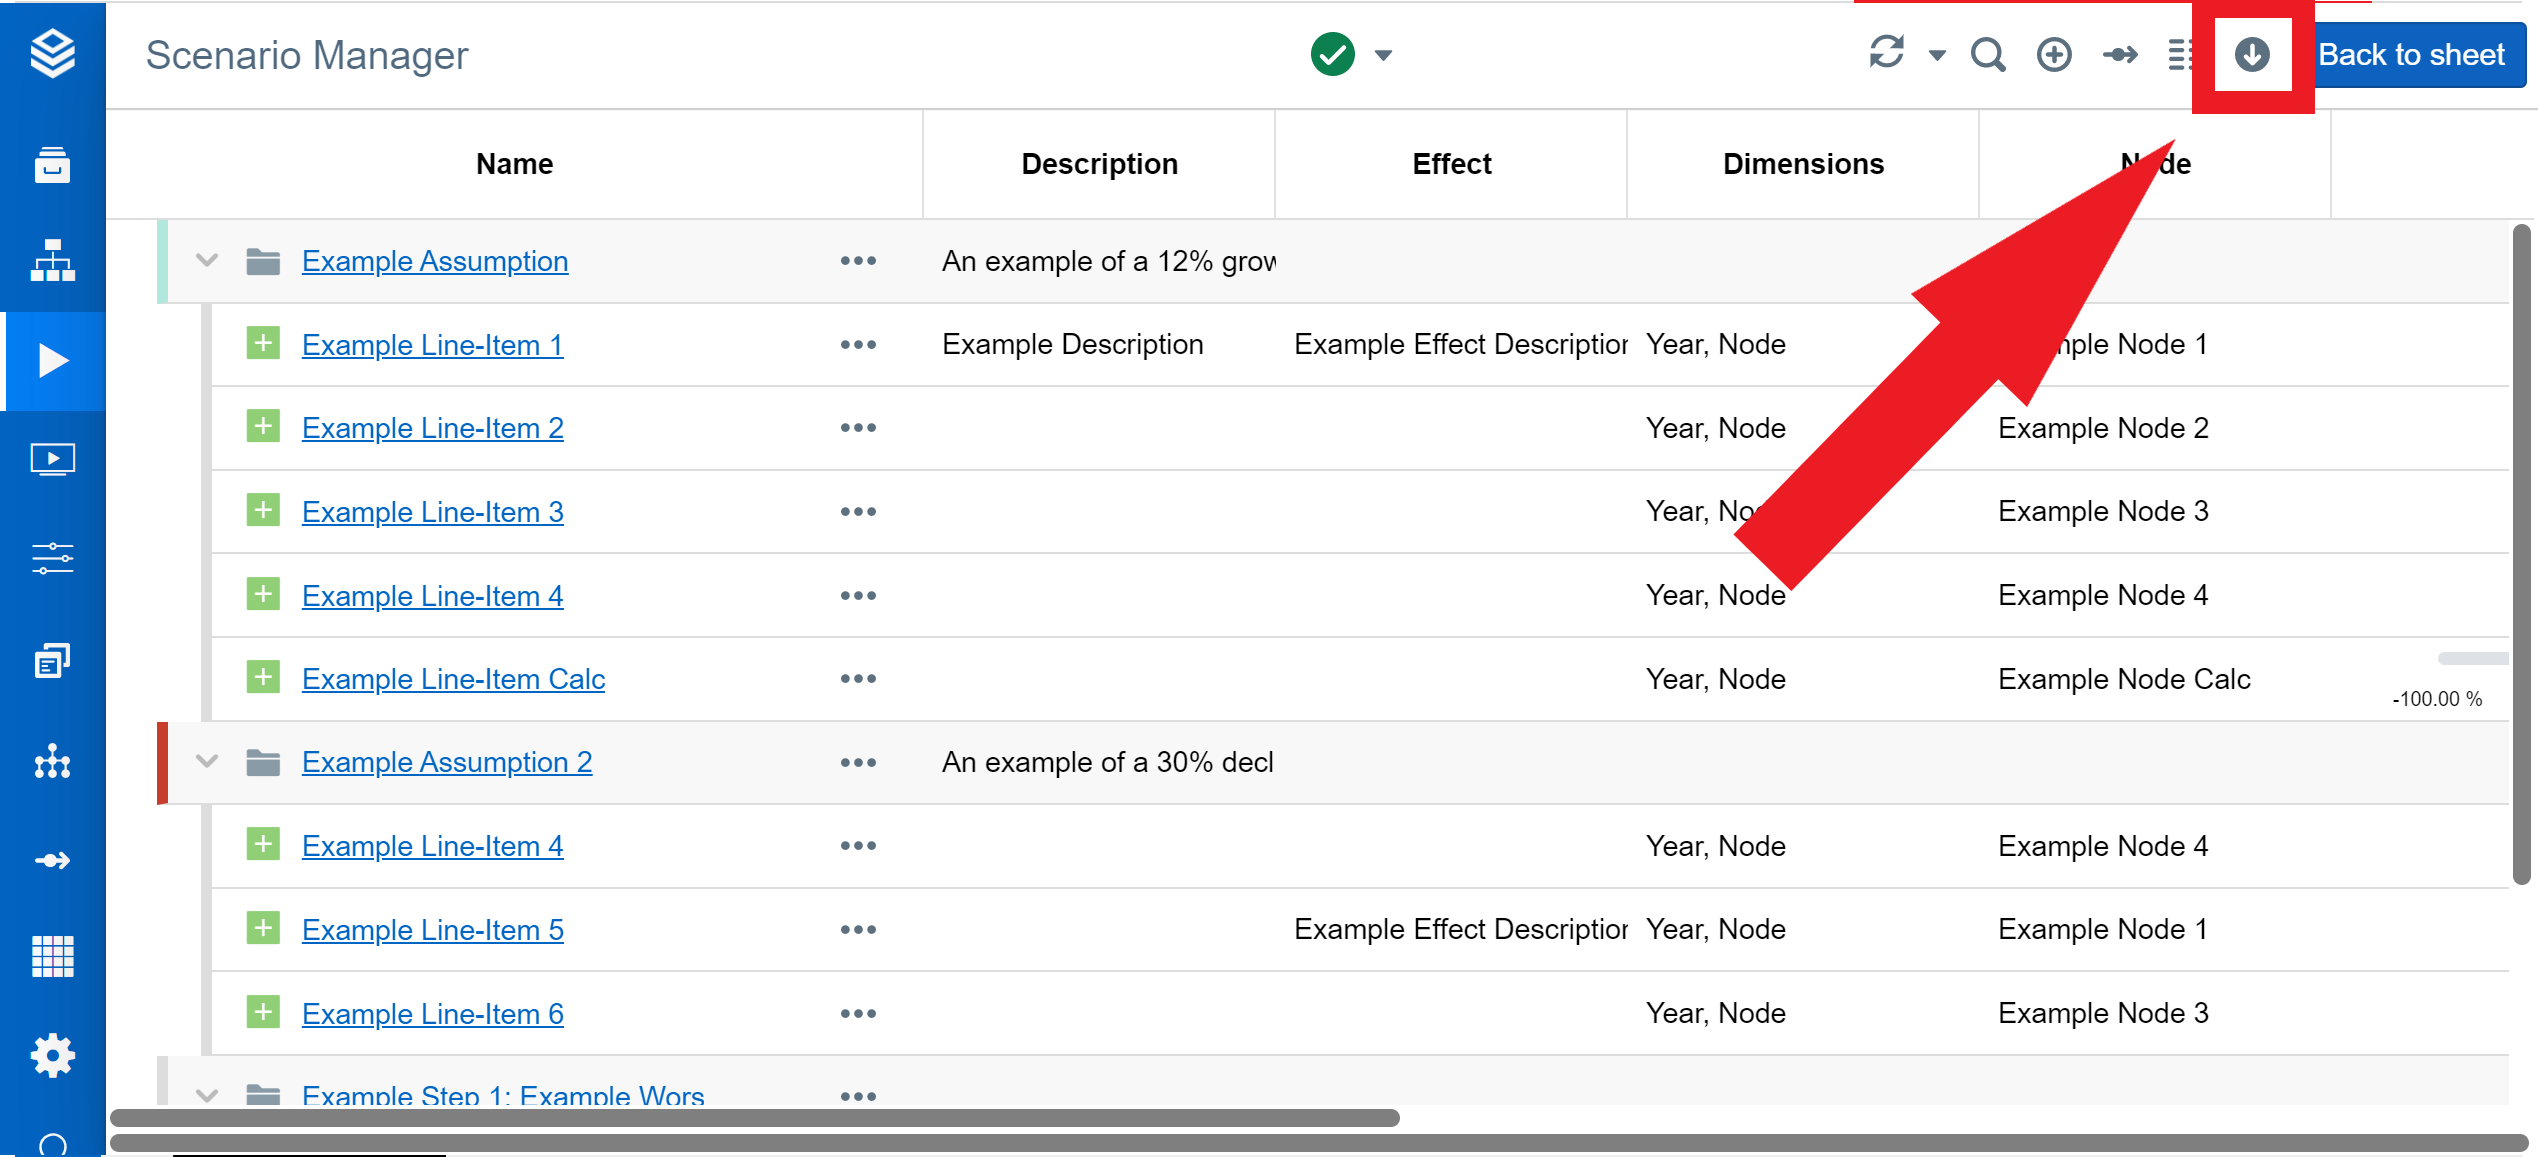
Click on the “Export Scenarios” button to open the respective dialog.
This will open the “Export Scenarios” dialog.
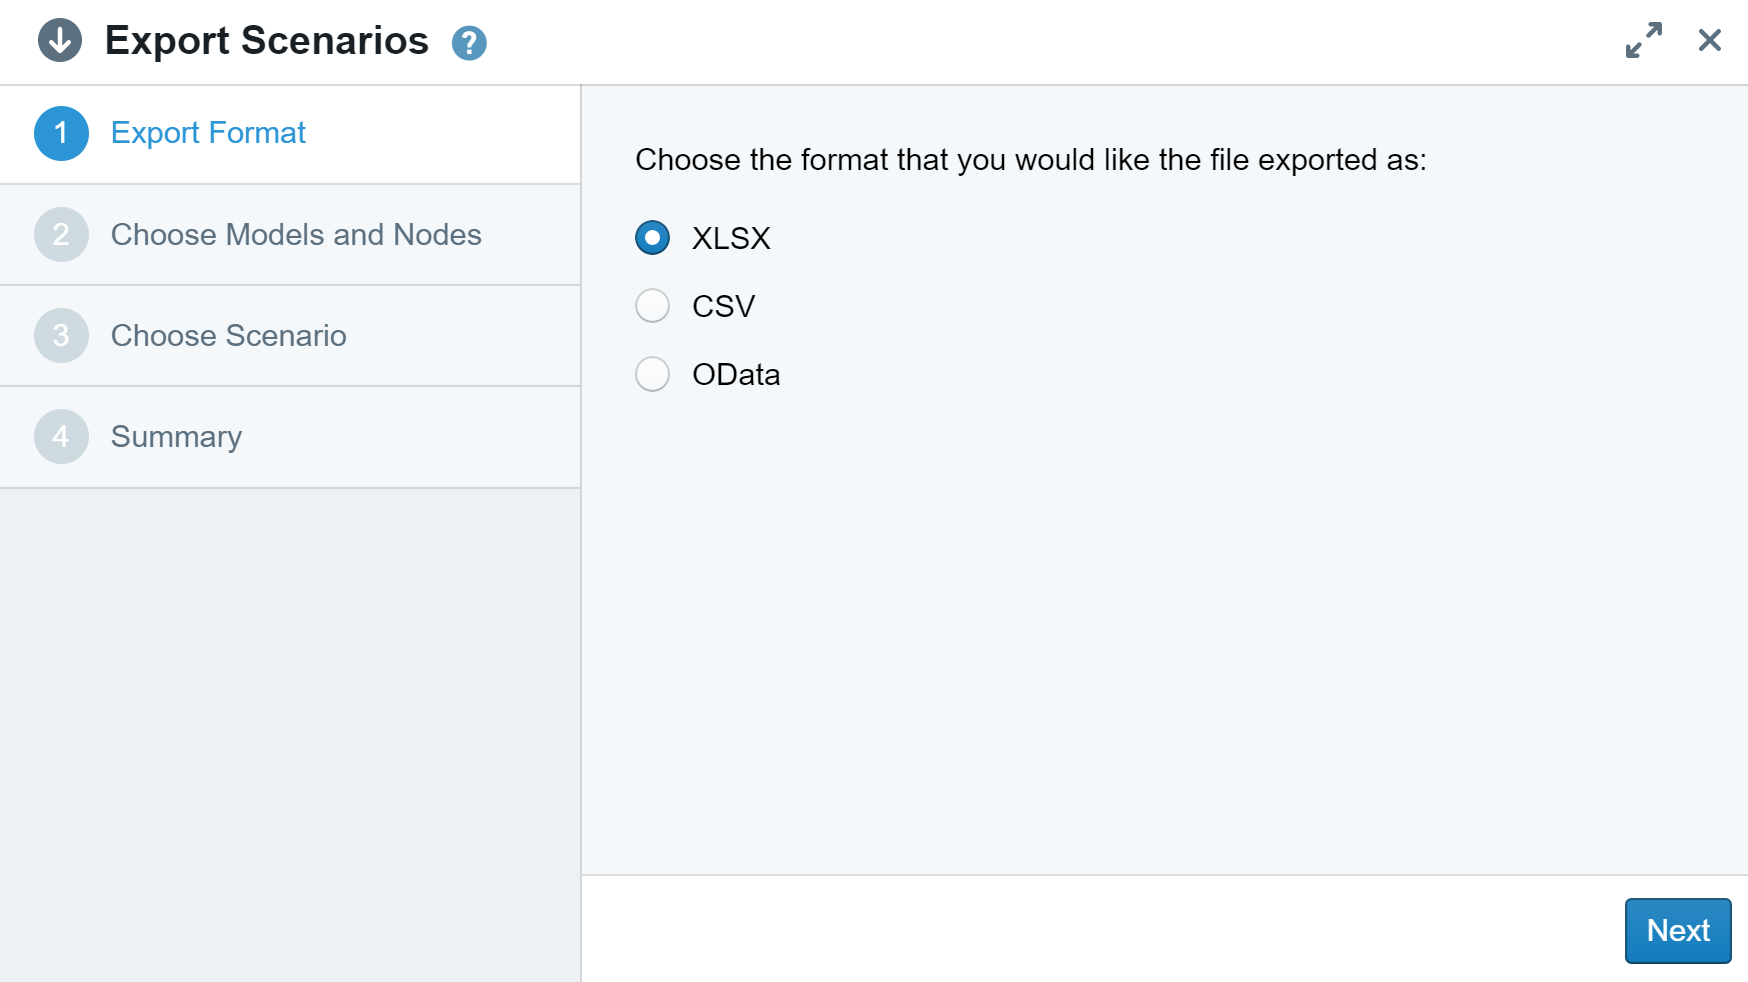
The first step is to select the data format you want to export your scenarios as.
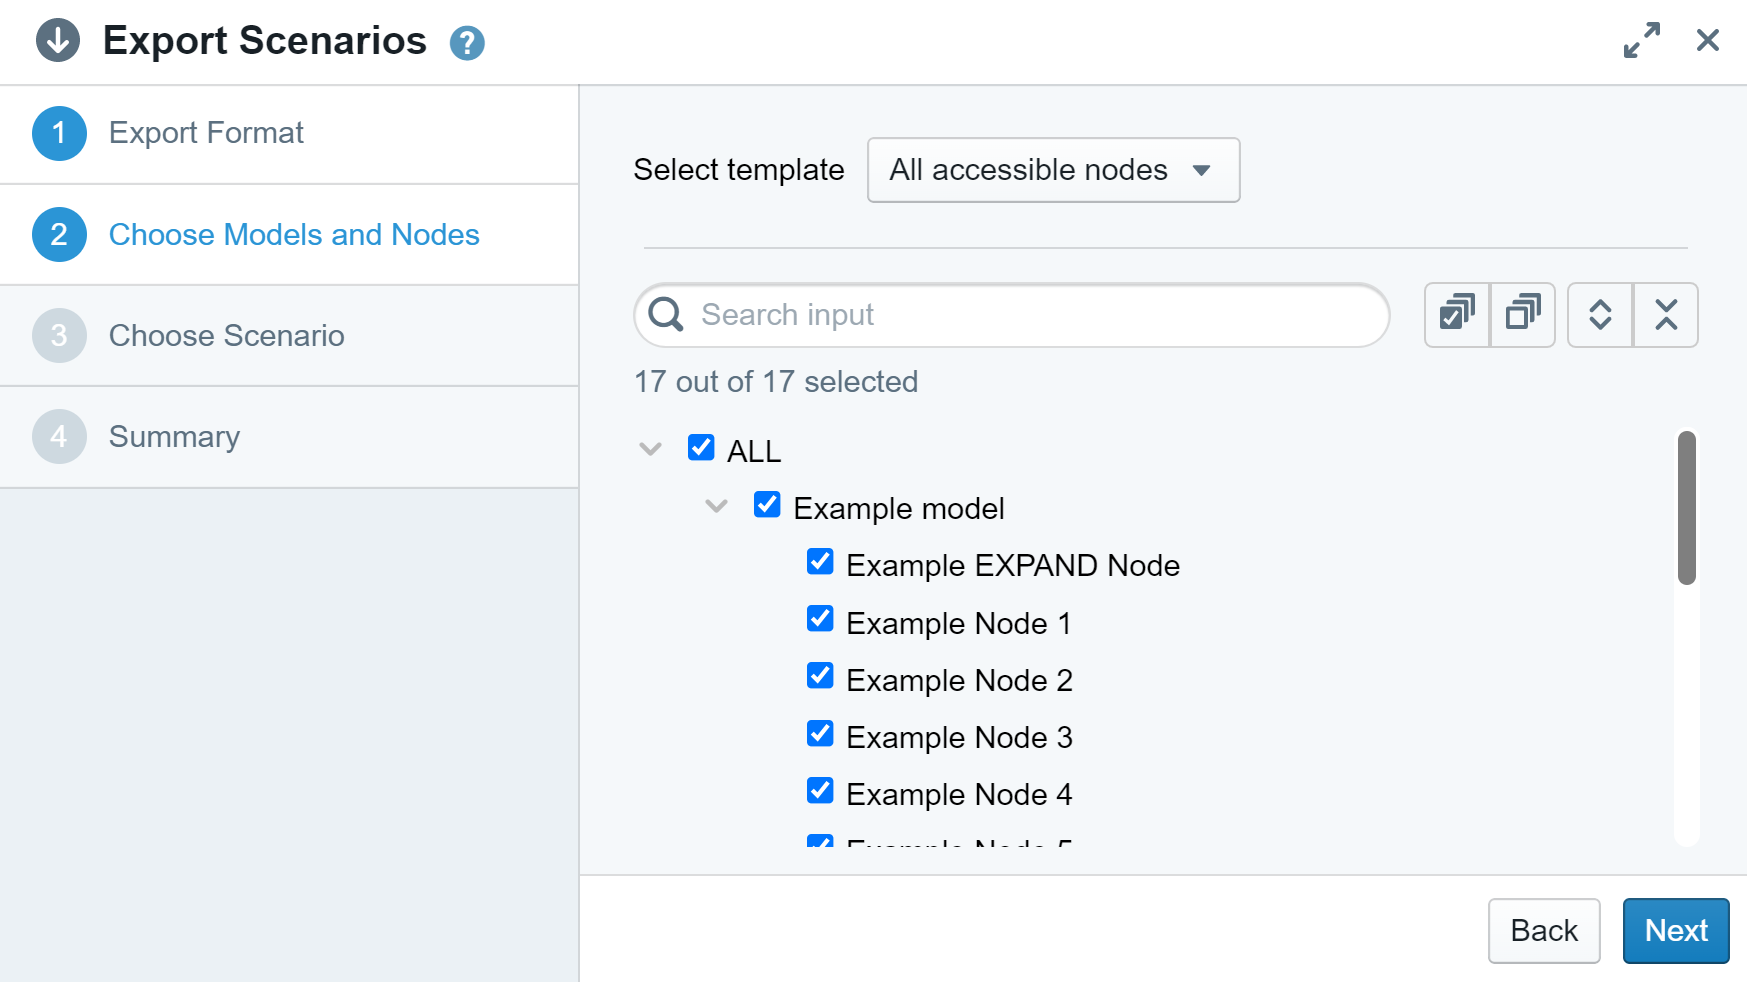
The second step requires you to select all models and nodes you want to include in the export.
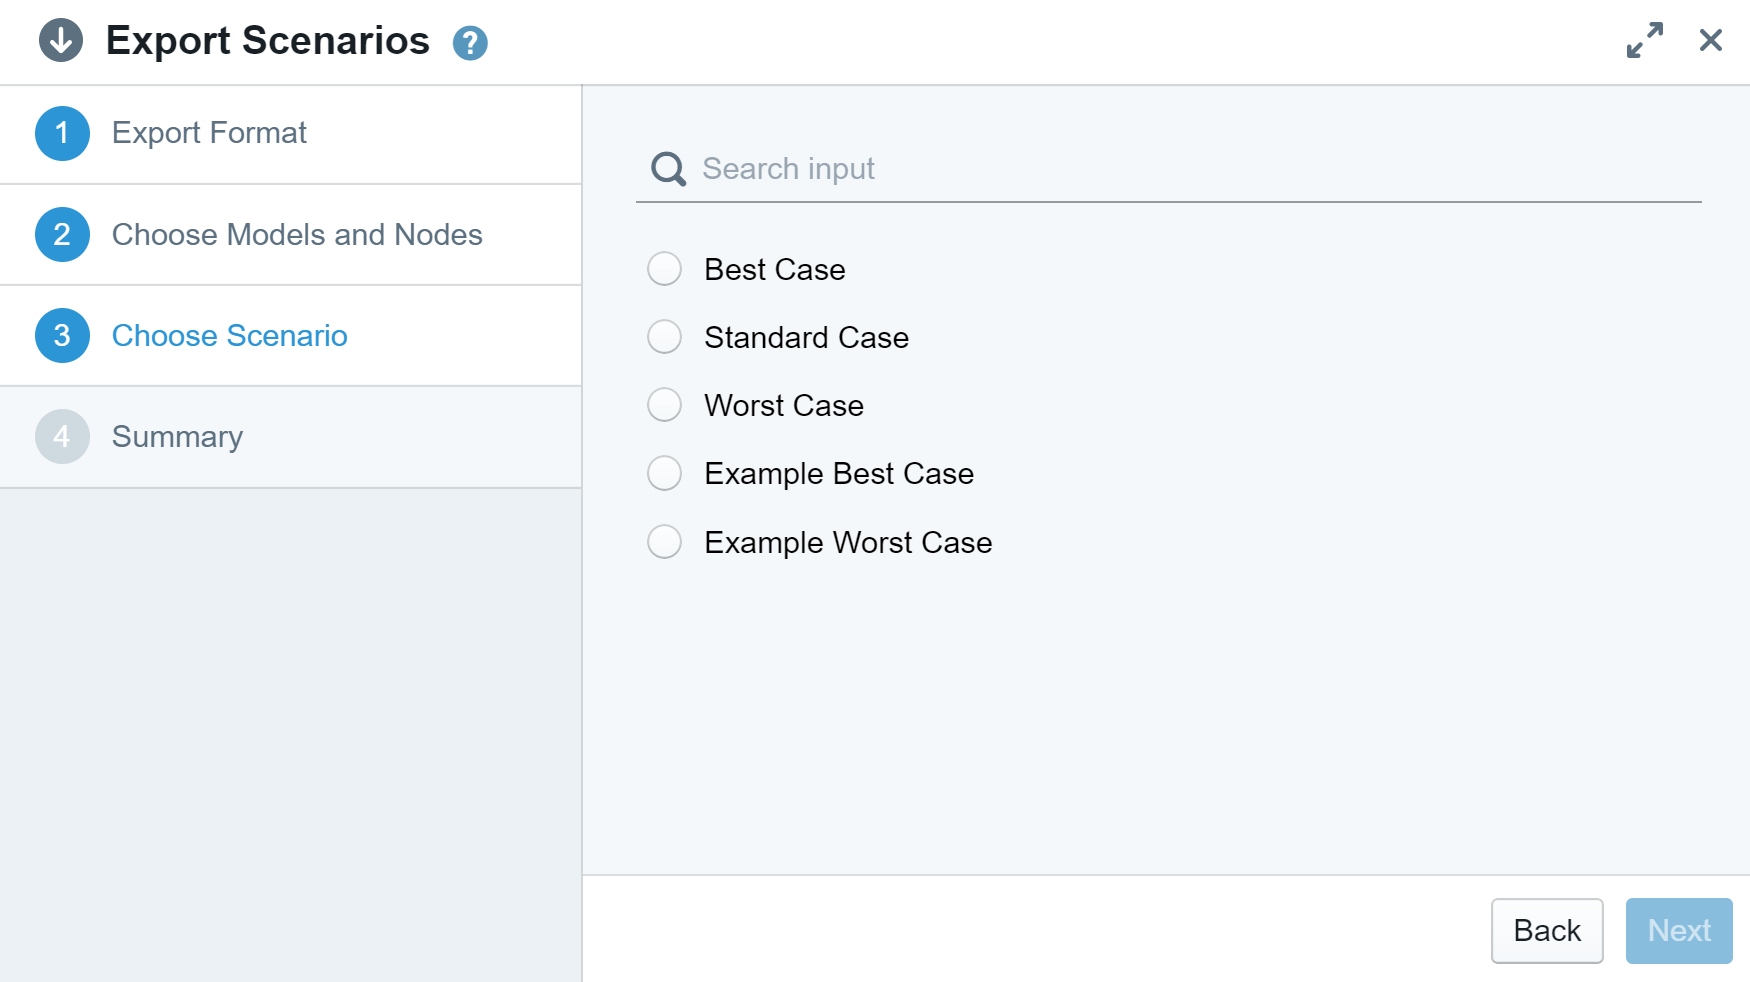
For the third step, select the scenario you want to export.

The final step contains the “Download now” button and an alternative link leading to the download of the file (to generate a link, a template has to be used).
Exporting a Scenario as an OData Feed and connecting to MS Excel
With OData, you can generate a link to a scenario in Valsight that is updated every time you change something in Valsight. OData is an open protocol that can be used by different software including MS Excel.
In this case, Excel will be used as an example.
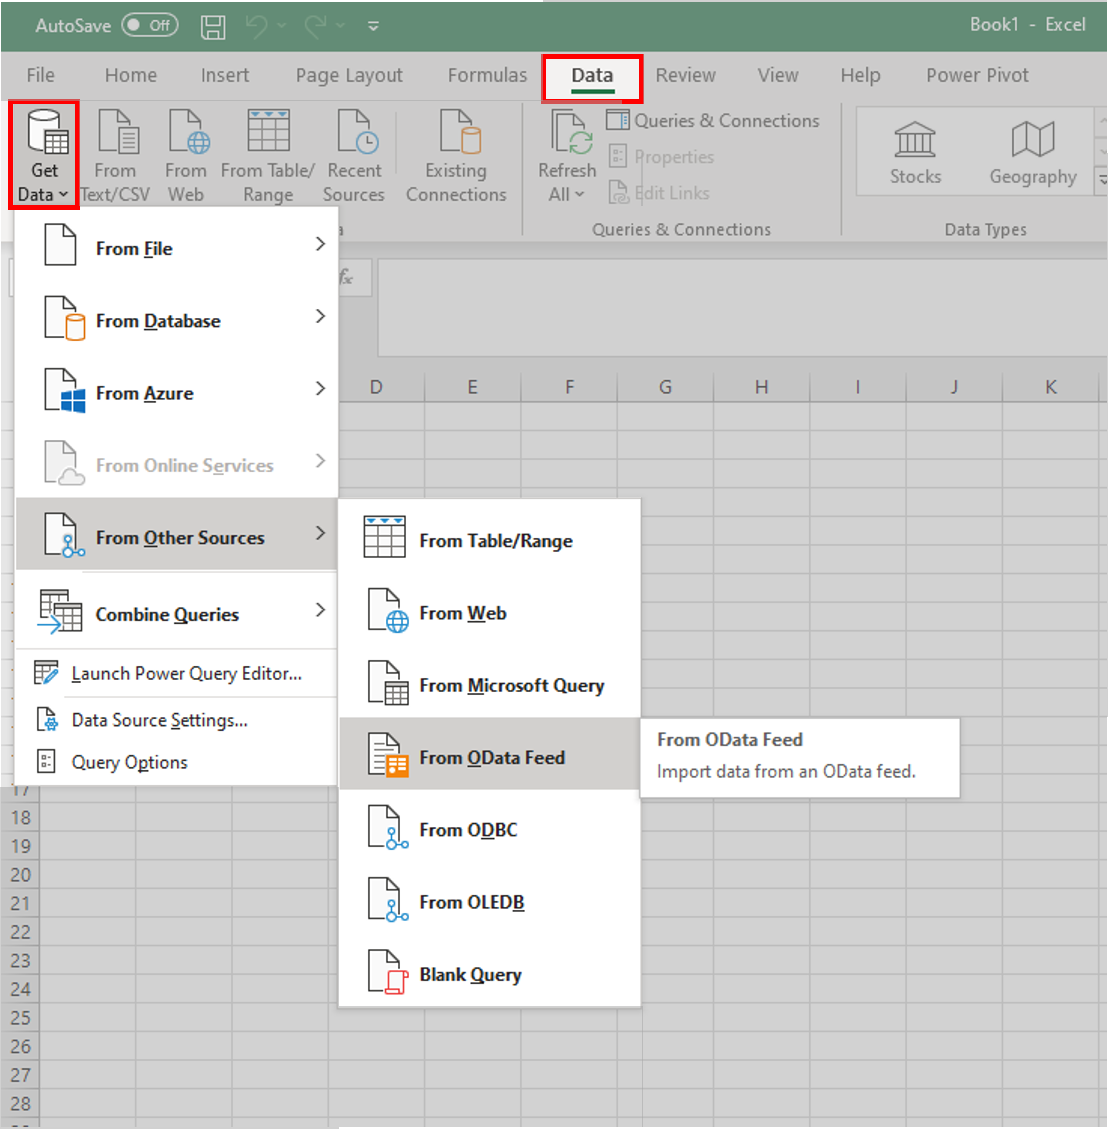
After creating a new sheet/document, go to ‘Data' and click on 'Get Data’.
Navigate to 'From Other Sources' and then 'From OData Feed' and click on it.
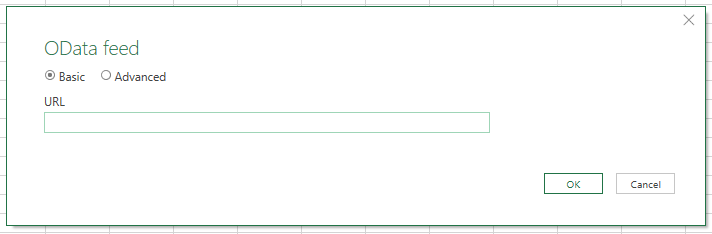
Following that, a pop-up window opens to insert the copied link you obtained from exporting a scenario.
Insert the link.
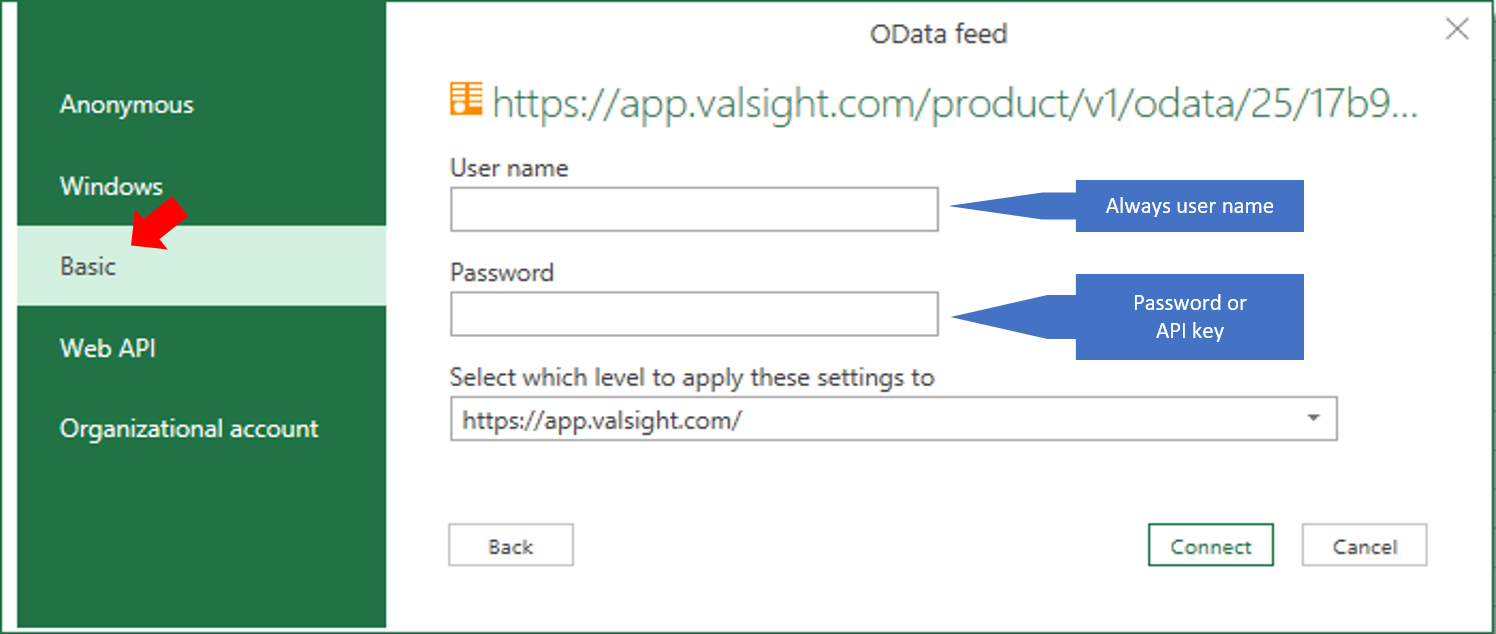
In the next step, a window opens with multiple login methods.
Choose 'Basic' on the left side.
Enter your username in the upper field.
In the lower field, either enter your password or an API key (Read API keys login on how to set up the API key).
Click on 'connect'.
Next, you will see a preview of the data.
Click on 'Load'.
The data will now be imported into Excel.
Importing a Scenario
In the project settings, scenarios can be imported via XLSX files.
Open the project settings to import a project.
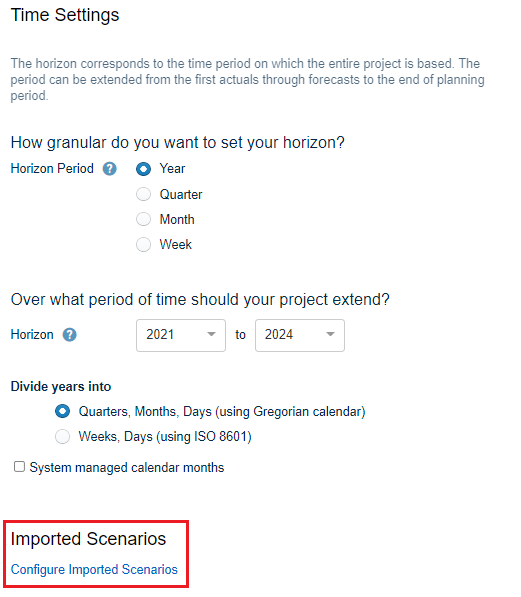
At the bottom of the settings menu, you can find the option to import scenarios.
Please look here for further information on the import of scenarios, how Valsight treats them differently than other scenarios, and potential challenges when using imported scenarios.
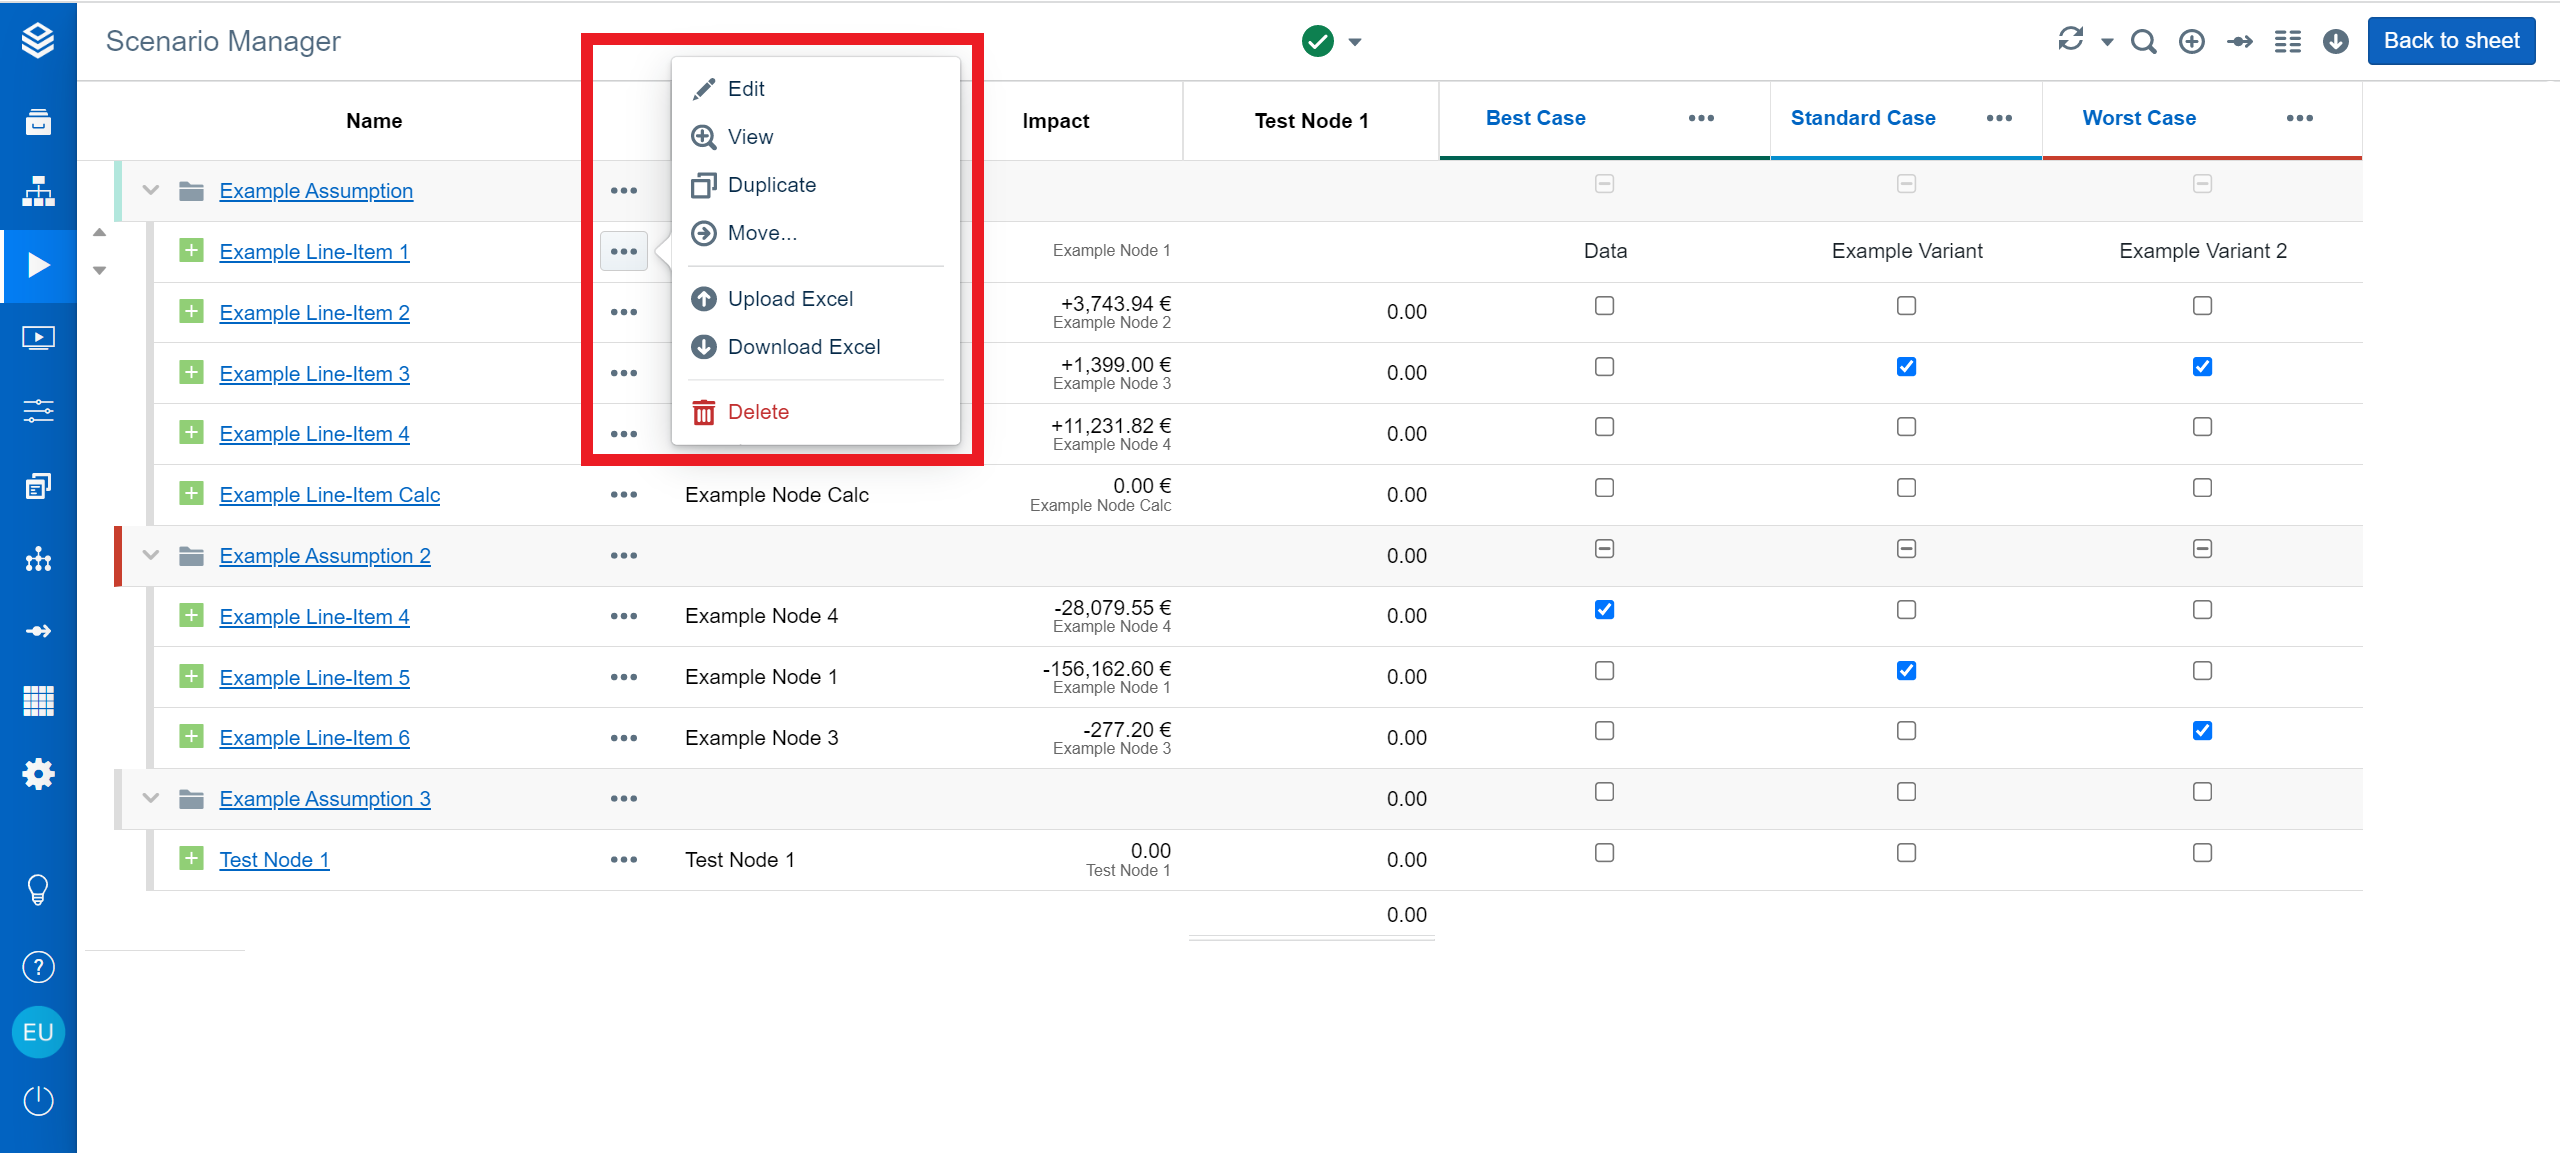
Assumptions
You can upload files for individual assumptions, save them for later usage, or implement data changes using Excel. Assumption data can be imported or exported as XLSX files.
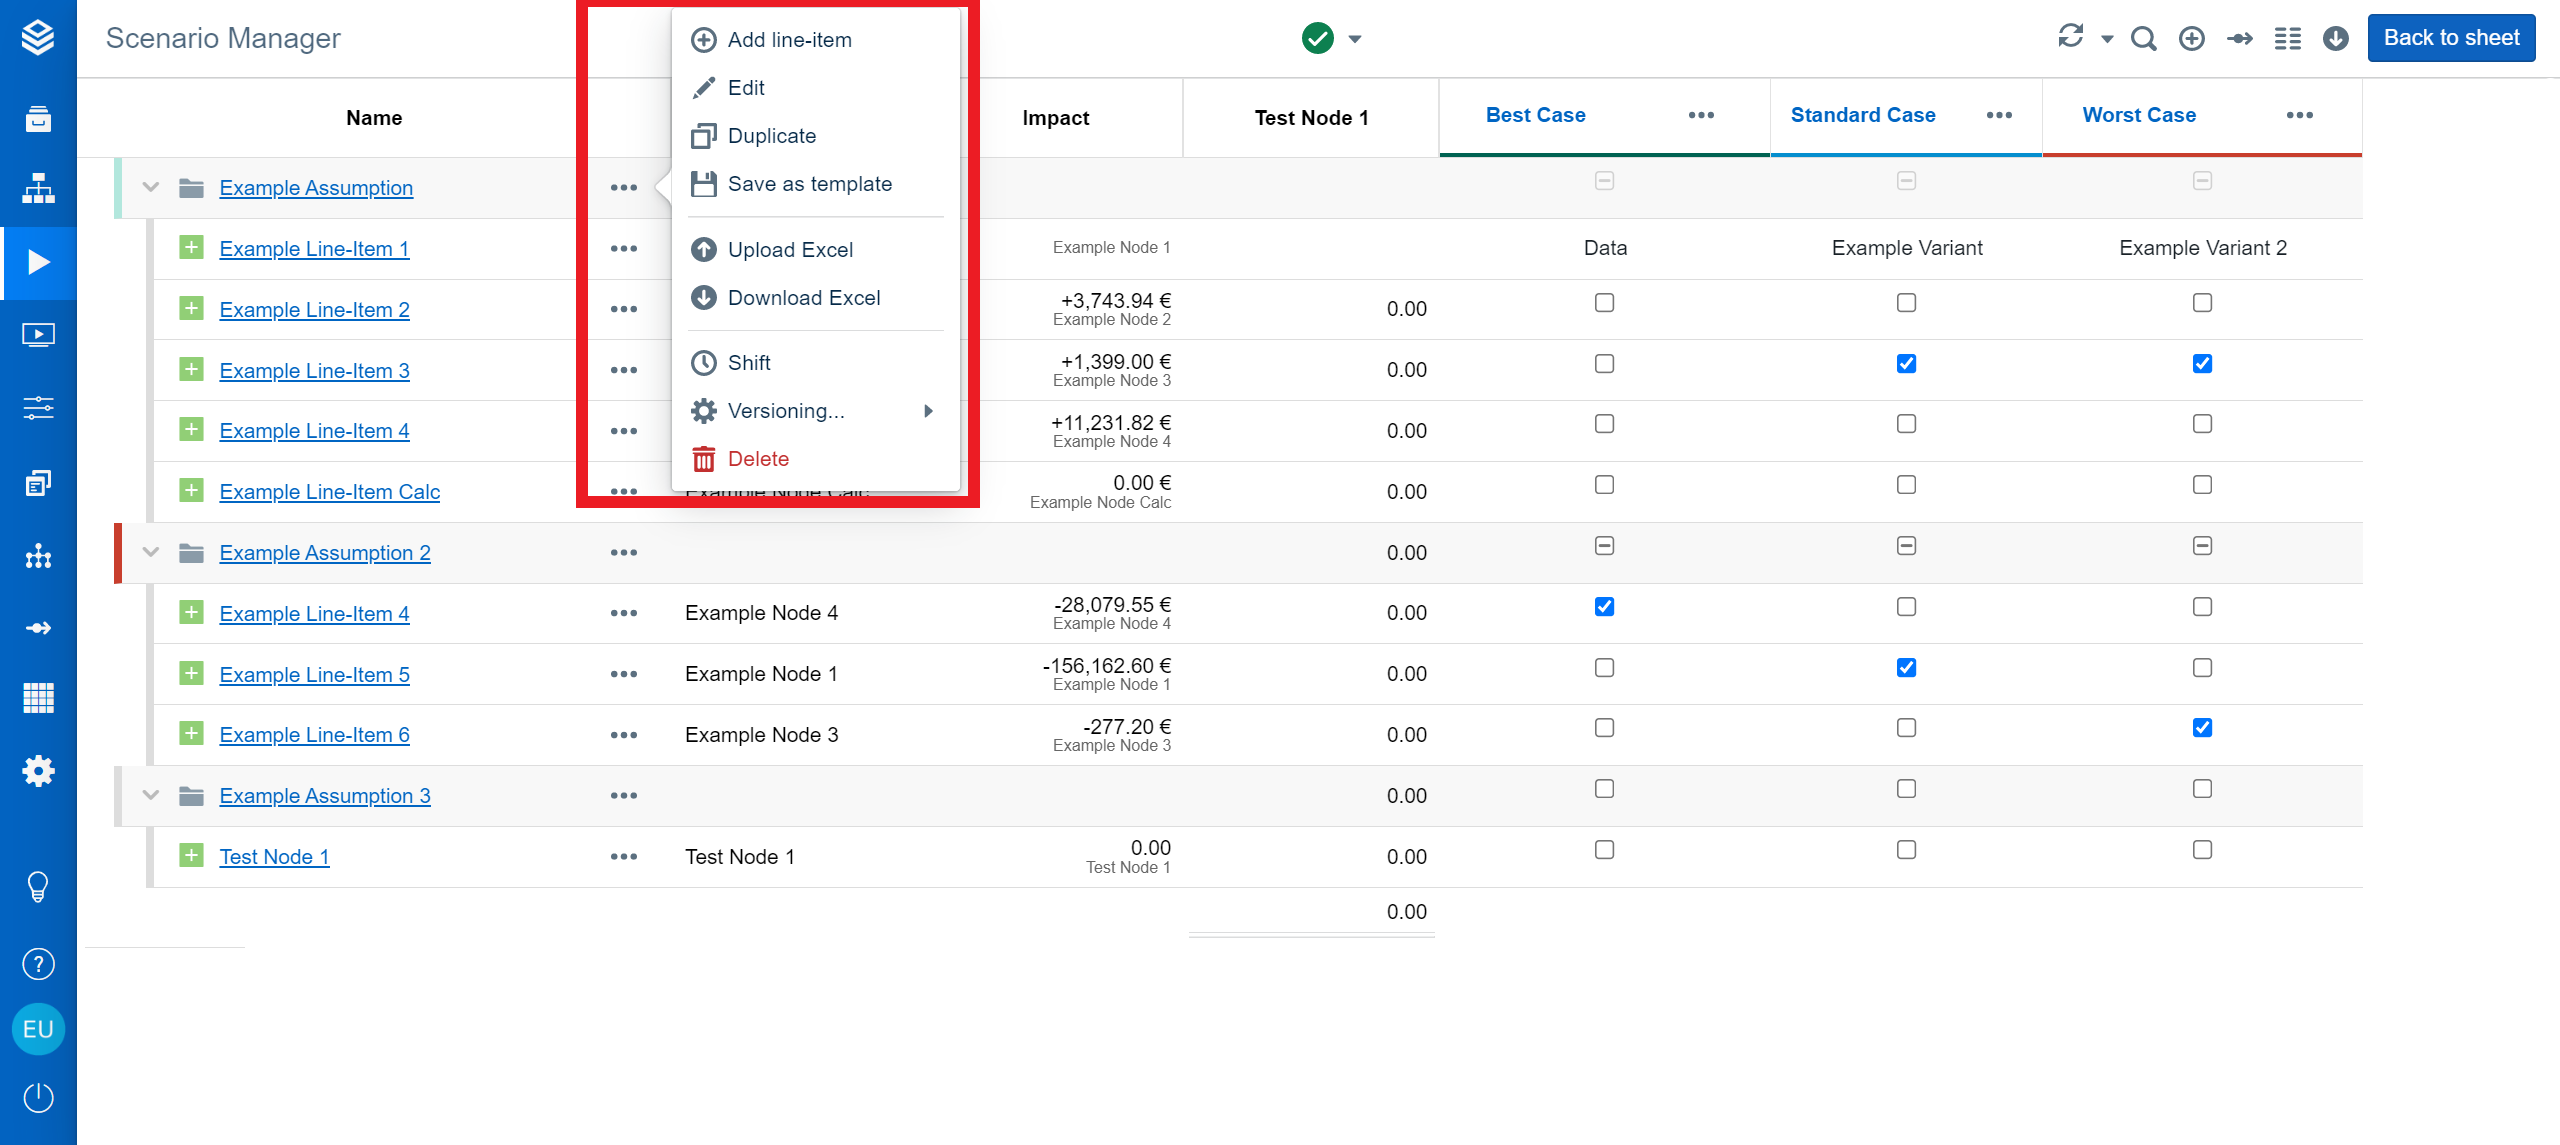
Instead of importing or exporting individual assumptions, you can also do so for all assumptions in the Scenario Manager.
Line-Items
Like assumptions, line-items can be imported or exported individually. This enables closer control over the data and, for example, changes in data.
Presentations
The presentation space has the option of importing an existing JSON file. This can be useful if you want to transfer created presentations. You can also export created presentations as JSON files and print or save them as a PDF file.
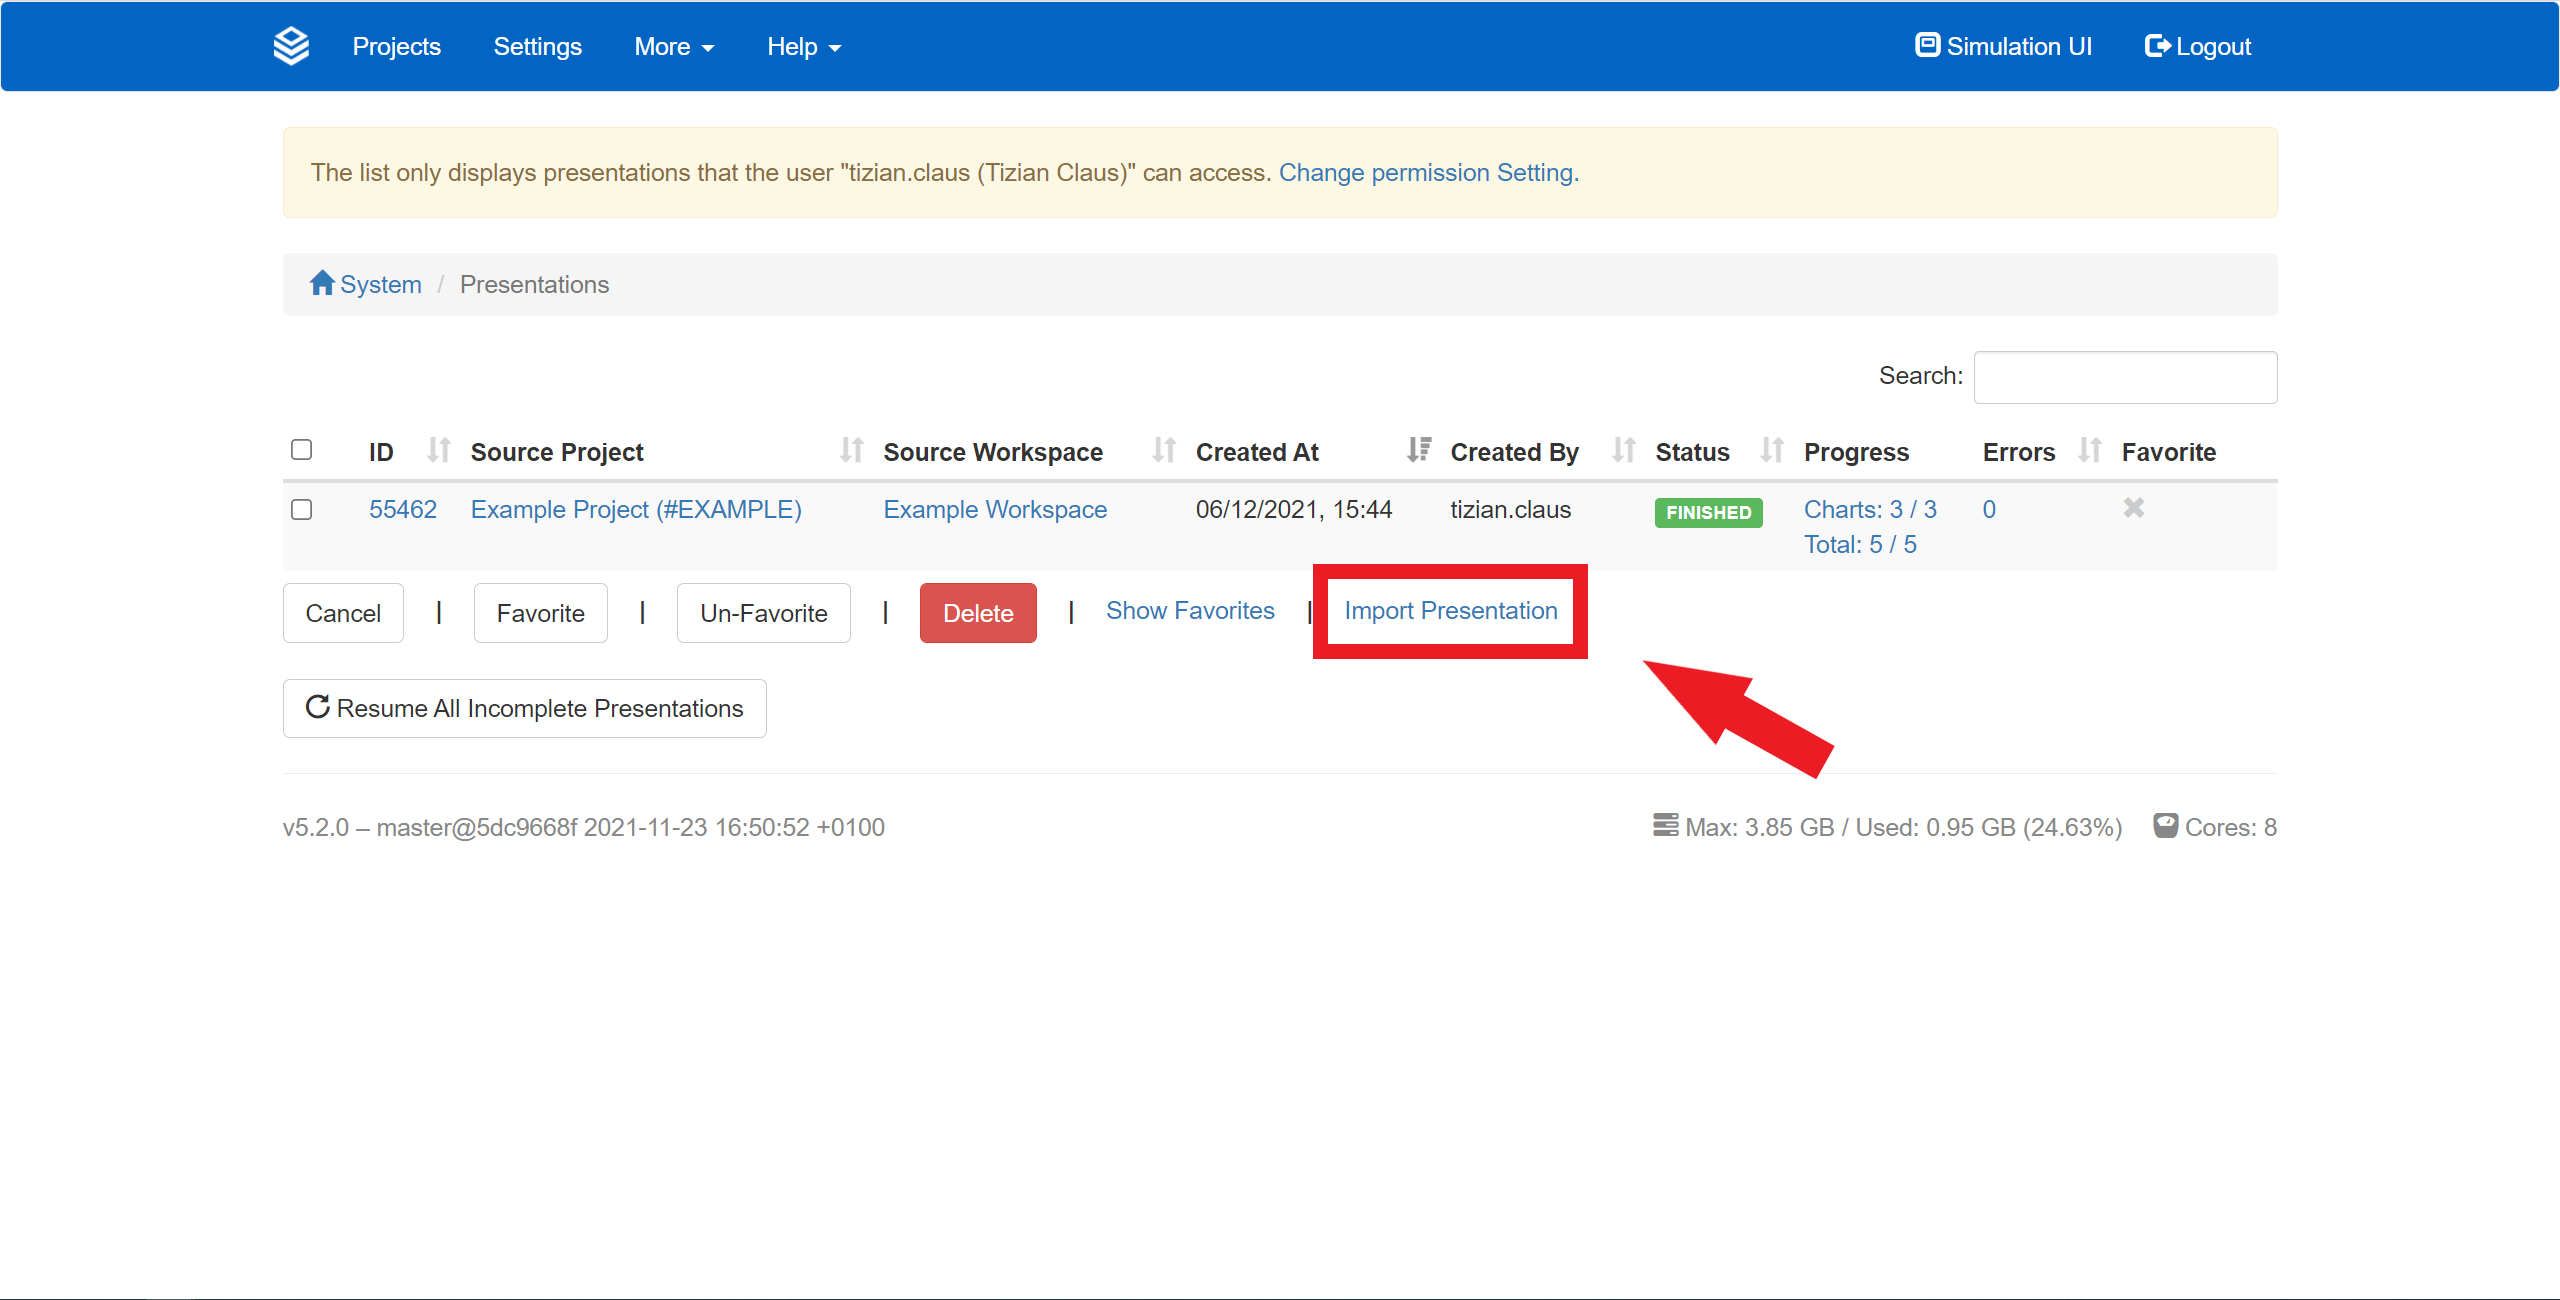
Click “Import Presentation” in the presentation space to import a presentation as a JSON file.
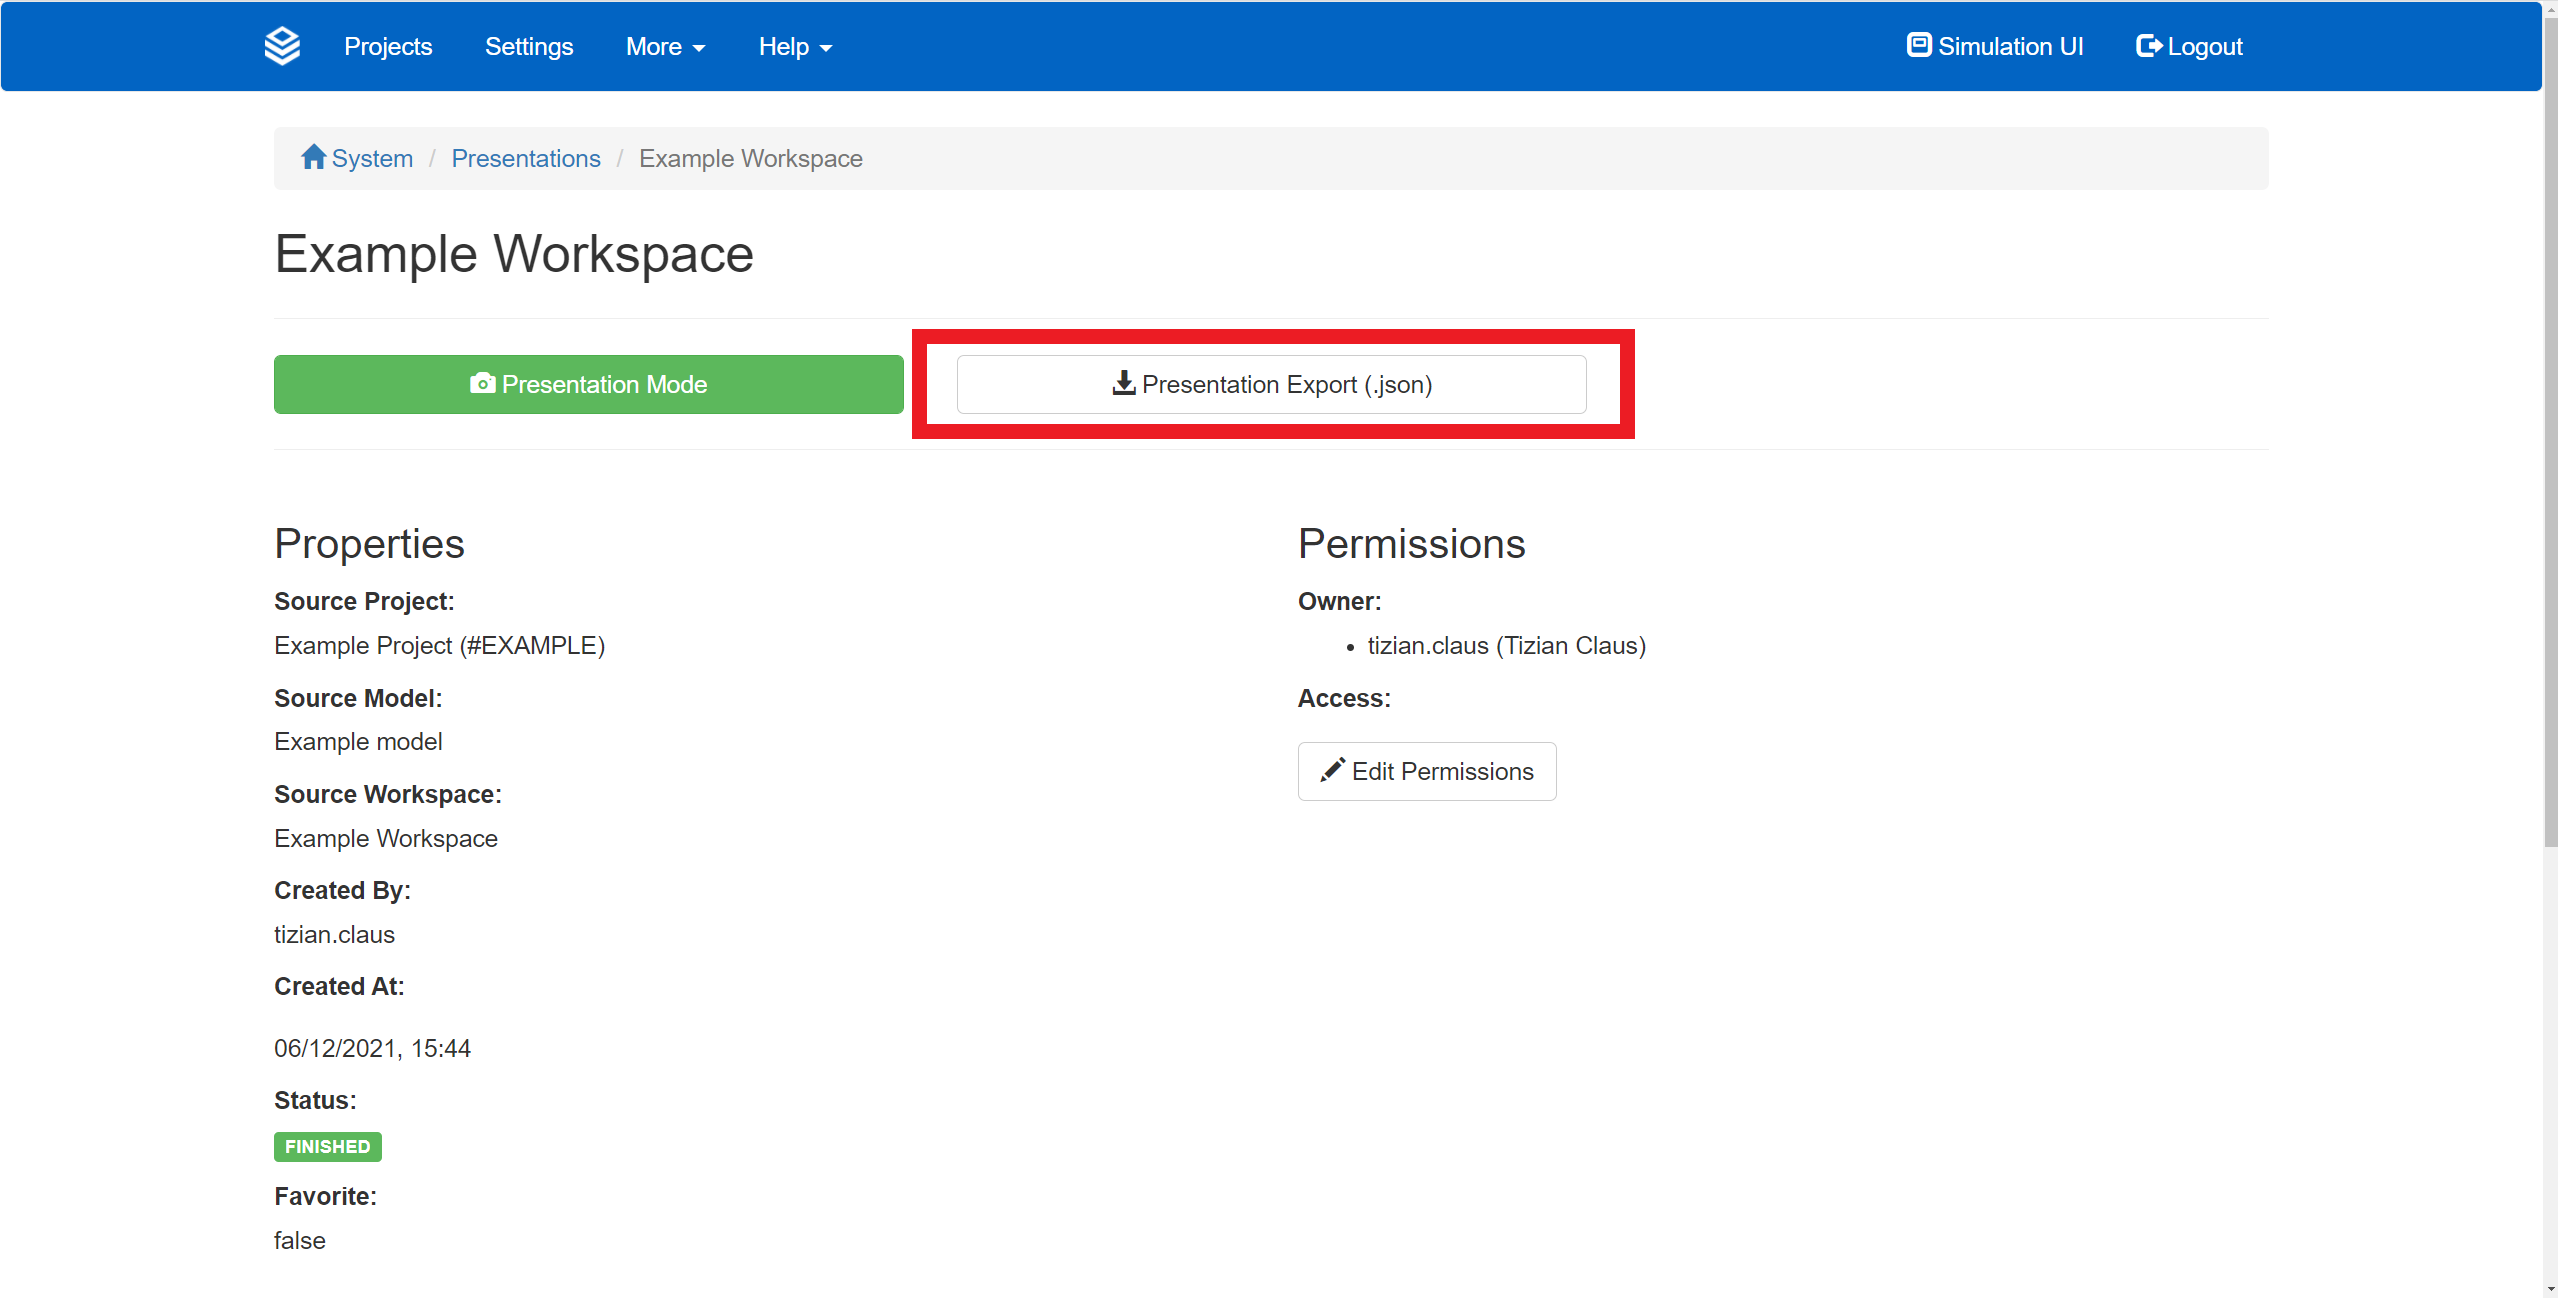
View a workspace in the presentation space and click “Presentation Export” to download a JSON file containing the presentation.
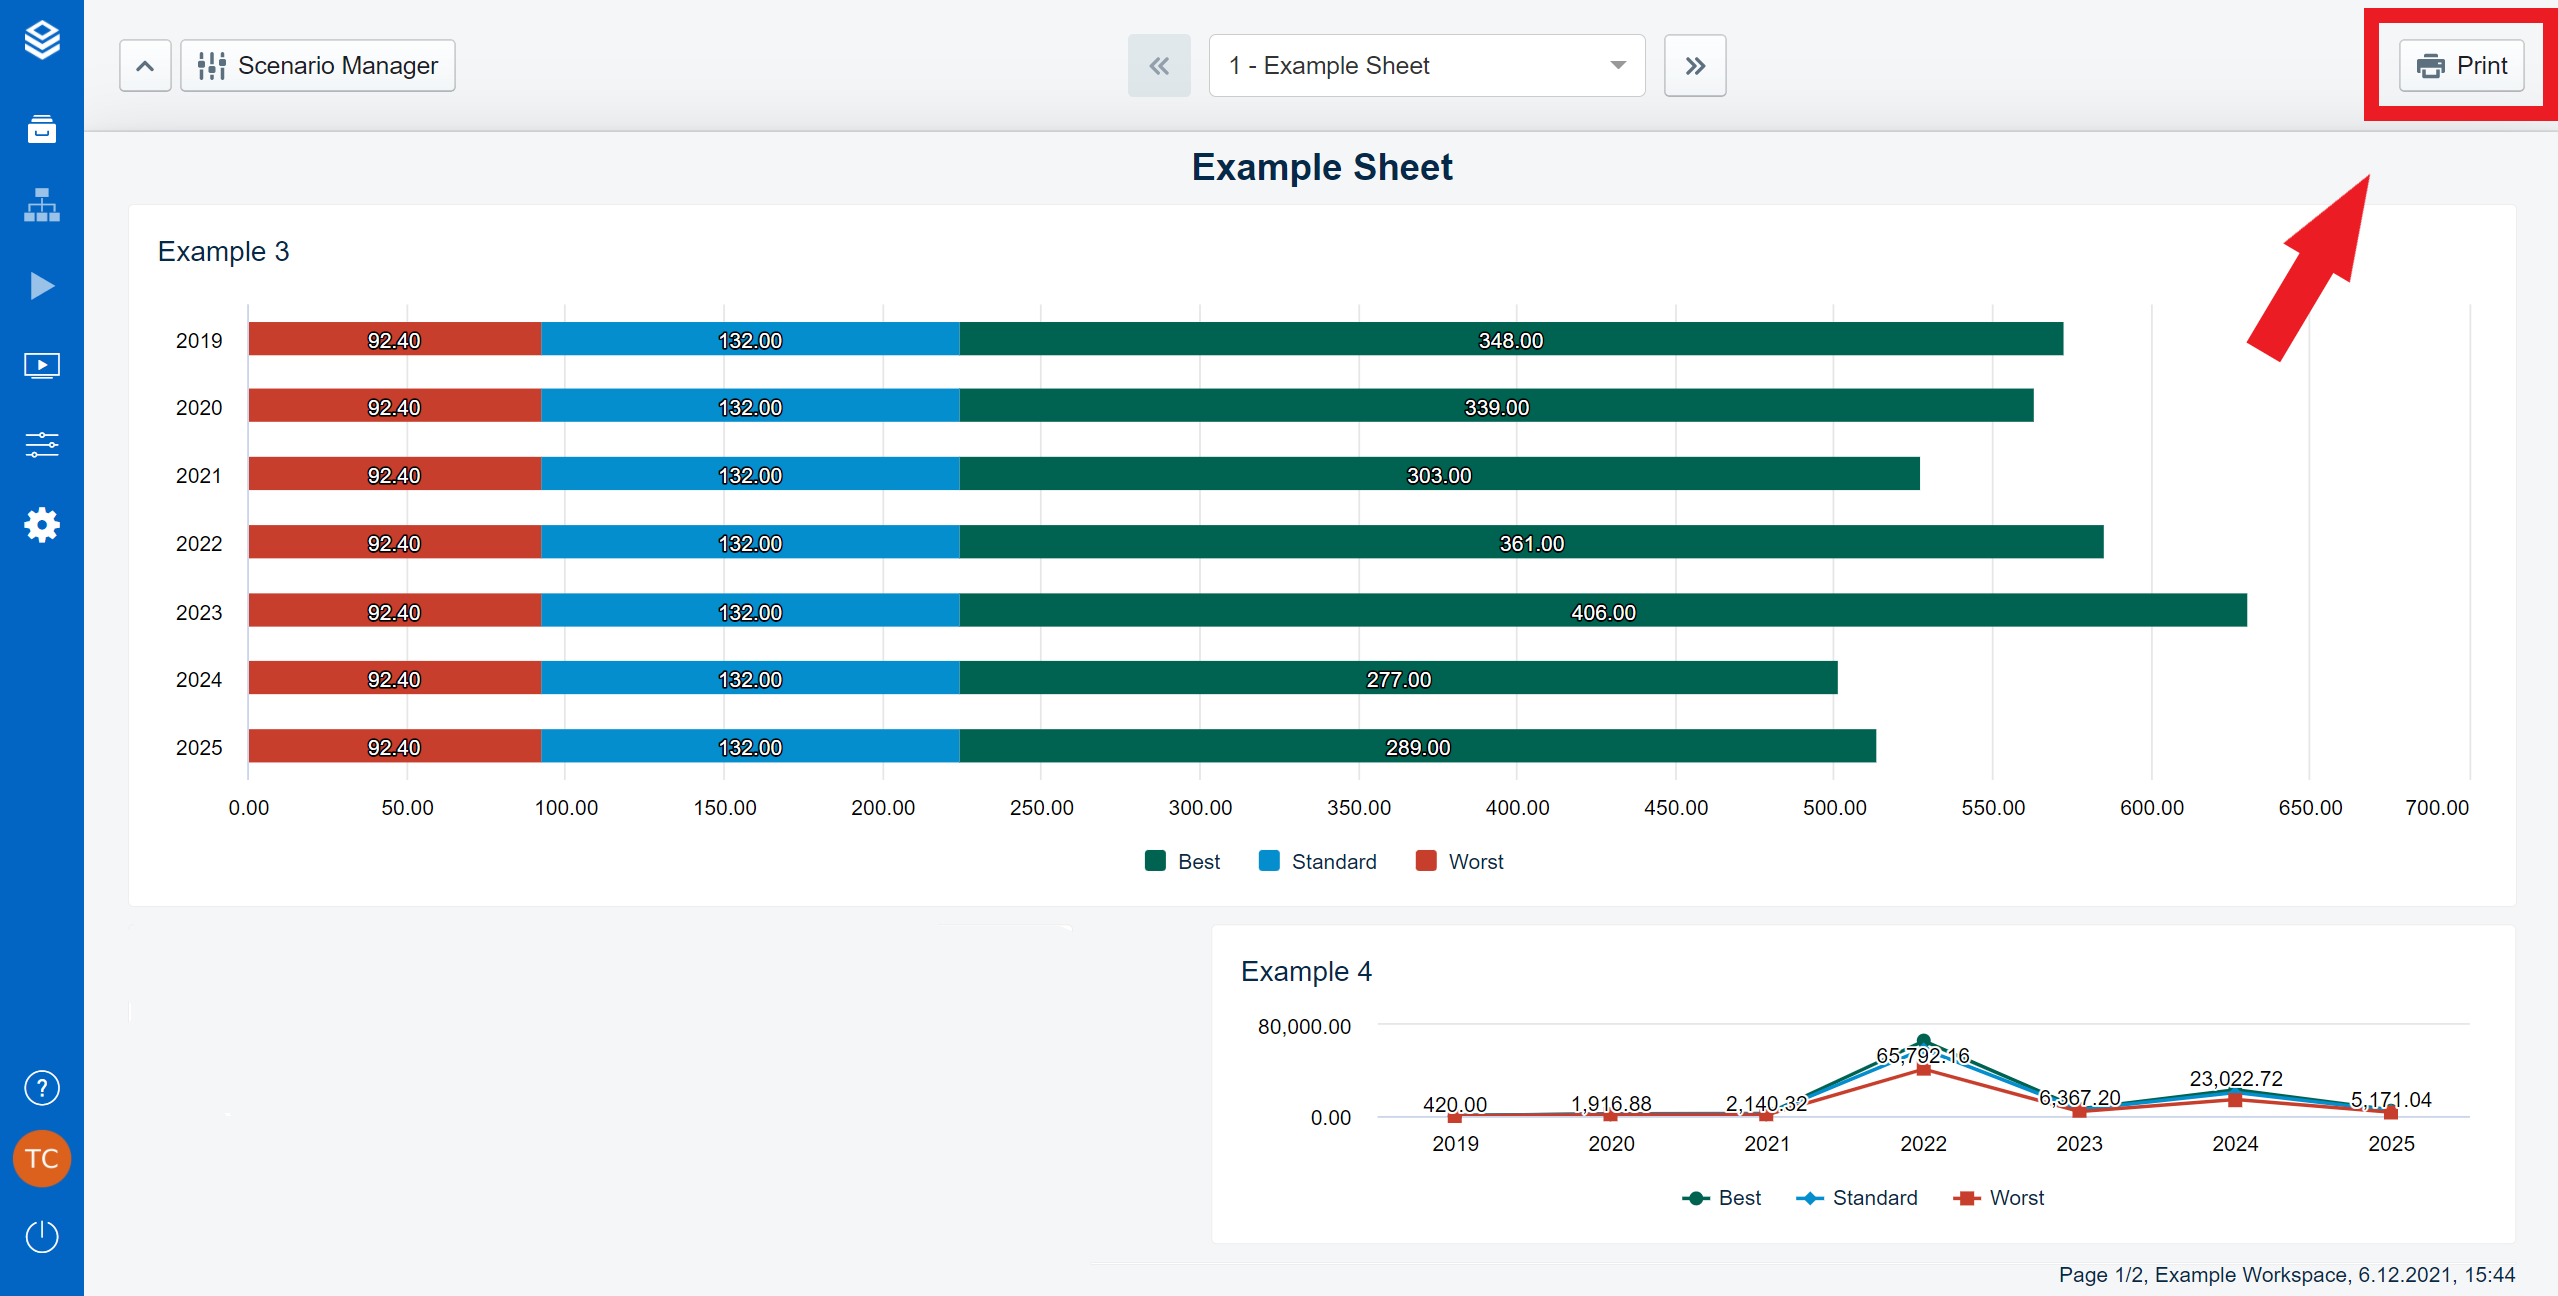
When viewing a presentation, click “Print” in the top right corner to print the presentation or save it as a PDF file.
Data Validation
Imported data have to conform to some limitations in order to be processed by Valsight. To make sure that data are correctly formatted, Valsight offers several options for validating the conformity of imported data.
The most basic data validation is carried out in the data source space. Here you can validate data against your dimensions and levels to make sure Valsight can process them properly.
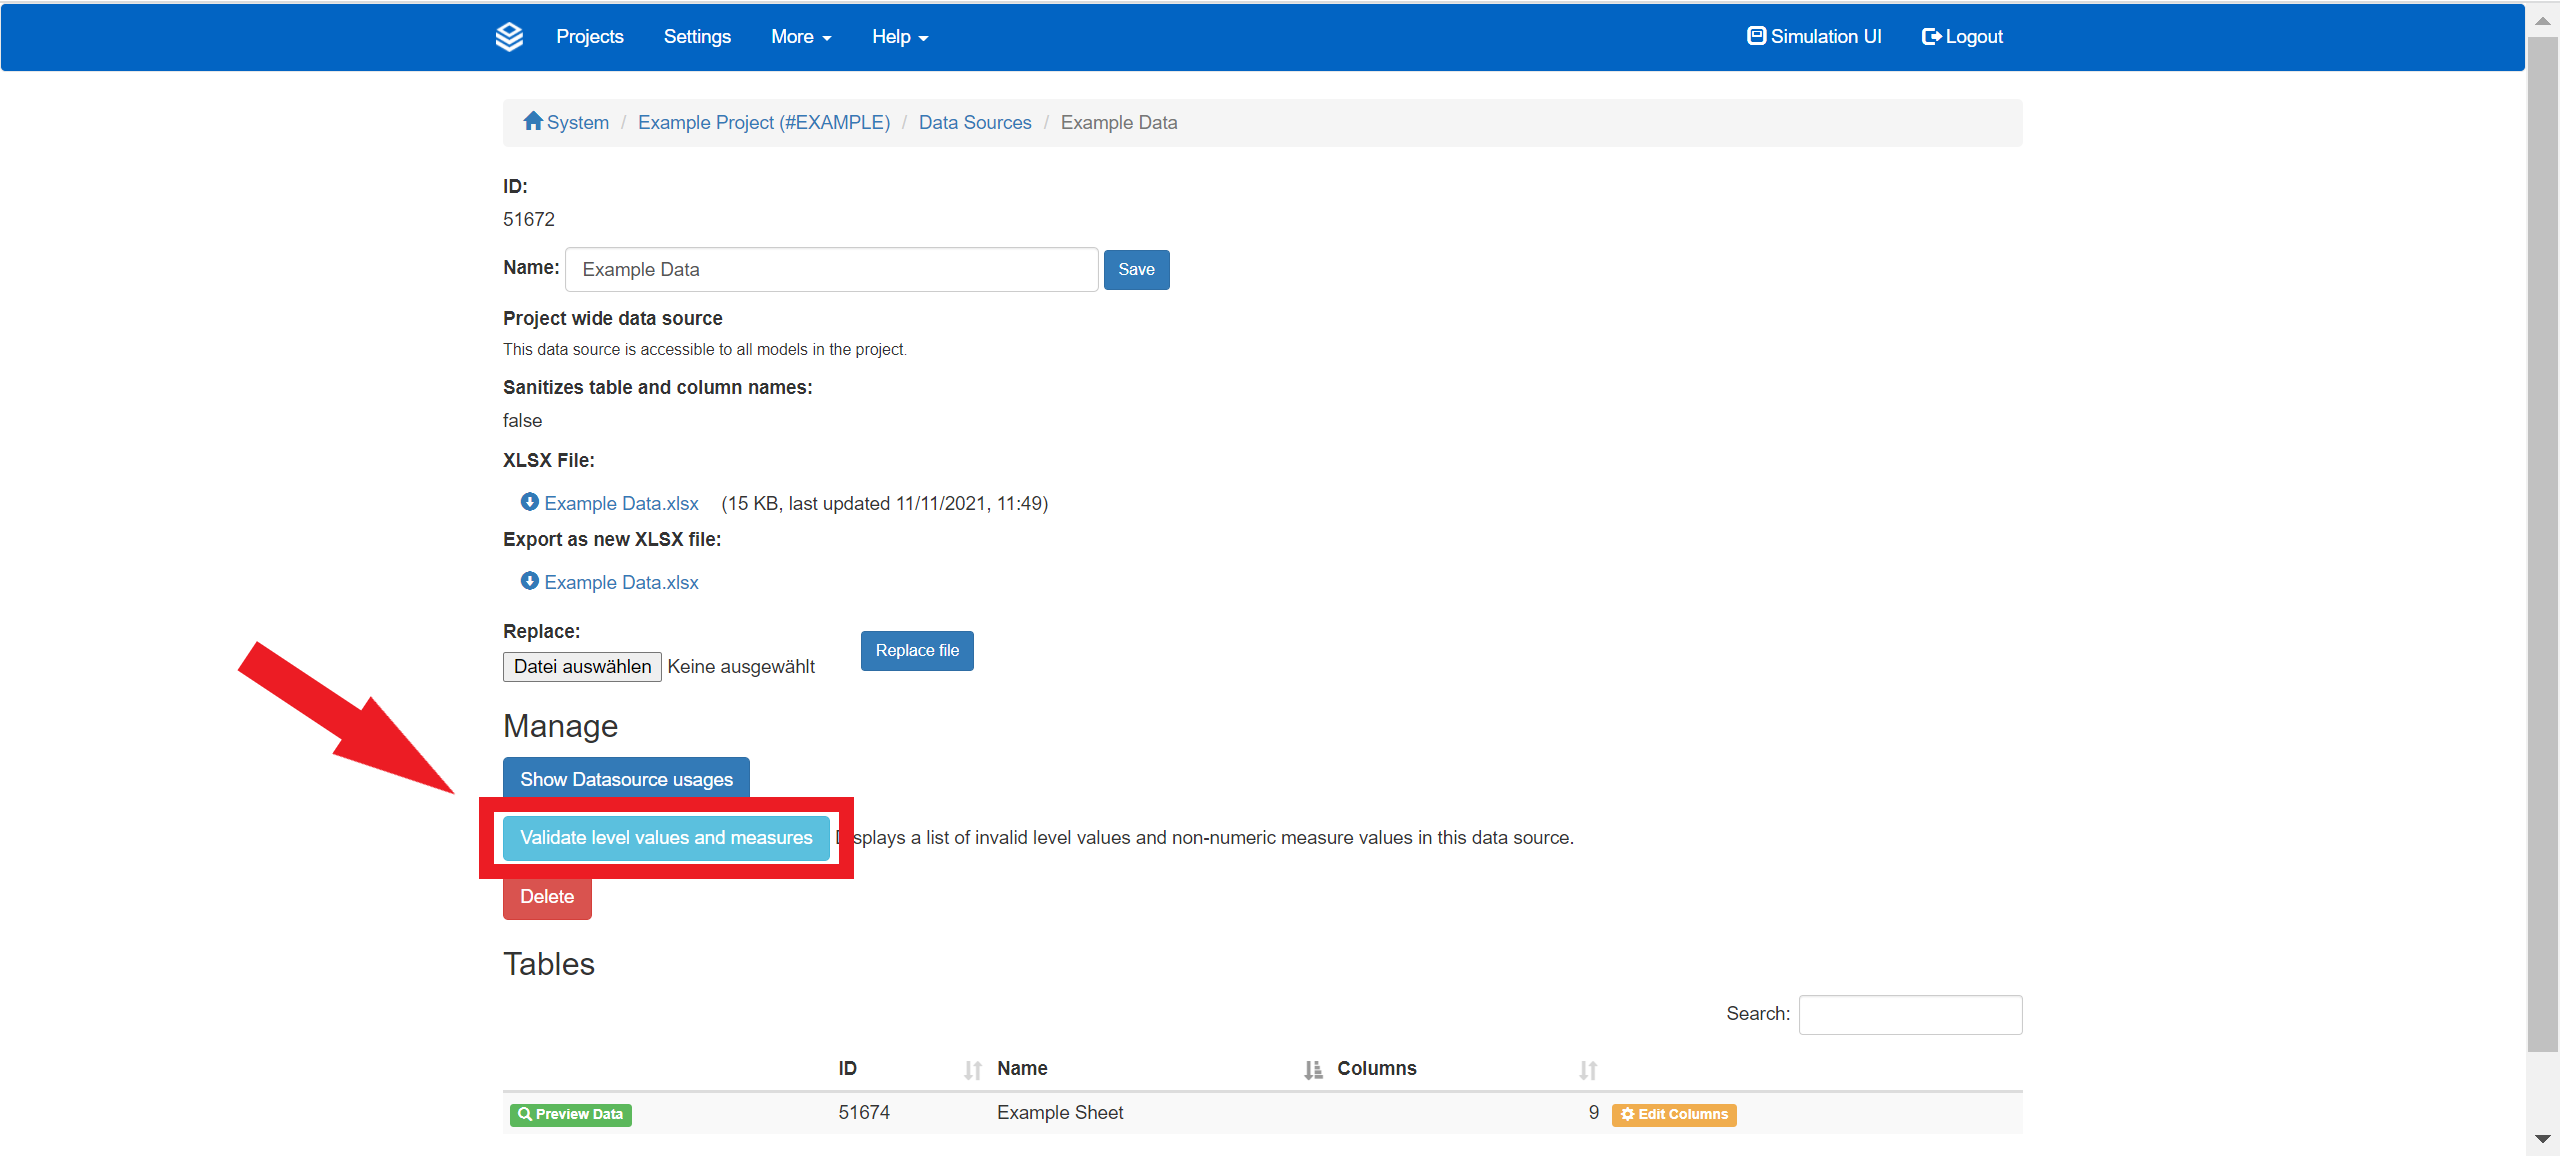
The data source space contains the button for validating datasources.
Data can also be validated during the modeling of your base model. By doing so, you can make sure that your nodes contain no syntactical errors and that your source data could be calculated correctly.
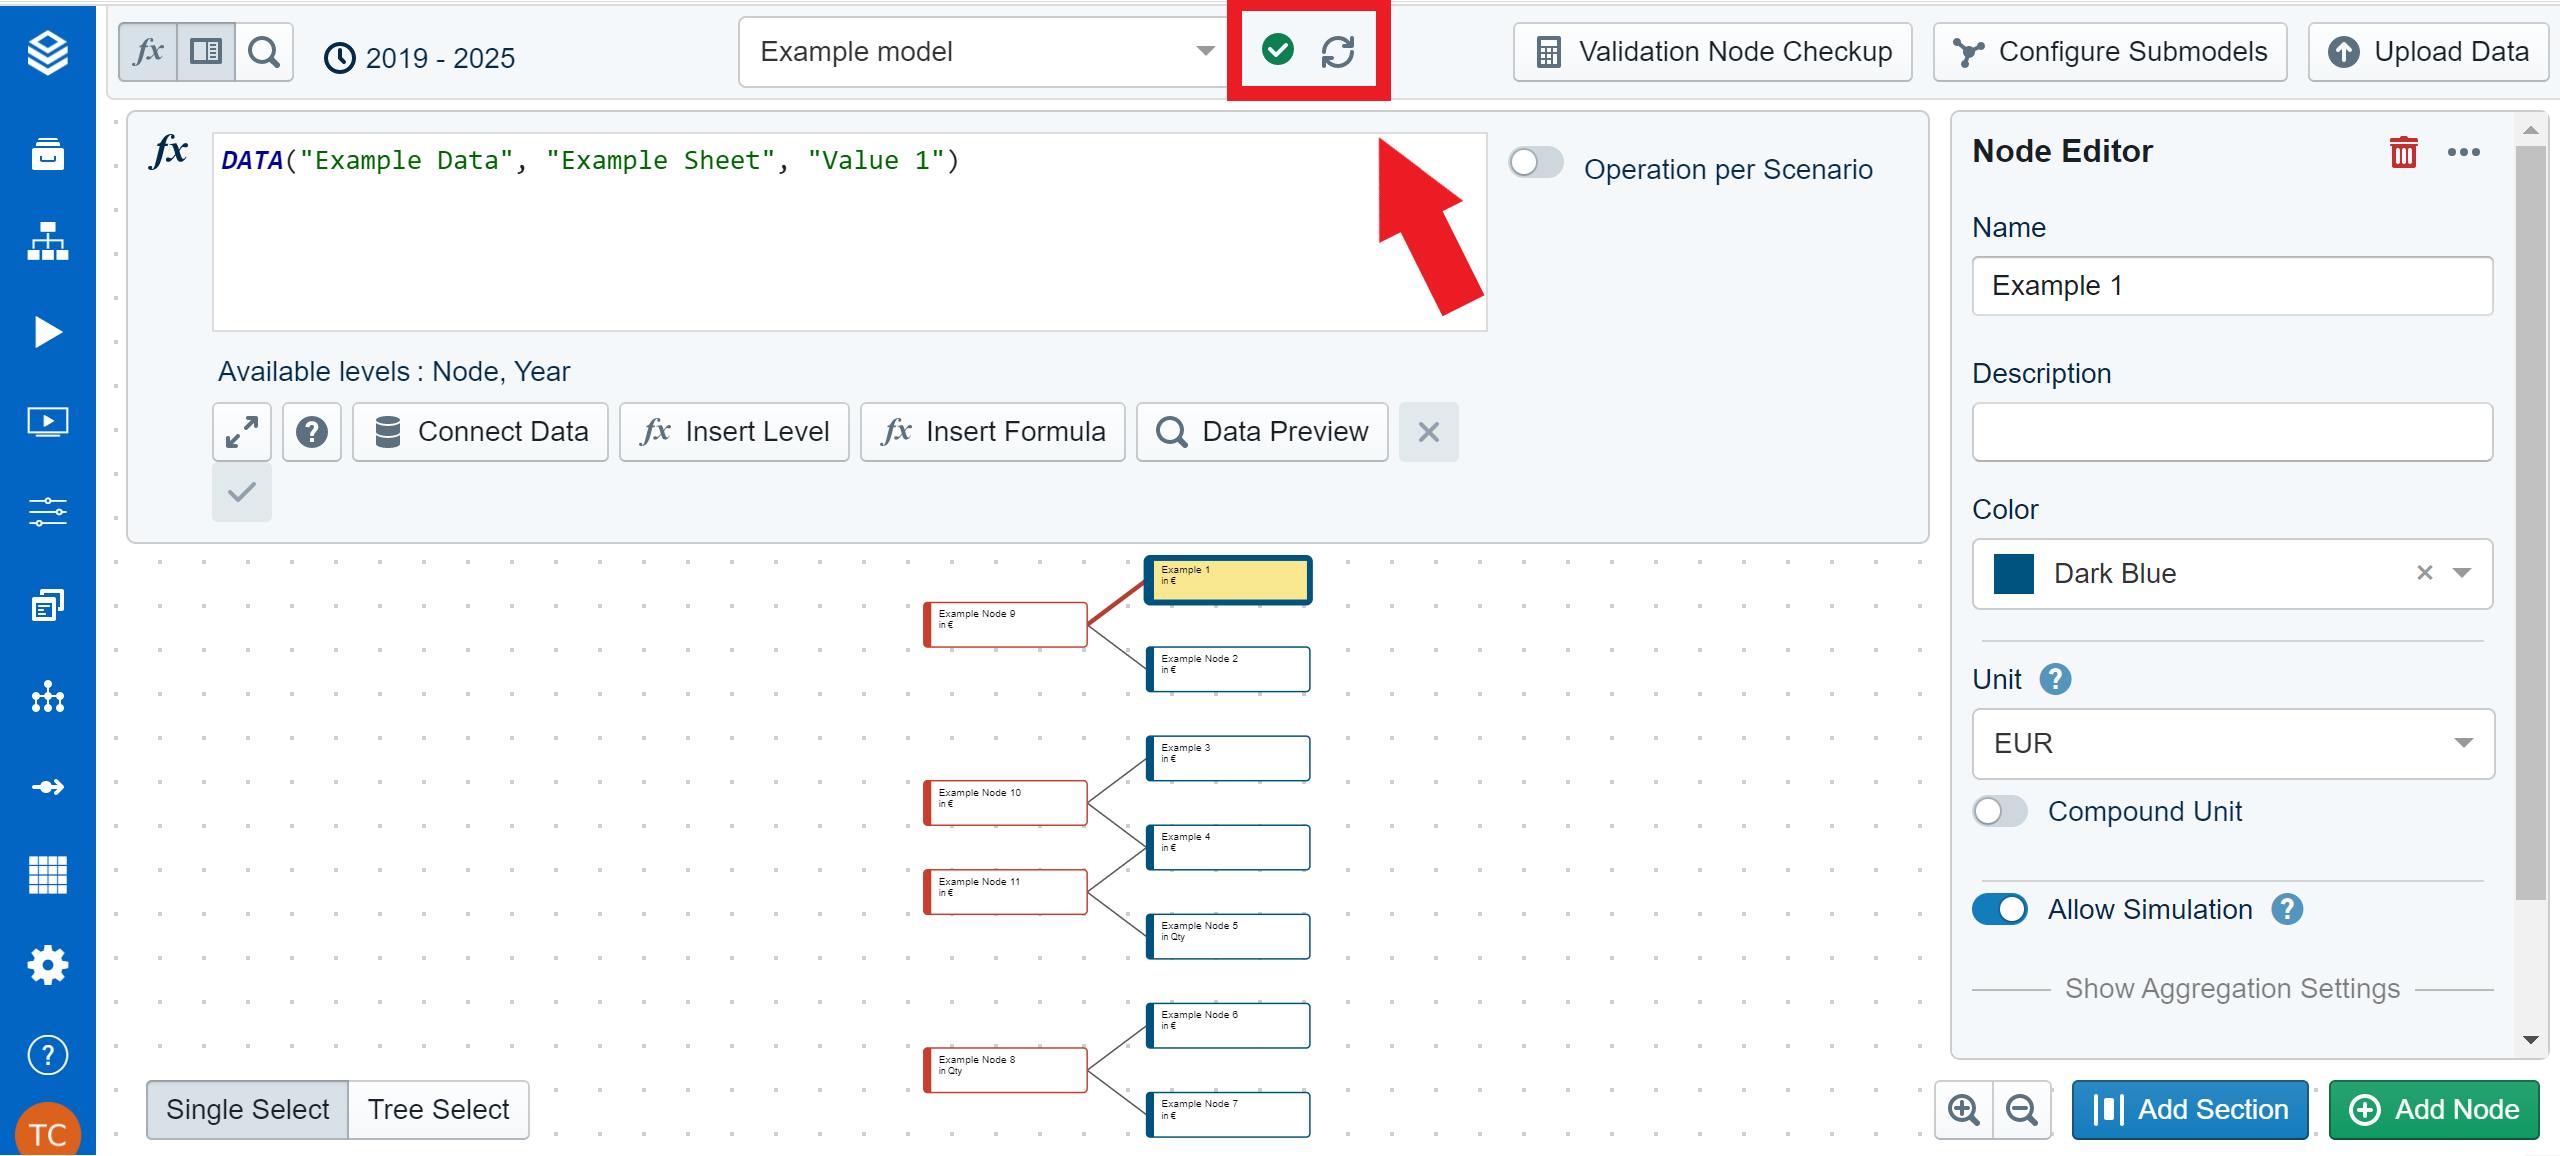
In the middle of the top bar, you can find the validation function when in the model editor or a workspace.
For additional help regarding data validation, please refer to the data validation guide.
Limitations and Data Upload Errors
Valsight allows you to build complex models and calculate simulations based on your data input. The performance of Valsight depends on the complexity of the base model and the amount of data that is calculated. In-depth information and guidelines on the technical limitations of Valsight can be found here.
Uploading data can sometimes fail and result in error messages or inadequate data. More information on common mistakes and errors can be found here.
Template Manager
The template manager allows you to quickly save configuration settings for further use with other projects.
An extensive guide on how to create templates can be found here.