
Creating & Managing Workflows (For Admins)
Workflows are Valsight's internal project management tools that enable a smooth collaborative process across multiple business units and levels. We recommend Workflows for larger, cross-departmental projects such as multi-year planning and forecasting cycles. A Workflow defines how a project works. It is reusable, which is particularly useful for recurring projects such as forecasting.
How Workflows Work
A Workflow allows multiple teams with multiple Workspaces (i.e. EU, DE, and EN),
to work on the same Scenario(s) (i.e. MYP – Base Case & MYP – Best Case),
in a pre-defined order (i.e. EU – Base Assumptions -> DE & EN Measures -> EU – Consolidation).
It allows Teams to view, review and build upon previous assumpions, measures and simulations, submit their own as well as eases the control and review process of these.
Navigating Workflows
The Workflows can be found under the ‘Workflows’ icon icon in the NavBar. The Workflow page consists of two tabs for an easier management; ‘Ongoing’ & ‘Completed’.

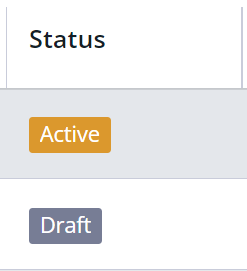
Workflows States:
Draft – A Workflow which has been created but not started yet. Can still be edited.
Active – A Workflow which has been started and is currently ongoing. Only basic properties such as name can be edited.
Completed – These are Workflows which have been ended once all Workflows steps have been set to ‘Done’.
Cancelled – Workflows which have been stopped without all steps set to done.
Once a Workflow has been started, no new steps can be added.
Both, completed, as well as cancelled Workflows can be duplicated and re used later.
Creating a new Workflow
Click on ‘Create a Workflow’ to open the configuration dialogue. Here you will have parameters which you can set:
Base Settings: General settings for a basic Workflow
Name: The name of the flow. It is recommended to name it so that it is clearly understandable what it is. Keep in mind that individual contributors will have to chose it when importing or submitting their Scenarios, i.e. company forecast.
The Scenario names that you choose in the setup of your Workflow will define the Scenarios you want people to collaborate on in your Workflow. Each user will be able to add assumptions to these Scenarios. Other users will be able to see these changes and built upon them in their own workspace.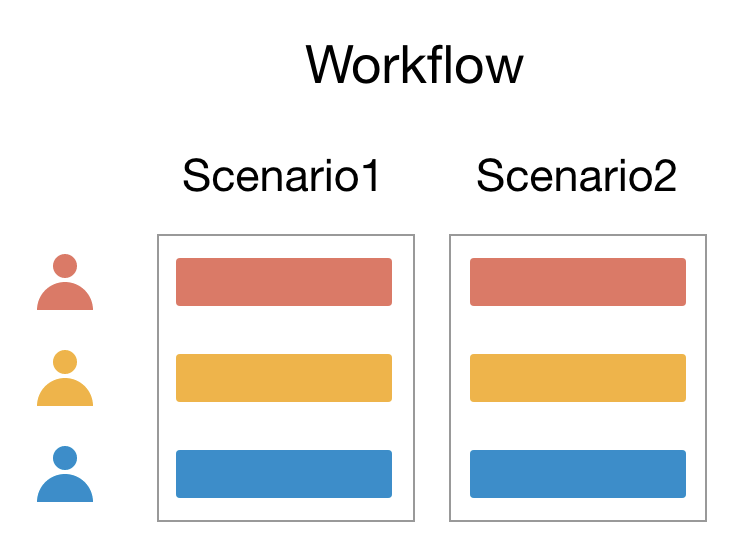
As Workflows can be repeated, it is best to not include version specifics in the name (i.e. 2024 or v1). Use the Version field for this (see below).
Create Scenario: Starting a Workflow will create one or more Scenarios in each chosen workspace. Individual contributors will then be able to submit their measures and assumptions in these Scenarios. To name the Scenarios, type the Scenario name followed by a comma (,). Press enter to confirm.
Description
Version: You can leave this blank if you do not wish to repeat this Workflow. If you do, you can give this specific version of the Workflow its unique name to identify them easier, i.e. ‘Q1’, ‘2024’, ‘FC 3+9’, ‘v1’…
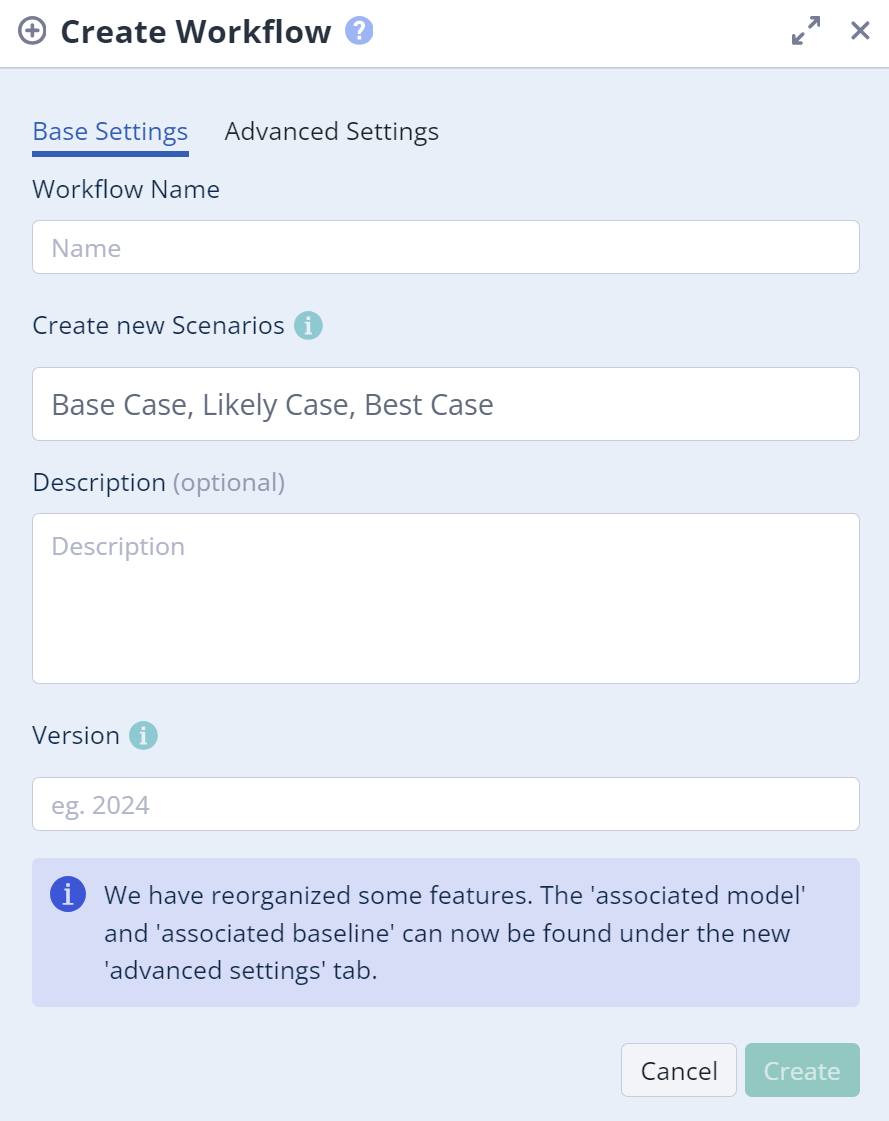
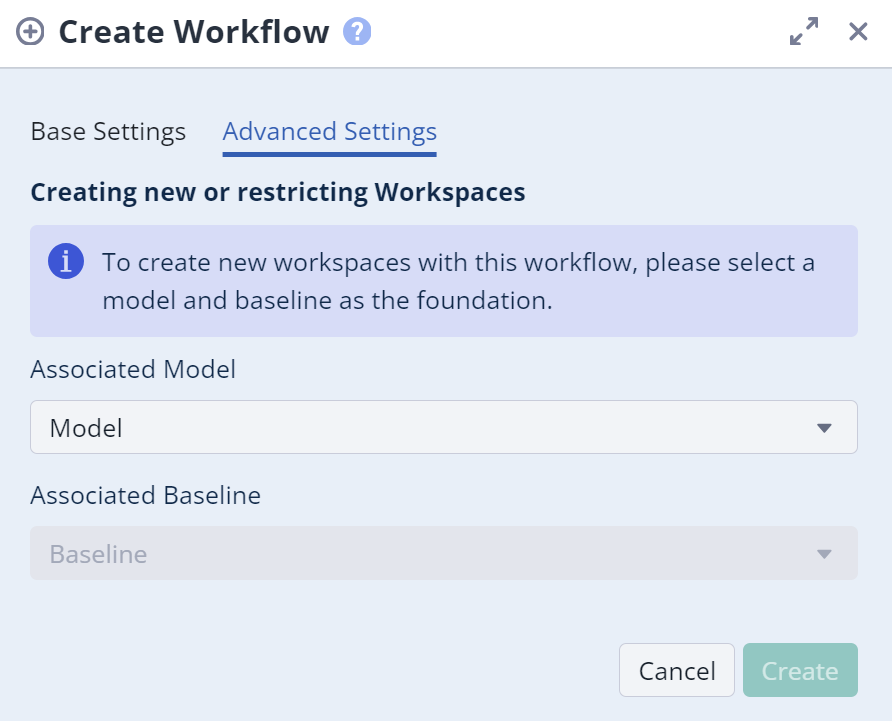
Advanced Settings: These are optional settings which are necessary in case you wish to create new workspaces with starting this Workflow. I.e. a consolidation workspace.
Associated Model: Which model should the new workspaces be based on.
Associated Baseline: Which baseline should these workspace use.
New workspaces will be named after the Workflow step. To create a new workspace, simply leave the ‘Associated workspace’ field empty when creating a Workflow step (see below).
Configuring the Workflow
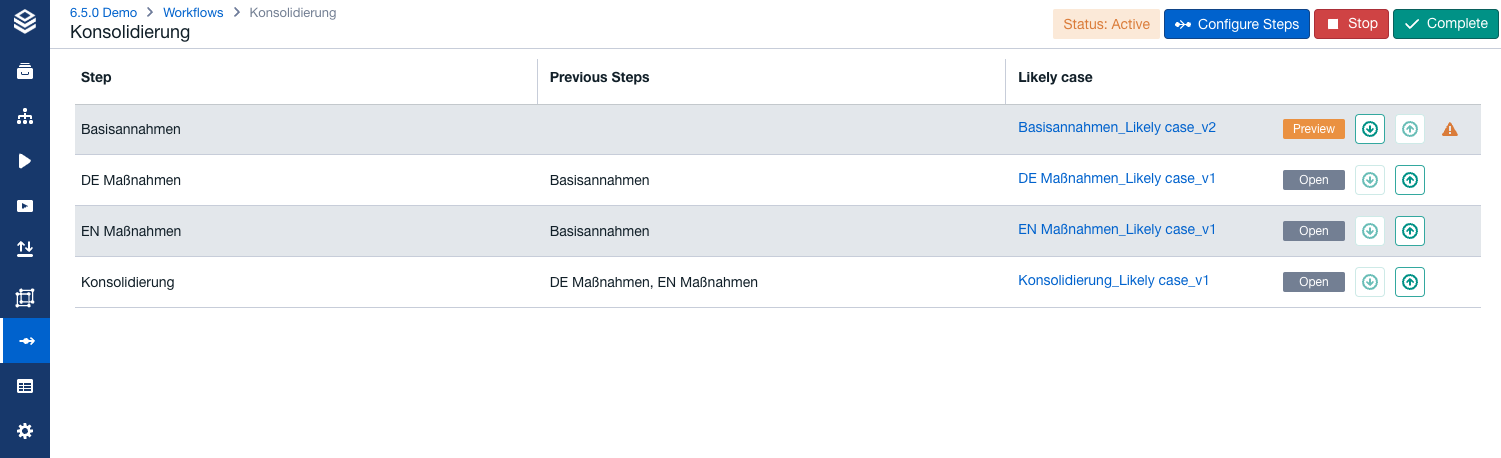
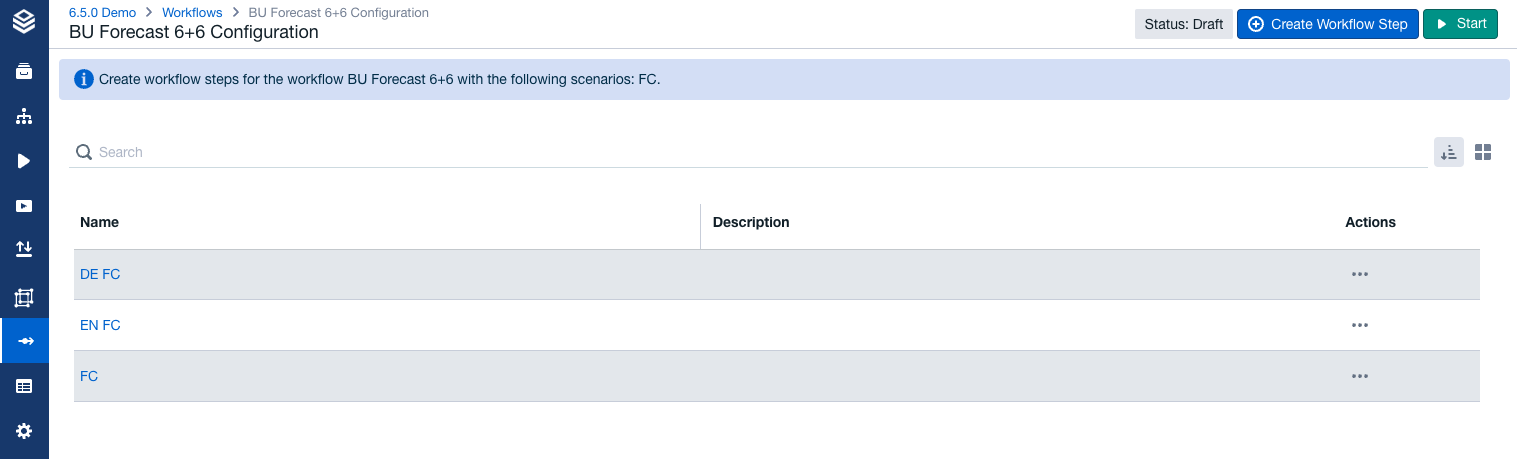
A Workflow consists of multiple Workflow steps. These have a specific order and can be dependent from one another. To configure the Workflow, click on the Workflows name once it is in ‘Draft’ stage.
Workflow step stages:
Open: The step has not been submitted yet
Preview: The step has been submitted. If necessary, it can be reviewed now.
Review: The step has been reviewed and promoted. If necessary, it can be reviewed a second time by another reviewer.
Done: The step is reviewed and completed. No further changes are possible.
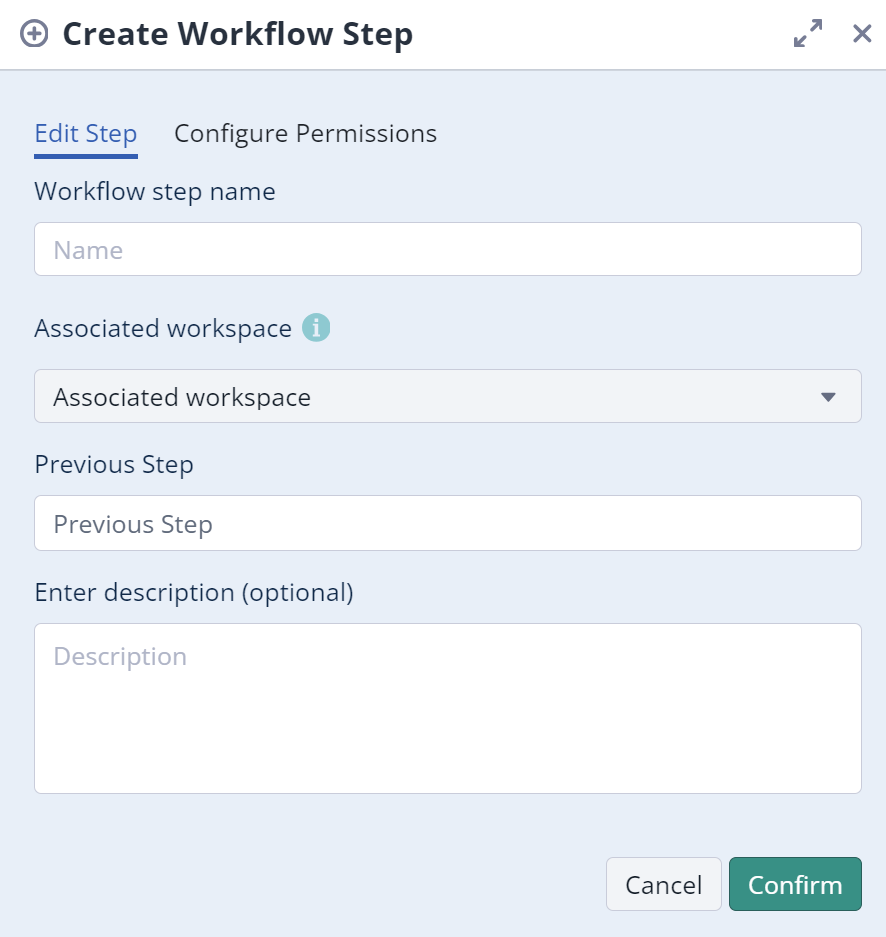
Click on the ‘Configure Workflow Step’ button. To create a step, give it a name (i.e. ‘EU Base Assumptions’) and assign it a workspace (leave blank to create a new one).

Select a previous step if necessary. This will determine, which Workflow steps this step is dependent on. This step will then require the selected steps to import into their Scenario in order to submit their own assumptions.
Configure Permissions:
Here you can assign specific users and user groups for the individual steps of the Workflow.
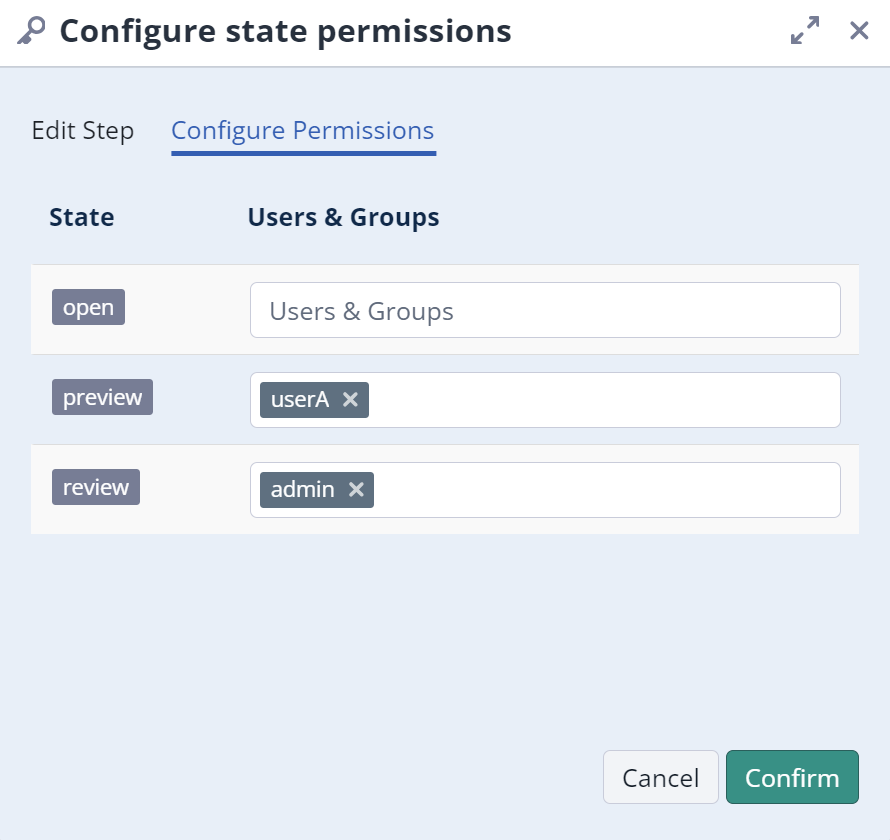
Select a specific user group or user which is able to submit and promote the step. Leave blank for steps which do not need to be reviewed by specific users.
Once the Workflow is configured, it can be started via the three-dot menu. This will create all Scenarios in all associated workspaces as well as create any new Workflows.
Step Order:
Workflow steps can be configured by the admin, and their order will be reflected in both the Workflow Dashboard for an improved overview and in the workspaces. If a workspace has more than one workflow step assigned, arranging the steps in the correct order helps users navigate them more easily within the workspace.
Clicking on the sort button, right next to the search bar, will open the sorting dialogue:
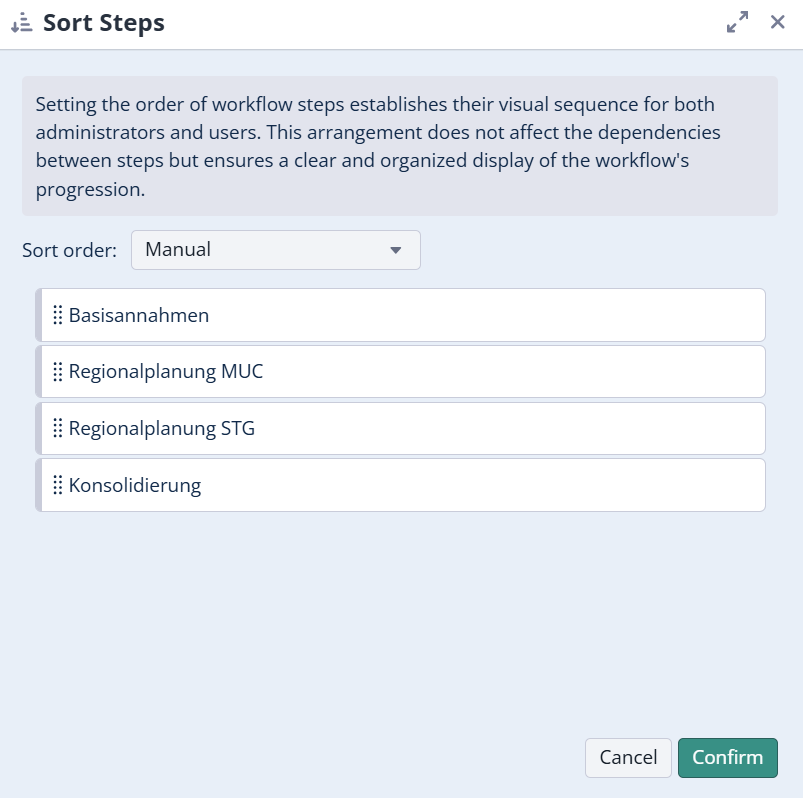
Workflow steps are sorted alphabetically per default.
Managing Ongoing Workflows
Open a Workflows dashboard to view its progress by clicking on an active Workflows name.
Here you can view all Workflow steps Scenarios and their status. Click on the status to open the steps details. Here you can view all submissions including comments, submission dates as well as promote or demote a step to another stage.
As an admin, you can demote a Workflow step from done to review. This is only possible for admins and will also demote subsequent steps which were on done back to review.
Reviewing and Consolidation Steps / Scenarios
To review a submission, open the subsequent steps workspace, navigate and to the Scenario manager. If a previous step has been submitted, the Workflow icon will be highlighted in orange. Click on it and open ‘Inputs and Submissions’. Select the current Workflow and the step that you are in and select all previous steps.
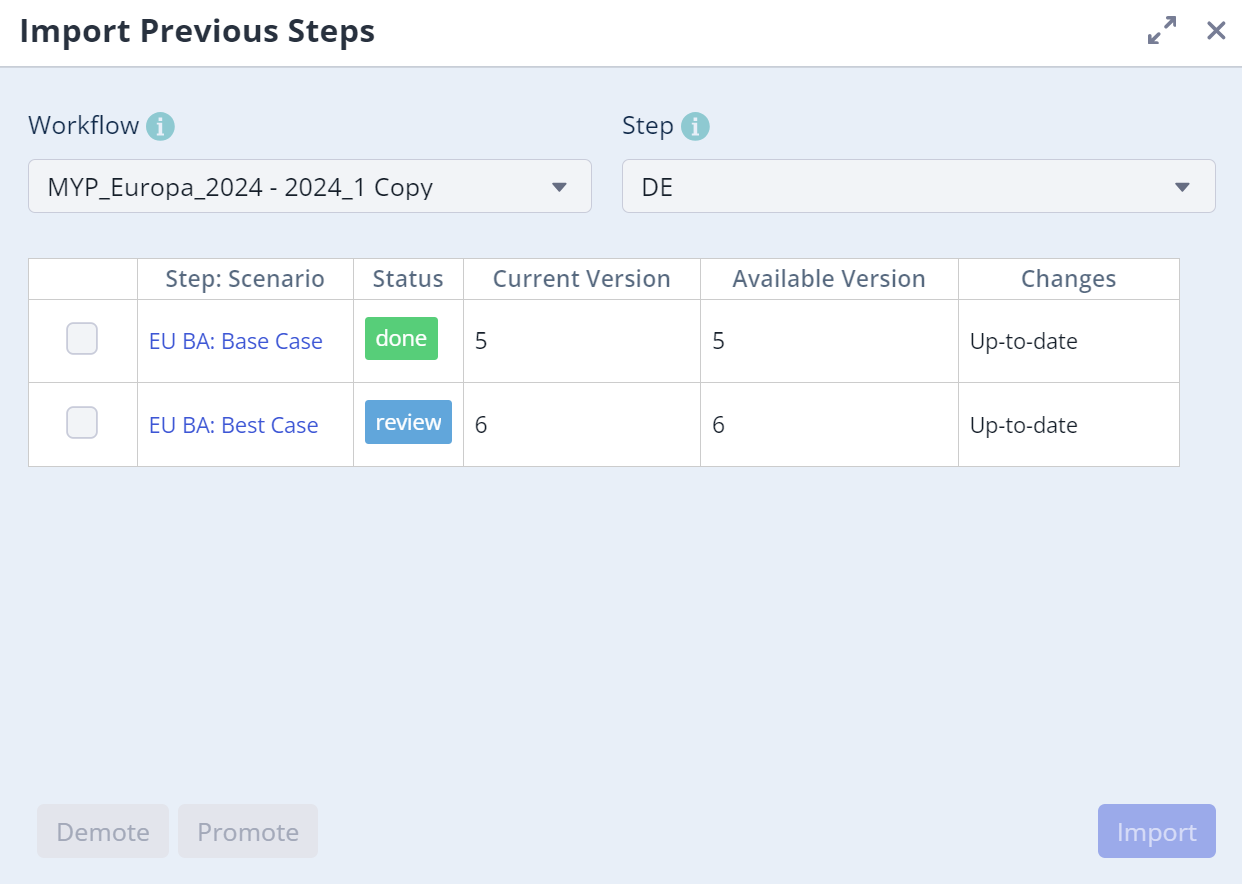
You can then check the numbers as well as any charts that you might have. If everything looks right, navigate back to the ‘Inputs and Submissions’ tab and promote the steps to the next stage. Alternatively, you can promote the steps via the Workflow dashboard in the Workflow section.
Consolidating and doubling assumptions: If you have two steps which have the same previous step, they will end up importing the same assumption (I.e. inflation). When consolidating these back together into a new or workspace, the two assumptions will not be doubled. Valsight detects that it is the same assumption and will calculate it accordingly, so that no further action have to be taken.
If you consolidate the assumptions into the original workspace, the workspace will still have the original assumption (i.e. inflation). In this case, the assumption has to be unchecked to prevent doubling, as the shared Scenarios will already carry the inflation in them.
Closing a Workflow
Once all Workflow steps and all Scenarios have been submitted, reviewed (where necessary) and promoted to done, the Workflow can be completed by clicking the ‘Complete’ button in the Workflow Manager or through the three-dot menu in the Workflow overview page. It can then be viewed by navigating to the tab ‘completed’.

Email Notifications
There are events that trigger e-mail notifications.
These events include:
A new comment has been submitted on a step
Data has been updated
The status of a step changes (promoted or demoted)
The recipients of these e-mails are all users that have a status right on the step or are listed as 'watchers'.
The one who triggered the action will not be notified.