
Data Permissions
Data permissions define which data a user can access. They can be configured for a project and will be enforced in workspaces.
Configuring Data Permissions
Data permissions are based on a function called data permission classes.
Data permission classes create a link between users/groups and dimension values, enforcing that the user has the right to see data for the respective dimension value. Users/groups can be given access to a data permission class and will then be able to see the respective data in charts.
1. Defining a Security Concept
As a first step, you should define your security concept and decide which dimensions you want to use to control data access. Although multiple dimensions can be used at once, it is advisable to choose one dimension for the access restrictions.
If you have chosen the dimension, think about how fine granular you want to differentiate the access rights inside this dimension. As an example, think about an entity dimension with the organizational structure. You could decide that all segments in one business unit are always bundled together, and access is assigned to this bundle. In contrast, you could have the requirement to differentiate access rights individually for each segment.
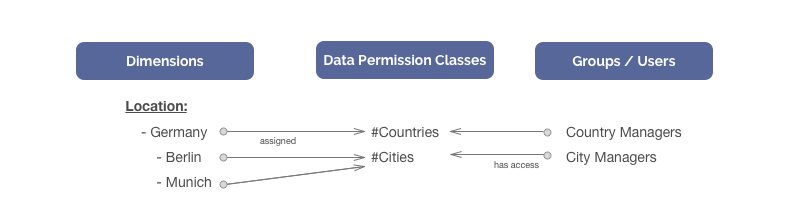
Example: Assume the following example with a dimension “Location” with countries and cities that should be used to define data permissions. The goal is to differentiate two groups of users: (1) city managers that are allowed to drill down to the individual cities and (2) country managers that are only allowed to see the totals of the countries. The two data permission classes #Countries and #Cities in combination with the groups for country and city manager reflect this structure and allow us to easily assign new users to one of the groups.
2. Create Data Permission Classes
The next step is creating the actual data permission classes.
1) Navigate to the configuration menu, open your project and choose “Security”.
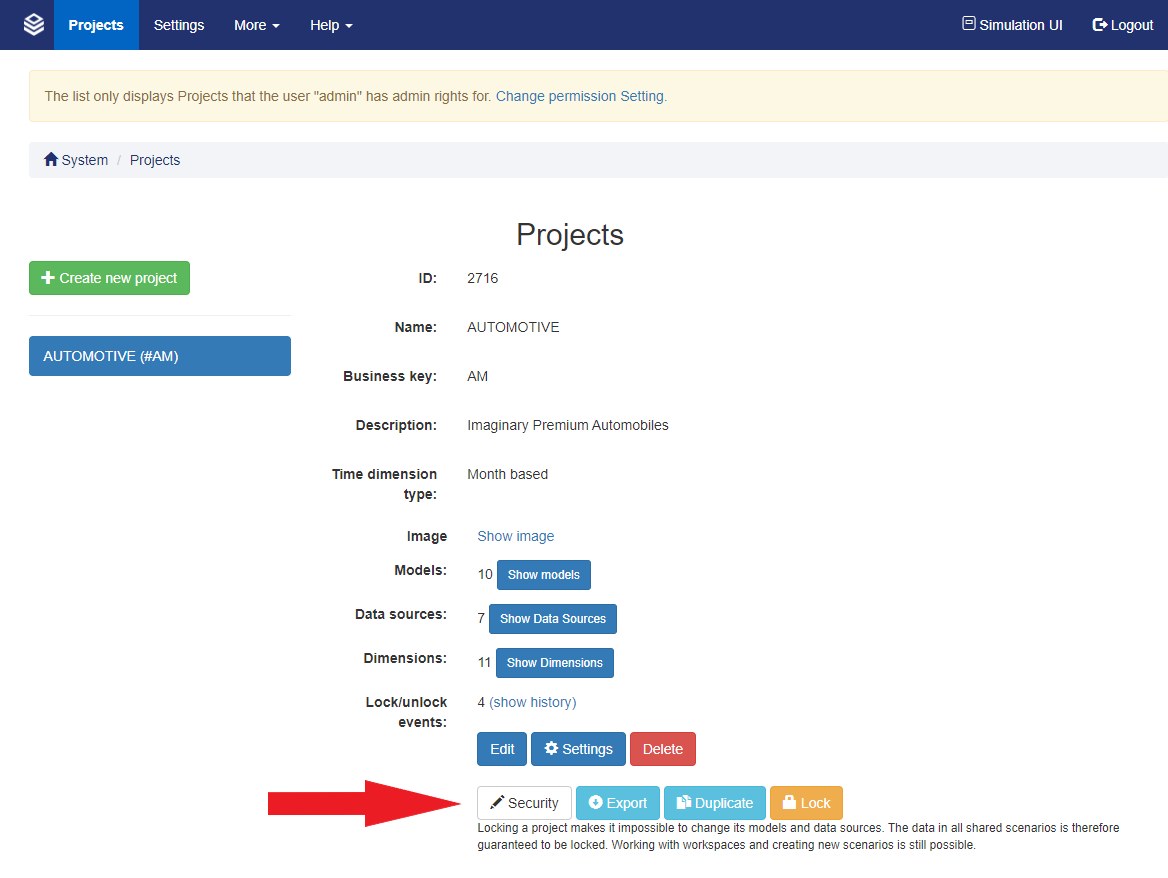
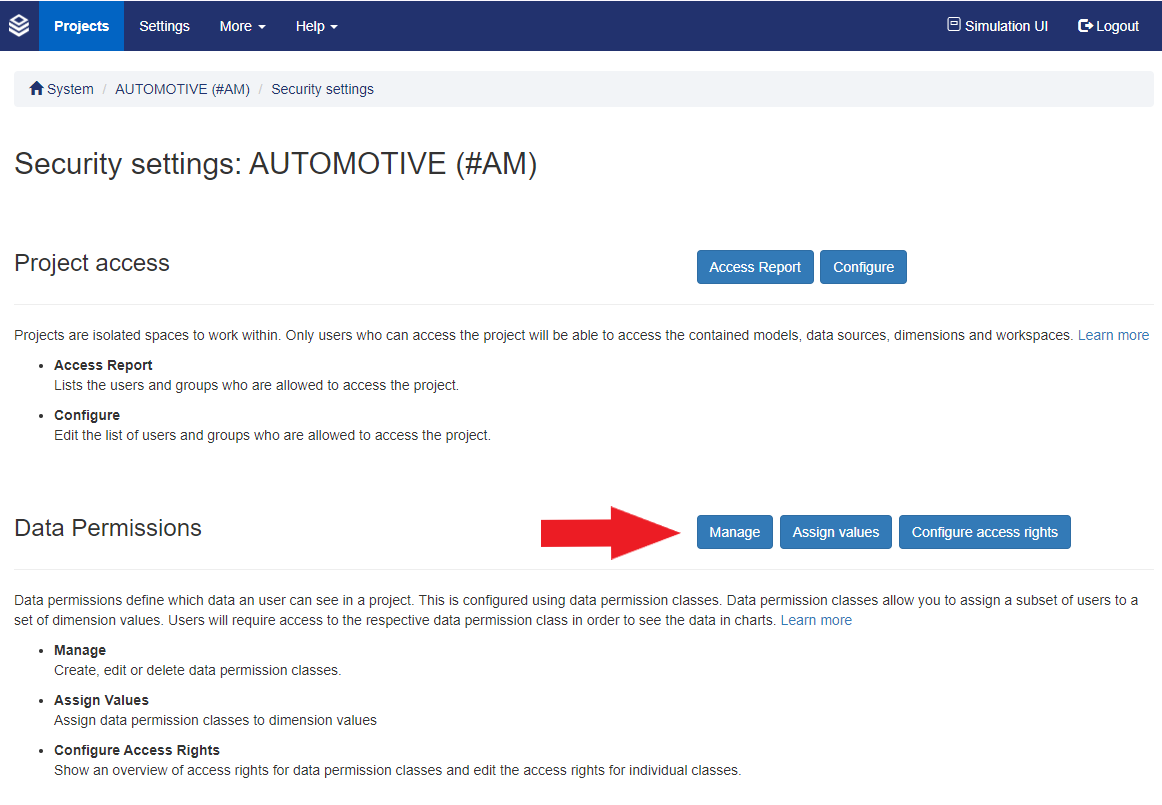
2) Here you will see the section “Data Permissions” and the “Manage” button will allow you to create and manage the data permission classes.
3) Create one class per bundle of values that you want to be able to differentiate and name accordingly.
Example: To create the structure described above, we create two new data permission classes: #Countries and #Cities.
3. Assign Dimension Values
When you have the data permission classes created, you can assign them to values in dimensions.
1. Open “Assign Values” from the data permission section on the project's “Security settings” page.
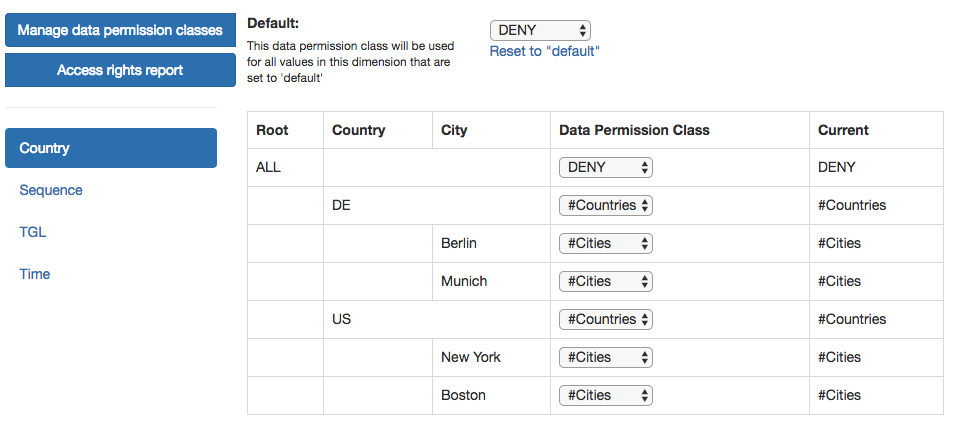
You will see a list of all your dimensions within the project.
2. A selected dimension will be listed with all its values, and you can select a data permission class for each value.
Assigning a data permission class means that any user who wants to display data in a chart will require access to this dimension’s values.
By default, all values are set to a default value that can be changed at the very top of the page. The data permission classes “ALLOW” and “DENY” are system generated and will either grant all users access to the level or deny access for
all users. “ALLOW” is the default selection.
You can assign data permission classes to any aggregation level, so it is possible to allow users to see data on an aggregated level but prohibit a drill down to lower levels.
Example: Following the example from above, we assign the data permission class #Countries to all countries (e.g. Germany) and #Cities to all cities (e.g. Berlin, Munich).
4. Configure Access Rights
The last and final step is to grant users or groups access to your configured data permission classes.
As a best practice, try to give groups access to data permission classes and assign users to groups.
Hereby, users will be granted access due to their group membership and stay better manageable.
To give users and groups access to a data permission class, open the “Configure” button on the project's “Security settings” page.
The resulting page shows all data permission classes in the columns of the matrix and groups or users in the rows. To edit the access rights for a data permission class, press the “edit” button in the header row and add the respective users or groups to the read or write access lists.
Read access will allow users to view data associated with this data permissions class as part of charts and analyses in workspaces.
Write access will allow users to create and change assumptions containing data associated with this data permission class.
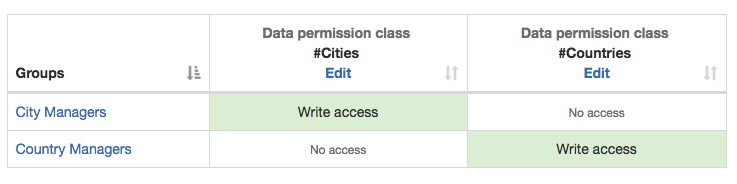
Example: Create the two groups City Managers and Country Managers. Configure the access rights for the as shown below, so that the city managers have access to #Cities and the country managers to #Countries.
Exceptions where Permissions are not enforced
Data permissions are only enforced in workspaces and models. They will not be enforced in:
Data Source Management: Data permission classes are not enforced on the data sources in the data source management. Users with access to these data sources can see the complete data. (e.g. users with “Edit” access to models can see the underlying data sources of a model.
Presentations: When viewing a presentation, users with access to a presentation will be able to see the full data that is contained in this presentation, independent of their data permissions. This also means, that if a user with insufficient permissions created a presentation, any other user will see the same permission error in the presentation independent of his data permissions.
Project Admins: Data permission classes are not enforced on project admins
When a level, that is included in a data permission class, is not on a node that is the base of the chart, everyone can see the data in the chart.
Exporting Projects with Data Permissions
When exporting a project, its data permission classes will be exported as well. However, as users are not part of a project they will not be contained in the project export. This means that the access rights for users to data permission classes have to be set again manually after importing a project.