
On-Premise Installation Guide
The Valsight platform is a standalone server application. It is recommended to install the Valsight application on a dedicated (virtual) machine.
System Requirements
The Valsight platform has the following minimum hardware and software requirements:
Hardware
Recommended | |
|---|---|
CPU | x64 architecture at least 2GHz, 4 Cores more than 10 parallel users: 8+ Cores |
Memory | minimum 8 GB more than 10 parallel users: at least 16 GB Typical Enterprise Production Deployments with complex models: 64GB+ recommended. |
Software
Supported Versions | |
|---|---|
Operating System | Debian Stable, Ubuntu LTS, SLES 12 or later, other Linux Systems possible. Windows Server 2019 or later. Non-production evaluation use possible on Windows 10/11. |
Java Runtime |
|
Model Database | Postgresql 11+ FOR 6.15 AND EARLIER Postgresql 13+FOR 6.16 AND LATER Microsoft SQLServer 2019 and later |
Client
Supported Versions | |
|---|---|
Operating System | Windows, Mac, Linux |
Browser | Google Chrome, Firefox, Edge - see Supported Browsers |
Screen Resolution | minimum 1280×800 |
Connection | HTTPS & Secure Websockets to Valsight Cloud or On-Premise Server |
Intermediate Proxys & Loadbalancers
Recommended | |
|---|---|
Websocket | Proxy Support for Websockets |
Installation Steps
Requirements
Install the requirements listed above on the target machine. Make sure the JAVA_HOME environment variable is set.
Unpacking
Extract the supplied ZIP file (e.g. valsight-server-1.4.zip) to the desired install location, without spaces in the name. On Linux, this could be /opt/valsight and on Windows C:\valsight
Configuration
In the conf/ directory: copy config.yml.default to config.yml and edit the file accordingly. While the standard settings work, consider to setup a production database.
Launching the Server
The Valsight application is launched using the supplied scripts, depending on the operating system:
Linux
Execute the script bin/valsight-server from the command line.
You may set up an initscript to run the service repeatedly or on system startup.
Make sure to set the service's working dir to the installation dir (and not bin/).
Windows (Non-Production Setups only)
Execute the script bin\valsight-server.bat from a command line or by double-clicking in Windows Explorer.
Configuration
The Valsight application is now running on port 8080 and you can access it using a browser by entering http://localhost:8080 into the address bar. The default username and password is "admin" and "admin".
Adding a License File
The license file needs to be put into the main directory of the application as "license.pem" (i.e. at the same level as the conf, lib and bin folders.) Alternativly, the license can be uploaded on the first start of the server.
Opening the URL above will bring you to the configuration page (http://localhost:8080/system/config) after starting the server for the first time. Before using the server, you need to add a valid license file.
In the file upload form in the upper part of the configuration dialog, select the license file which was provided to you
Press "Update License Key" to submit the form
The server should respond "License file uploaded successfully" and the license key information should be visible under "Current License"
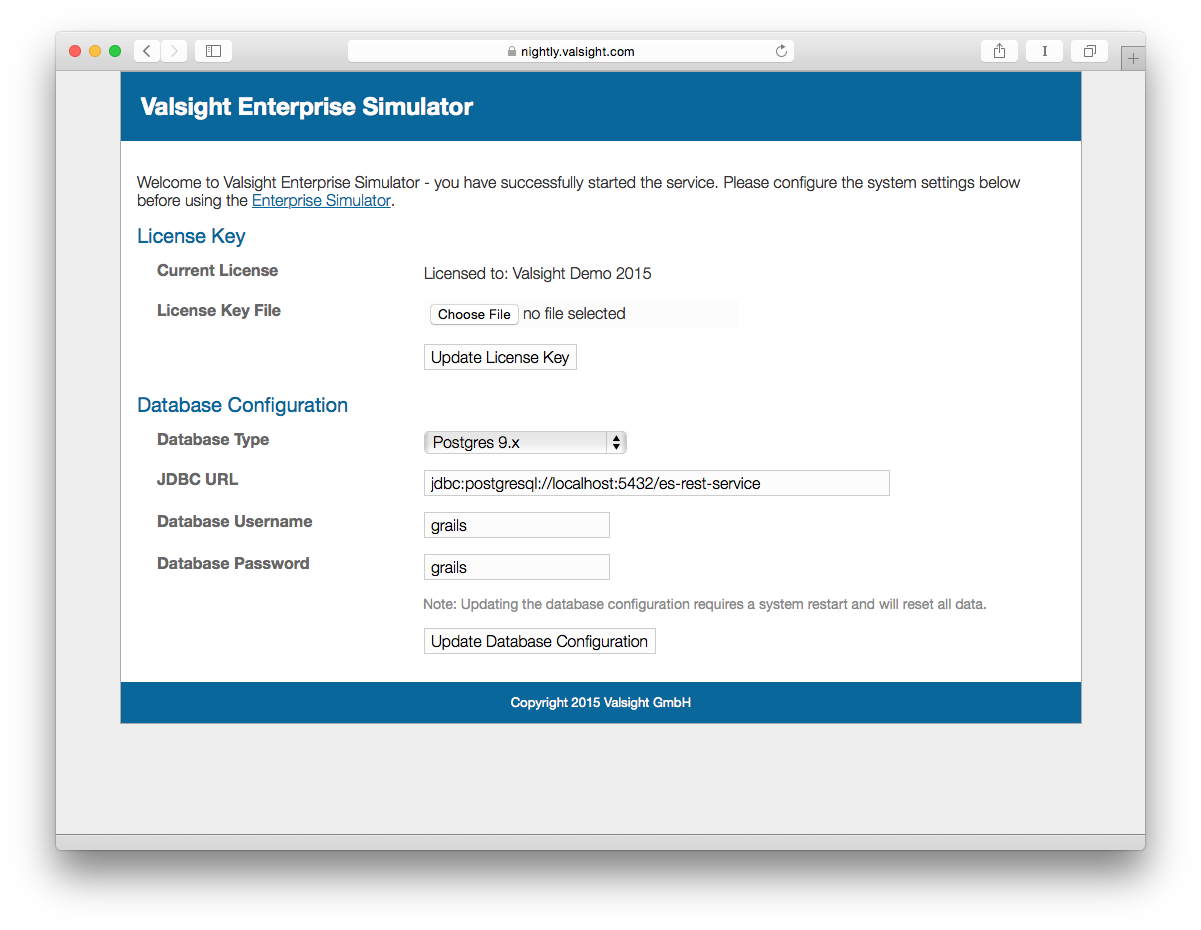
Configuring a Model Database
By default, the Valsight application will use a file-based internal database to store model configurations (the database files are located under db/*.db). For a growing production setup, it is recommended to use a dedicated database to store model configurations. The exact steps necessary will vary depending on the chosen database, but the general process is as follows:
Set up a supported database system
Create a dedicated database user for use by the Valsight application
Create a dedicated database and grant permissions to the user created in the previous step.
If using a MS SQL database ensure the setting READ_COMMITED_SNAPSHOT is enabled, more information can be found here https://learn.microsoft.com/en-gb/dotnet/framework/data/adonet/sql/snapshot-isolation-in-sql-server
In the Database Configuration form on the system configuration page (see above), enter the details to access your database
Press "Update Database Configuration" to save the configuration (it is stored in the config file
conf/config.yml)Re-start the Valsight application server to use the newly configured database. You will start with an empty database (information from the previously configured model database is not copied over).
Troubleshooting, hints & tips:
Postgresql of many distributions is often not configured for TCP/IP access and allowance of password based authentication. Make sure that psql -h 127.0.0.1 -U username allows you to connect to the database.
If you like to configure SSL, you can do so by adding the correct parameters to the JDBC string, e.g. for Postgresql extend the URL with ?ssl=true and enable SSL in the server settings.
conf/config.yml
# Excerpt from conf/config.yml#
environments:
    production:
        dataSource:
            driverClassName: org.postgresql.Driver
            sqlDialect: org.hibernate.dialect.PostgreSQLDialect

            # Alternative MSSQL:
            #   driverClassName: com.microsoft.sqlserver.jdbc.SQLServerDriver
            #   sqlDialect: org.hibernate.dialect.SQLServerDialect
            #
            username:
            password:
            url: jdbc:postgresql://localhost:5432/es-rest-service
Configuring an HTTPS proxy
Websockets
The application requires the support of websockets, please make sure that any used proxy is able to forward requests accordingly.
In a production setup, it is recommended to add HTTPS protection to the Valsight application. In a typical setup, an HTTP server such as Apache 2.0 would be set up "in front of" the Valsight application with a reverse proxy setup to port 8080. The exact steps necessary will vary depending on the chosen HTTP server, but a sample Apache 2.0 configuration could look like this:
/etc/apache2/sites-available/valsight.conf
<VirtualHost *:80>
  ServerName simulation.company.com
  Redirect permanent / https://simulation.company.com/
</VirtualHost>
NameVirtualHost *:443
<VirtualHost *:443>
  ServerName simulation.company.com

  # Reverse Proxy Settings
  ProxyPass / http://localhost:8080/
  ProxyPassReverse / http://localhost:8080/
  ProxyPreserveHost On

  # Rewrite WSS requests to WS
  RewriteCond %{HTTP:Upgrade} websocket [NC]
  RewriteRule ^/(.*)	ws://localhost:8080/$1 [P,L]

  SSLEngine on
  RequestHeader set X-Forwarded-Proto "https"
  SSLCertificateFile /etc/ssl/certs/simulation_service_https.pem
  SSLCertificateKeyFile /etc/ssl/private/simulation_service_https.key
  SSLHonorCipherOrder on
  # Enable this if you want HSTS (recommended)
  Header add Strict-Transport-Security "max-age=31536000; includeSubDomains; preload"
  BrowserMatch "MSIE [2-6]" \
    nokeepalive ssl-unclean-shutdown \
    downgrade-1.0 force-response-1.0
  # MSIE 7 and newer should be able to use keepalive
  BrowserMatch "MSIE [17-9]" ssl-unclean-shutdown
</VirtualHost>
First Steps
Please add at least one default data source with an empty xlsx file before using the software. See Data Source Upload for the basic steps.
To get started with the software visit Valsight Help Center.
Upgrade Steps
Stop the running Valsight application service (Ctrl-C when running from the command line, or using an initscript)
Unpack the supplied ZIP file (e.g. valsight-server-1.5.zip) to a temporary location
Move the new application content to the previous install location, overwriting existing files. Runtime files such as your configuration (
conf/config.yml), license file (license.pem) or database (db/*.db) should not be overwritten.Start the Valsight application service as before
Optional: Remove old version from install-dir/lib/rest-service-(old-version).war